No-Knead Beginner Sourdough
The perfect no knead, rustic sourdough bread for beginners! This recipe will produce a crunchy crust, yummy middle and it does all the work itself in this relatively hands-off sourdough made with no commercial yeast. It's the perfect starter recipe if you are new to sourdough.
Ingredients
Levain(3-4 hours until peak)
- 85 grams ripe sourdough starter
- 85 grams water warm or cool depending on the temperature
- 85 grams all purpose flour
Dough (8-36 hour rise)
- 230 grams levain about 1 cup
- 400 grams water, room temperature about 1 3/4 cups
- 600 grams bread flour or all purpose (see recipe note) about 4 1/2 cups
- 12 grams salt about 2 teaspoons
Instructions
Mix Levain (ready in 3-4 hours at 78-80ºF)
- To a clear liquid measuring cup add 90 grams of starter, 90 grams of water and 90 grams of flour. Mix together. Cover and let sit at warm room temperature (78-80ºF) for about 3-4 hours until the mixture is bubbly, doubled in size and just about to fall. Once the levain has doubled in size and has reached it's peak height, it is ready to use.
No-Knead Beginner Sourdough
- Mix Dough: Mix 230 grams of ripe levain, room temperature water, flour and salt in a bowl using a wooden spoon or dough whisk (affiliate link). The dough will look “shaggy” (rough, craggy and a little bit lumpy) at first but mix until it forms a ball. Cover the bowl and let rest for 1 hour at 78-80ºF.
- Stretch & Fold #1: After an hour, uncover the bowl and do a series of three "stretch and folds". To do this, pick up the underside of the dough and fold it on top of itself, turning the bowl after each fold and picking up a different section of the dough to fold and turn. An example of this folding technique is found here (halfway through the video). Cover the bowl again and let it rest for another hour, keeping the dough at 78-80ºF.
- Stretch & Fold #2: After an hour, uncover the bowl and repeat the series of three stretch and folds. Notice how the dough is coming together. It doesn’t feel shaggy anymore and is becoming more stretchy and cohesive. Cover the bowl again and let rest at a warm temperature 78-80ºF for one hour.
- Stretch & Fold #3: Uncover the bowl and repeat the series of three stretch and folds. This is your final set of stretch and folds. Cover the dough and let rest for another hour, keeping the dough warm 78-80ºF.
- At this point about 4 hours should have passed from the time you initially mixed the dough. The dough should have risen 30-40%, have some scattered bubbles over the top of the dough, pull away from the sides and start to dome toward the center and feel more elastic. If it doesn't look that way, let it keep fermenting for another 30 minutes and check again. Check your dough temperature and make sure your dough is in the 78-80ºF range.
- Cold Bulk Fermentation: Cover the bowl with plastic wrap or a lid and put it in the refrigerator to rest overnight. The dough can stay in the refrigerator for 12 to 48 hours. See recipe notes for instructions on baking the same day.
- Pre-heat the Oven: The next morning (or whenever you are ready to bake your bread), put a dutch oven into your oven with the lid on and set the oven to 500ºF. Preheat the dutch oven by leaving it in the oven for 30 minutes.
- Shaping: Immediately after setting the dutch oven to preheat, pull out a piece of parchment paper. Take your dough out of the fridge. Dump dough on the counter and use your hands to shape the dough into a round ball, gently dragging the dough on the counter as you shape it into a ball. The dough should be fairly easy to work with because it is cold. Use wet hands if the dough is sticky.
- Scoring: When your dutch oven has preheated for 30 minutes, score the top of your bread with a bread lame (affiliate link), sharp knife or razor.
- Bake the Bread: Take the dutch oven out of the oven. Warning: This is a VERY HOT dutch oven. Keep those oven mitts on and be very careful not to burn yourself. Take the top off the dutch oven and place the dough and parchment paper into the dutch oven. Place the top back on the dutch oven and close the oven door. Immediately decrease the baking temperature to 450 degrees and bake for 25 minutes. After 25 minutes, take the top off the dutch oven and continue baking for 20 more minutes. The internal temperature should be 205ºF when finished baking.
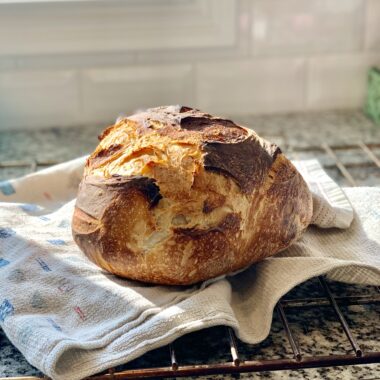
- Pull the bread out of the oven. Wait until cool to cut into it. Enjoy!
Notes
Sourdough Starter: This recipe requires a ripe, bubbly, active sourdough starter. A levain is made from the starter to raise the bread. If you don't want to make the levain, you can substitute ripe, active sourdough starter instead.
Bread Flour: If you don't have bread flour on hand, you can substitute all purpose flour and vital wheat gluten. Use 600 grams of all purpose flour and add a Tablespoon vital wheat gluten.
Instructions for Baking without Refrigerating the Dough: The sourdough flavor comes through the most and is more complex the longer you refrigerate the dough. If you want to bake the bread immediately without refrigerating, once you finish your series of stretch and folds, let the dough rest in the container a couple of hours to rise. Once it is puffed up and doubled in size, preheat the oven and pot. Gently shape the dough into a round ball, doing your best not to deflate the dough. Cover and let sit for another hour while the oven preheats. Then score and bake according to the recipe.
Dutch Oven: This is the dutch oven I have used for many years. I recently purchased this bread and potato pot and love the bake I get with it. If you don't have a dutch oven you can also heat a baking stone preheated to 500 degrees. Once the stone is pre-heated, place a pan with about a cup of ice cubes into the hot oven on the bottom rack. Then place the bread on the pizza stone. This will mimic a dutch-oven bake.
Tried this recipe?Let us know how it was!