Affiliate disclosure: This post may contain affiliate links. Please see our disclosure policy.

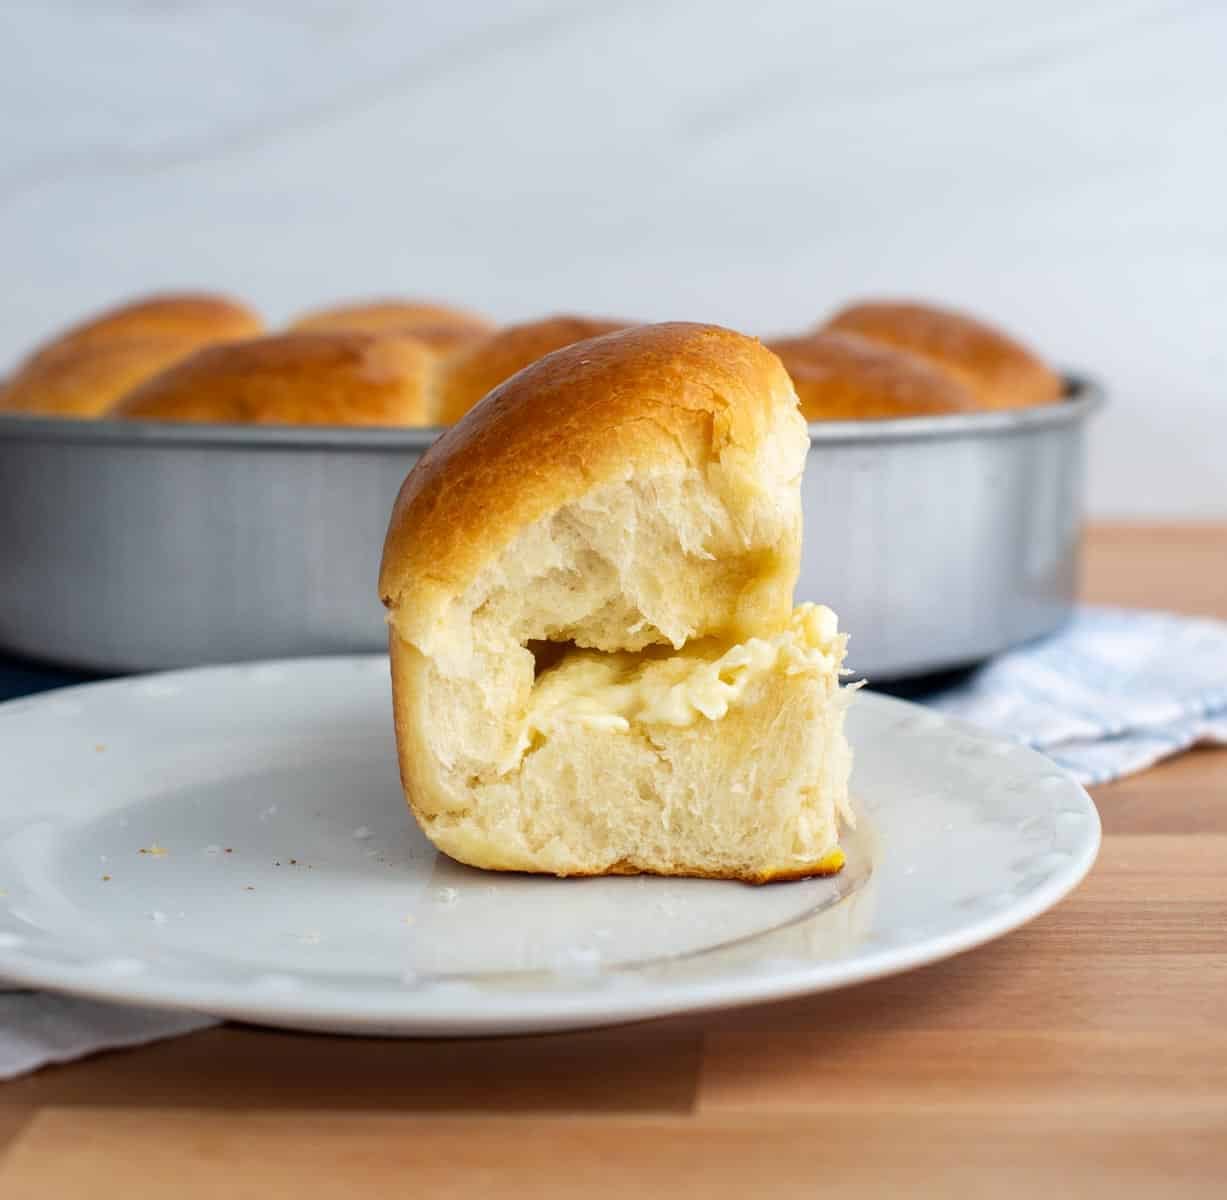
These sourdough brioche rolls are super soft, rich, and buttery. They’re the kind of homemade dinner rolls that disappear fast, with a golden outside and a tender, fluffy crumb inside.
When my kids pulled these apart for the first time, they couldn’t get enough. It quickly turned into “just one more”… and then another. They’re pillowy soft, perfectly shreddy, and so good warm with a little butter.
With classic brioche flavor and a light sourdough tang, these soft sourdough brioche rolls are perfect for serving with butter and jam, alongside soups or holiday dinners, or even used for sliders and sandwiches. If you love my Sourdough Brioche or Sourdough Brioche Burger Buns, these have that same soft texture in a perfectly portioned, pull-apart roll.
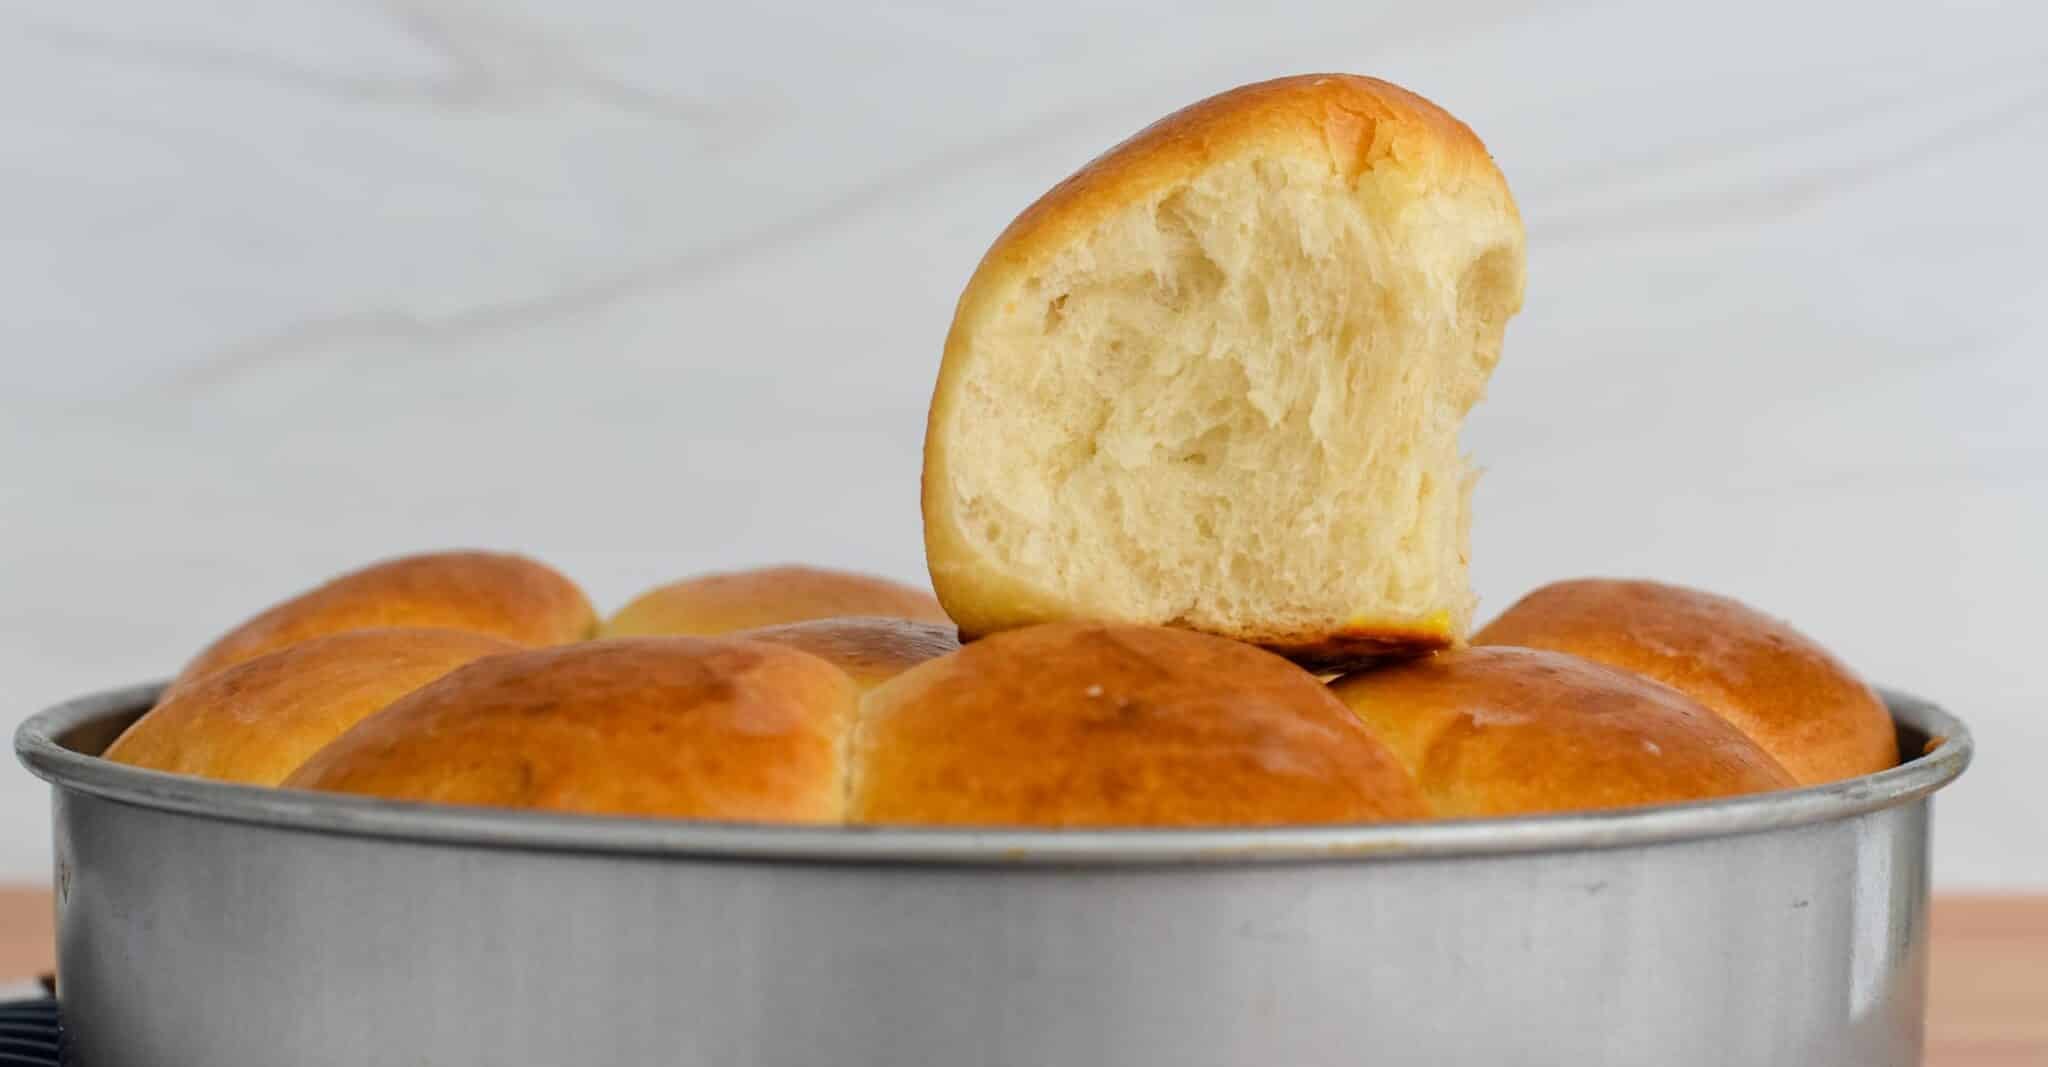
Table of Contents
- Quick Look: Sourdough Brioche Rolls
- Why You’ll Love These Brioche Rolls
- Ingredients For Sourdough Brioche Rolls
- Substitutions & Variations
- Sourdough Baker’s Timeline
- How to Make Sourdough Brioche Rolls
- How to Store Sourdough Brioche Rolls
- Amy’s Recipe Tip
- Frequently Asked Questions
- Popular Sourdough Roll recipes
- Sourdough Brioche Rolls Recipe
Quick Look: Sourdough Brioche Rolls
- Prep Time: 45 minutes
- Fermentation Time: 1 day, 6 hours
- Bake Time: 35 minutes
- Total Time: about 1 day 7 hours
- Servings: 12 rolls
- Calories: ~248 kcal per roll (based on nutrition panel)
- Cook Method: Bake at 375°F
- Flavor & Texture: ight, buttery, and soft with a fluffy, pillowy crumb
- Difficulty: Moderate. This sourdough brioche roll recipe has a few extra steps and is temperature dependent, but it’s very manageable if you’re comfortable making bread or rolls.
SUMMARIZE AND SAVE THIS RECIPE CONTENT ON:
Save this for later!
Why You’ll Love These Brioche Rolls
- Pillowy Soft and Fluffy – These homemade sourdough brioche rolls bake up incredibly light, tender, and buttery with that signature soft, shreddy texture. If you love the texture of my sourdough brioche bread, you’ll love these in roll form.
- Rich, Buttery Flavor – Made with eggs, milk, and butter, this enriched sourdough dough gives you classic brioche flavor with a subtle tang. For another sweet option, try my chocolate chip sourdough brioche.
- Perfect for Any Occasion – These sourdough brioche dinner rolls are perfect served warm with butter, alongside soups, or used for sliders and sandwiches. For a sturdier option, try my sourdough brioche burger buns.
- A Worthwhile Baking Project – This recipe has a few extra steps, but the results are worth it. If you’re looking for something easier, try my soft sourdough dinner rolls or one hour sourdough discard rolls.
New to Sourdough? Learn how to make a sourdough starter from scratch and follow my Sourdough Beginner Guide to get started. Baking with sourdough takes more time than using commercial yeast, but the flavor and fermentation benefits are worth it.
Ingredients For Sourdough Brioche Rolls

- Levain – Use an active/ripe sourdough starter (doubled in size/bubbly/mild sour aroma) to mix the levain.
- Yudane – A simple mixture of bread flour and boiling water used to create a softer, more tender crumb. The boiling water gelatinizes the flour, helping the dough retain moisture and stay soft longer.
- Milk – Whole milk works best for a rich, tender crumb.
- Sugar – Adds a light sweetness and balances the flavors without making the rolls overly sweet.
- Eggs – Essential for richness and give brioche its signature golden color.
- Salt – Enhances flavor and supports proper fermentation.
- Bread Flour – Provides the strength needed to develop gluten before adding butter. You can substitute all-purpose flour if needed, but you may need to add a few extra tablespoons.
- Unsalted Butter – Brioche uses a generous amount of butter. Use room temperature butter (about 65–67°F) that is soft but not greasy. It’s added after initial mixing so gluten can develop properly.
- Egg Wash – Brushed on before baking for a shiny, golden finish.
See the recipe card for full information on ingredients and quantities
Substitutions & Variations
- Bread Flour – Bread flour is best for structure and chew, but you can substitute all-purpose flour if needed. The dough may be slightly softer and less structured. For best results, add 1–2 teaspoons of vital wheat gluten per cup of flour to help mimic bread flour.
- Sourdough Starter – You can use active sourdough starter in place of the levain. Make sure it’s 100% hydration, bubbly, and recently fed. Substitute it 1:1 for the levain. If you need help adjusting timing or feeding ratios, see my sourdough ratios guide.
- Yudane – You can skip the yudane, but you’ll need to replace it with equal weights of flour and water in the dough. You can also substitute it with a tangzhong if you prefer. Either method helps create a softer, more tender crumb, but without it, the rolls may be slightly less soft and won’t stay fresh as long.
- Milk: 2% milk can be used in a pinch if you don’t have whole milk.
- Toppings – Sprinkle parmesan cheese or fresh herbs over the tops before baking for a savory finish.
Sourdough Baker’s Timeline
A sample baking schedule helps me when baking with sourdough. Sourdough takes much longer to rise than traditional bread. This schedule helps me plan my brioche rolls. Please Note: This schedule assumes the dough temperature is about 78ºF while the dough rises.
| Day 1 | Mix Levain/Mix Dough/Bulk Fermentation/Cold Fermentation |
| 8:00 AM-11:30 AM | Mix Levain. Let sit at 78º F for about 3-4 hours until doubled/bubbly and ripe. |
| 11:00 AM | Mix yudane. Let cool. |
| 11:30 AM -11:35 AM | Mix dough in stand mixer without butter |
| 11:35 AM – 12:50 PM | Add butter to dough and mix until windowpane (can take 15-20 minutes) Be careful that the temperature of the dough doesn’t go above 78ºF during this mixing process. |
| 12:50PM – 5:00 PM | Bulk Fermentation at 78-80ºF |
| 5:00 PM – 8:00 AM | Cold Fermentation |
| Day 2 | Shape, Proof and Bake |
| 8:00 AM -2:00 PM | Shape the dough. Lt |
| 2 or 3:00 PM | Bake the rolls |
How to Make Sourdough Brioche Rolls
Mix the Levain
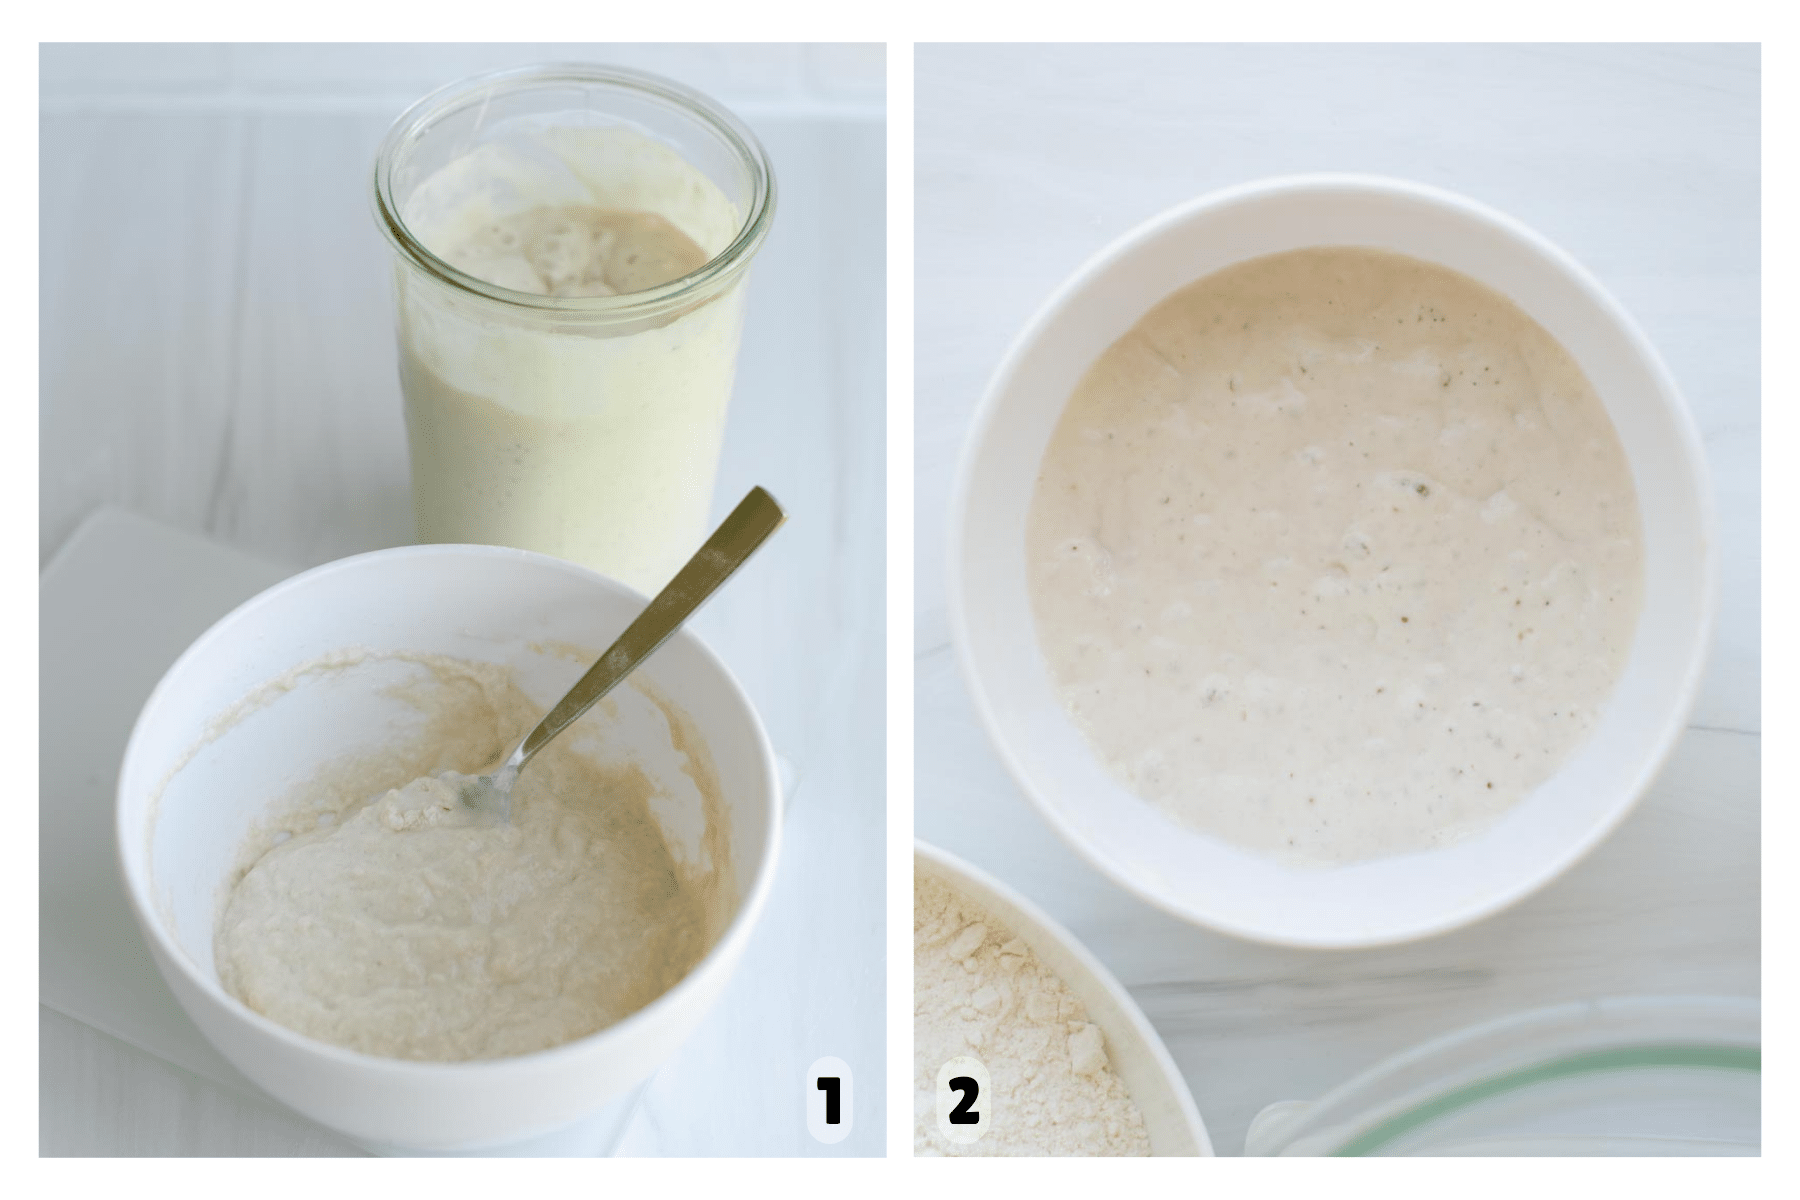
Step 1: Mix the Levain. This levain is mixed the same day you make the dough. Combine all purpose flour (or bread flour), active sourdough starter, and water (Image 1). Let it rise at 78–80ºF for about 3–4 hours, until it’s doubled, bubbly, smells slightly sour, and is just starting to fall from its peak (Image 2).
Can I substitute ripe active starter? Yes, you can use ripe, active starter in these sourdough brioche rolls. I prefer building a levain to keep the flavor mild and give these rolls the most active rise.
Make a Yudane

Step 2: Mix Yudane. About 30 minutes before your levain is ready, use a kitchen scale to combine 75 grams of flour with 75 grams of boiling water (Images 3 & 4). Whisk together and let cool completely before mixing the dough (Image 5).
What is Yudane? Yudane is a Japanese bread-making technique that mixes boiling water with flour to gelatinize the starches, helping create a softer, more tender crumb. It allows the dough to hold more moisture, giving these rolls their pillowy texture and helping them stay soft longer.

Amy’s Tip: Yudane vs. Tangzhong
I use a tangzhong, a cooked flour-and-liquid paste commonly used in Asian milk breads, in my sourdough brioche. It’s a similar method to yudane, but made on the stovetop. For these brioche rolls, I’ve started using yudane because it’s simpler and less messy. You still get that same soft, fluffy texture without needing to cook anything.
Mixing the Dough
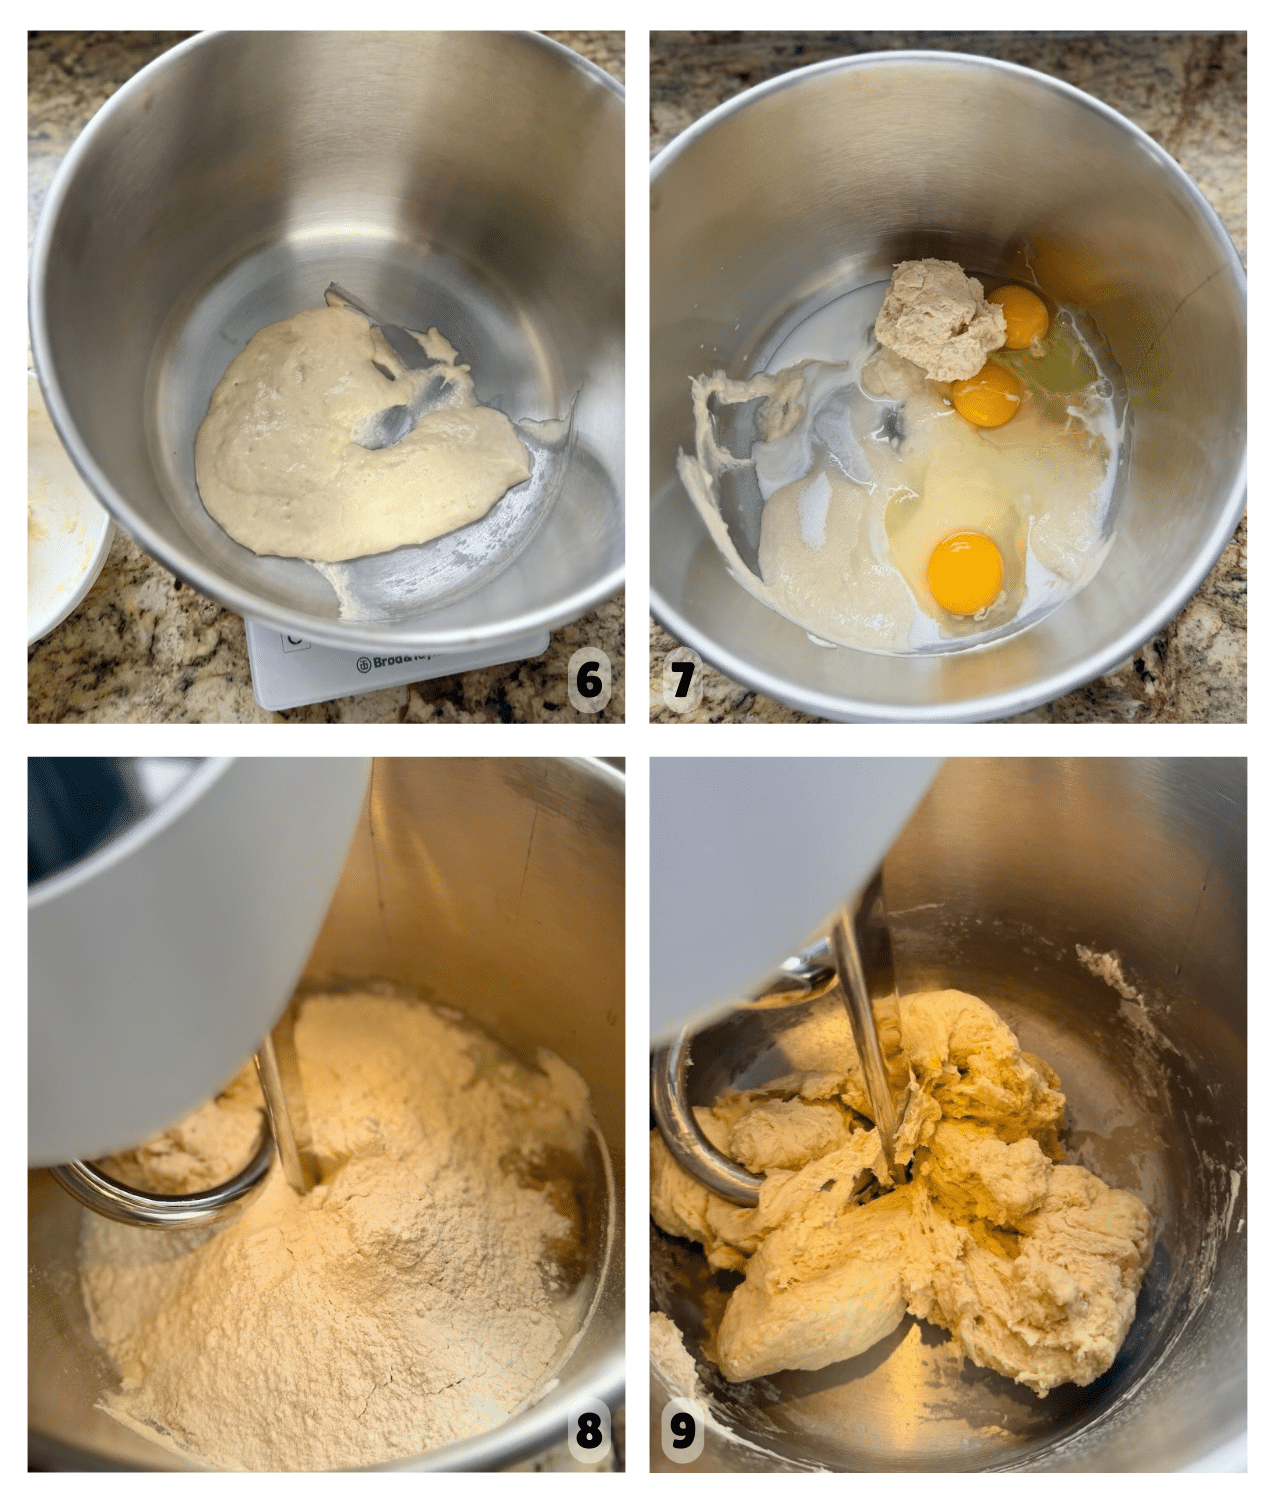
Step 3: Mix the Dough. Add the ripe levain and cooled yudane to the bowl of a stand mixer. Add the milk, granulated sugar, eggs, and salt (Images 6 & 7). Add the bread flour and begin mixing (Image 8). Knead with the stand mixer for about 5 minutes, until the dough comes together and the ingredients are fully combined (Image 9).
Note: If you’re using cup measurements, hold back a small amount of the flour and add it gradually as the dough kneads. The dough should feel tacky, but not overly sticky.
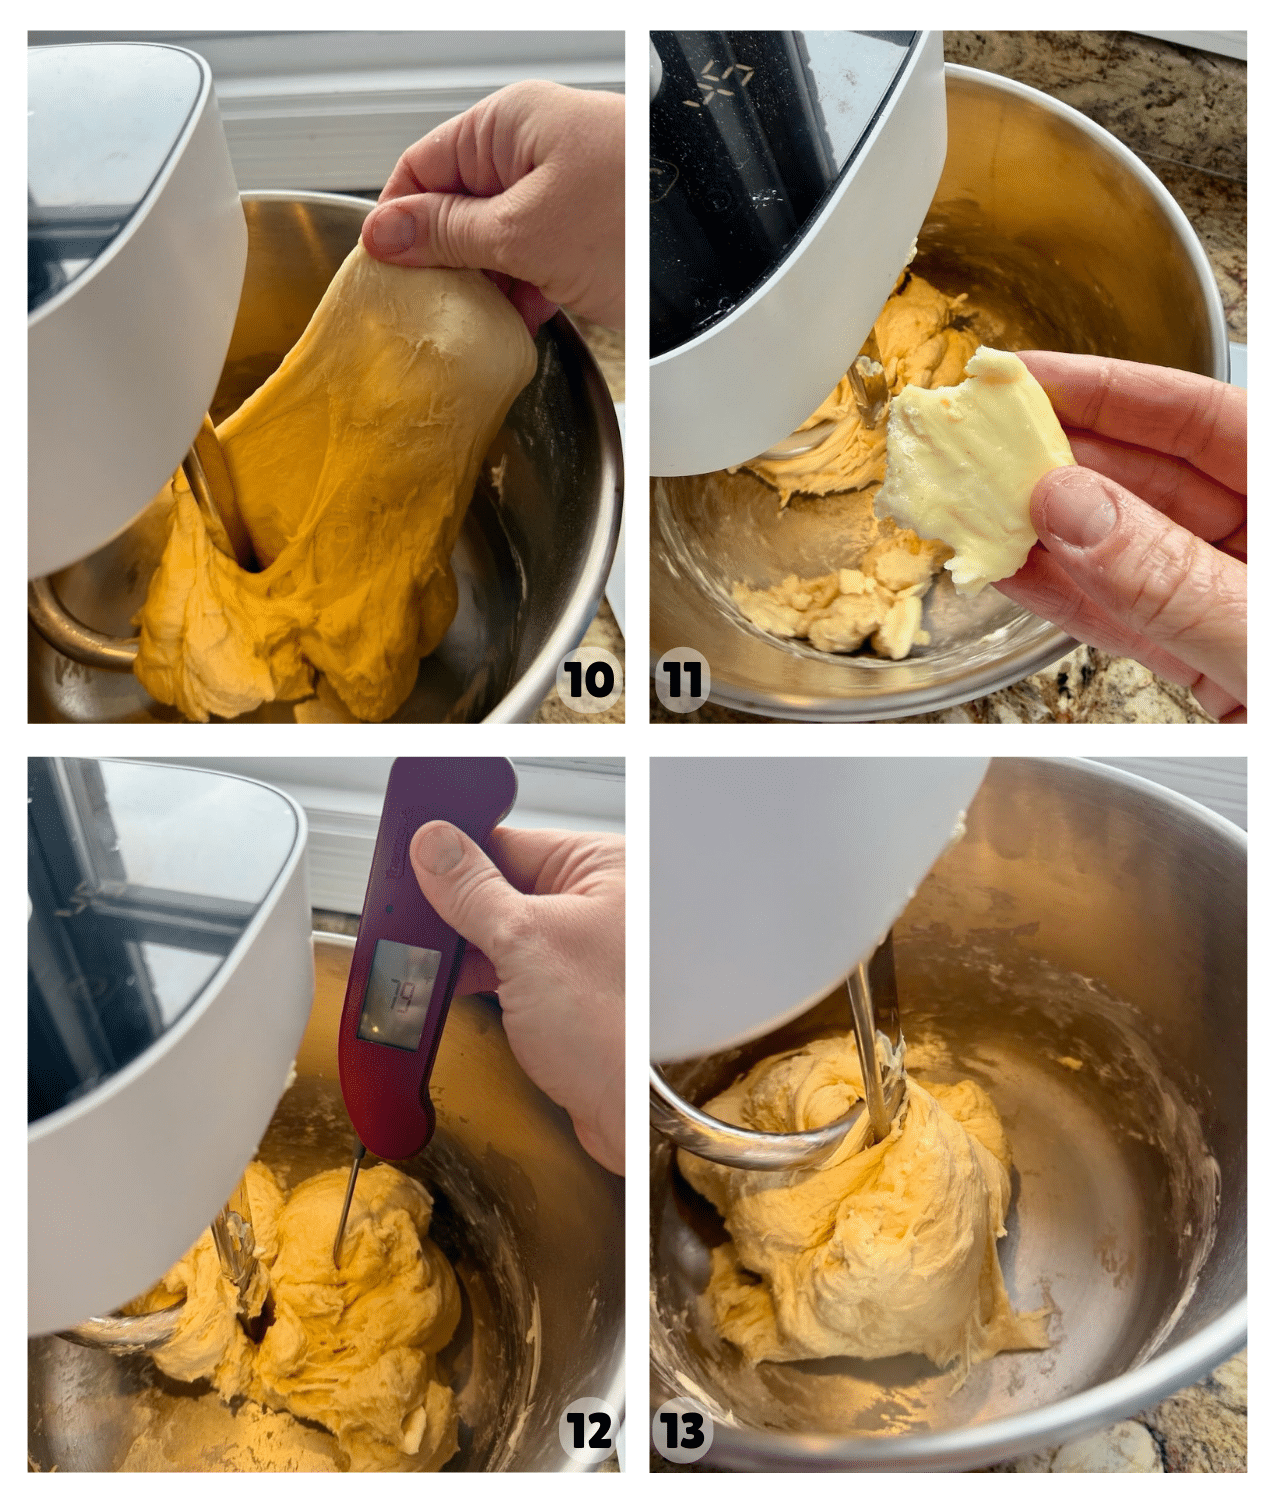
Add the Butter: Cut the softened butter into 8–12 pieces. With the mixer running, add the butter gradually, allowing each piece to incorporate before adding the next (Images 10 & 11). Pause occasionally to check the dough temperature (Image 12), since the friction from the mixer can warm the dough. The butter will incorporate best if the dough stays below 78°F. As you add the butter, the dough will need time to knead and fully incorporate it. This step can take a while, but it’s what gives brioche its rich flavor and signature tender texture (Image 13).
Knead until Windowpane: Continue kneading the dough on medium speed for about 10–15 minutes, depending on your mixer and dough. You’re looking for the dough to become smooth, elastic, and strong.
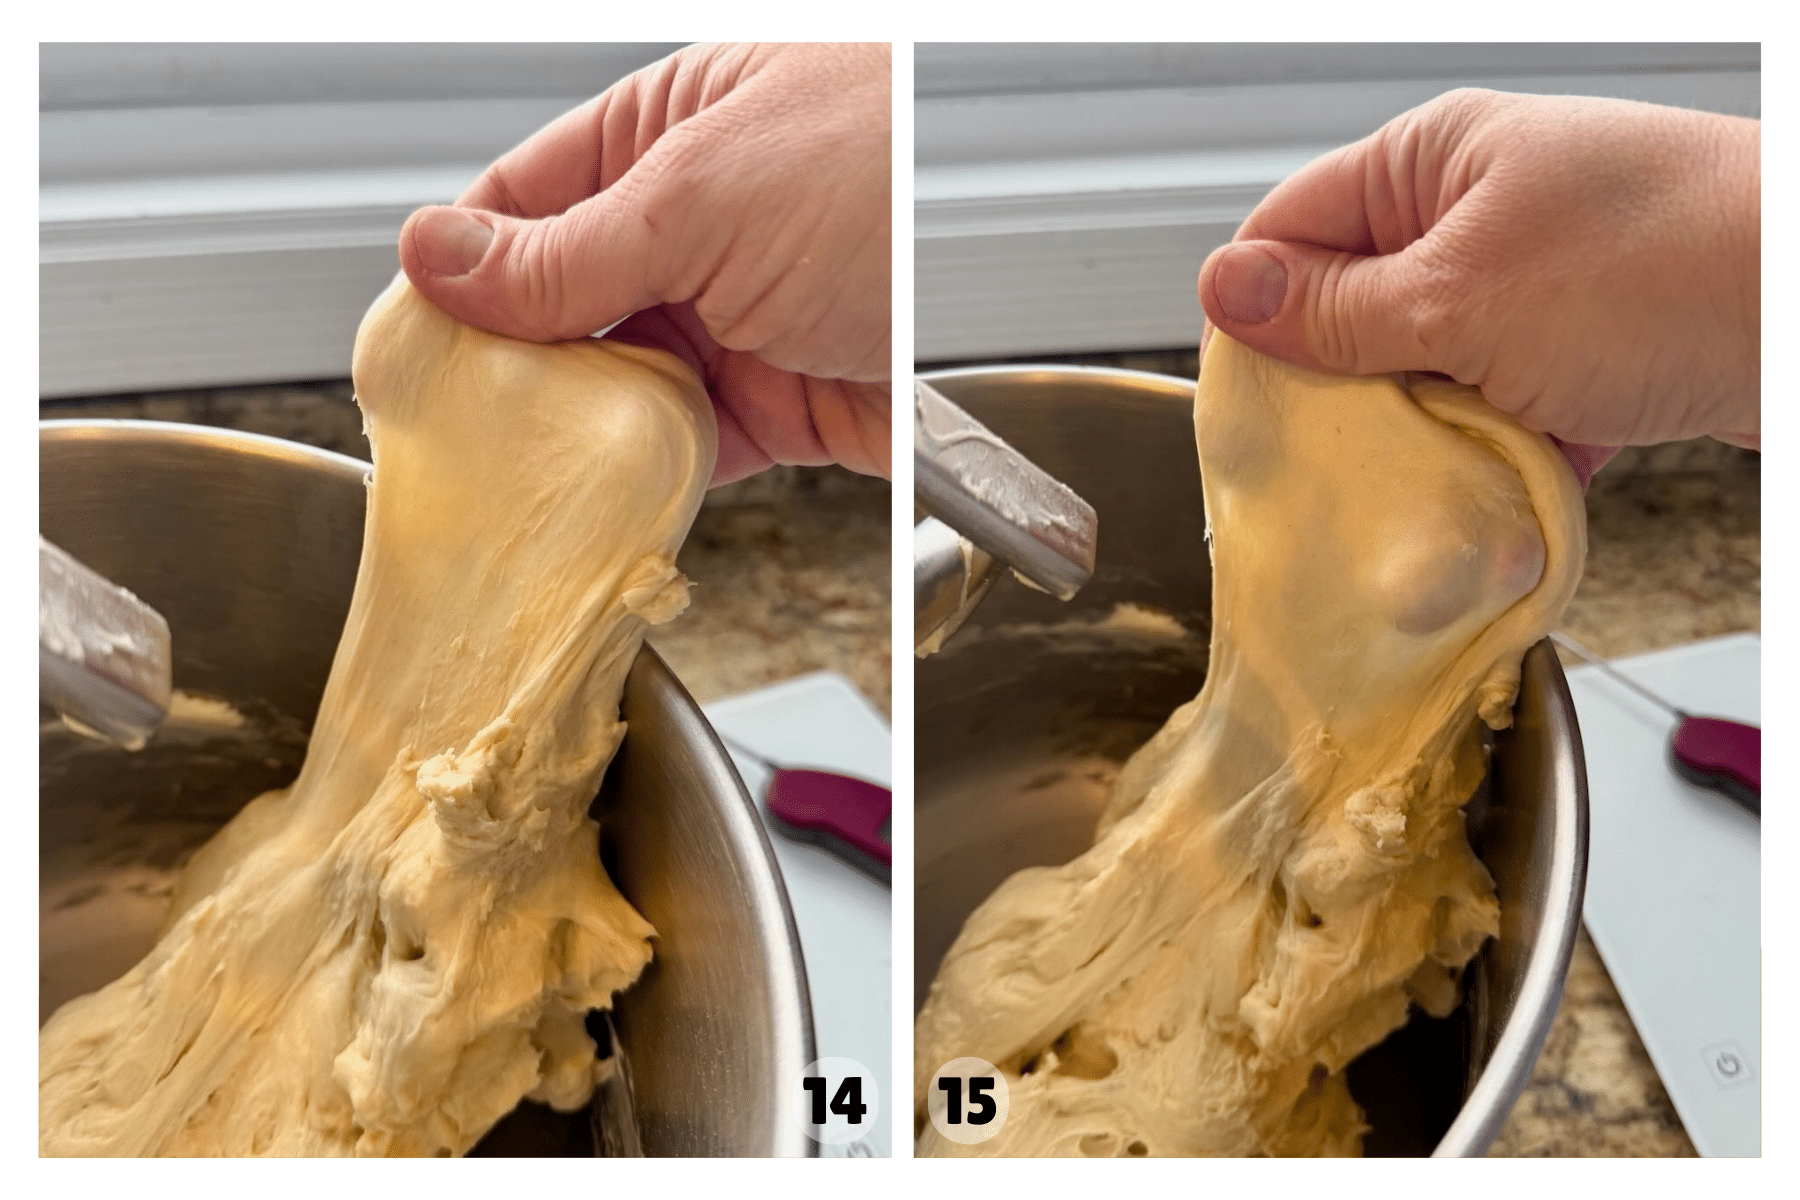
To check for windowpane, stop the mixer and pull off a small piece of dough. Gently stretch it between your fingers (Images 14 & 15). Early on, the dough will tear quickly. As the gluten develops, it will stretch thinner and thinner without breaking. When you can stretch it enough to see light through it—almost like a little window—the dough is ready.
Amy’s Tip: Can I Knead This Dough by Hand?
You can knead this dough by hand, but I don’t recommend it. Brioche dough is rich and sticky, and it takes time to fully develop the gluten. A stand mixer will give you the best results
Bulk Fermentation (First Rise)
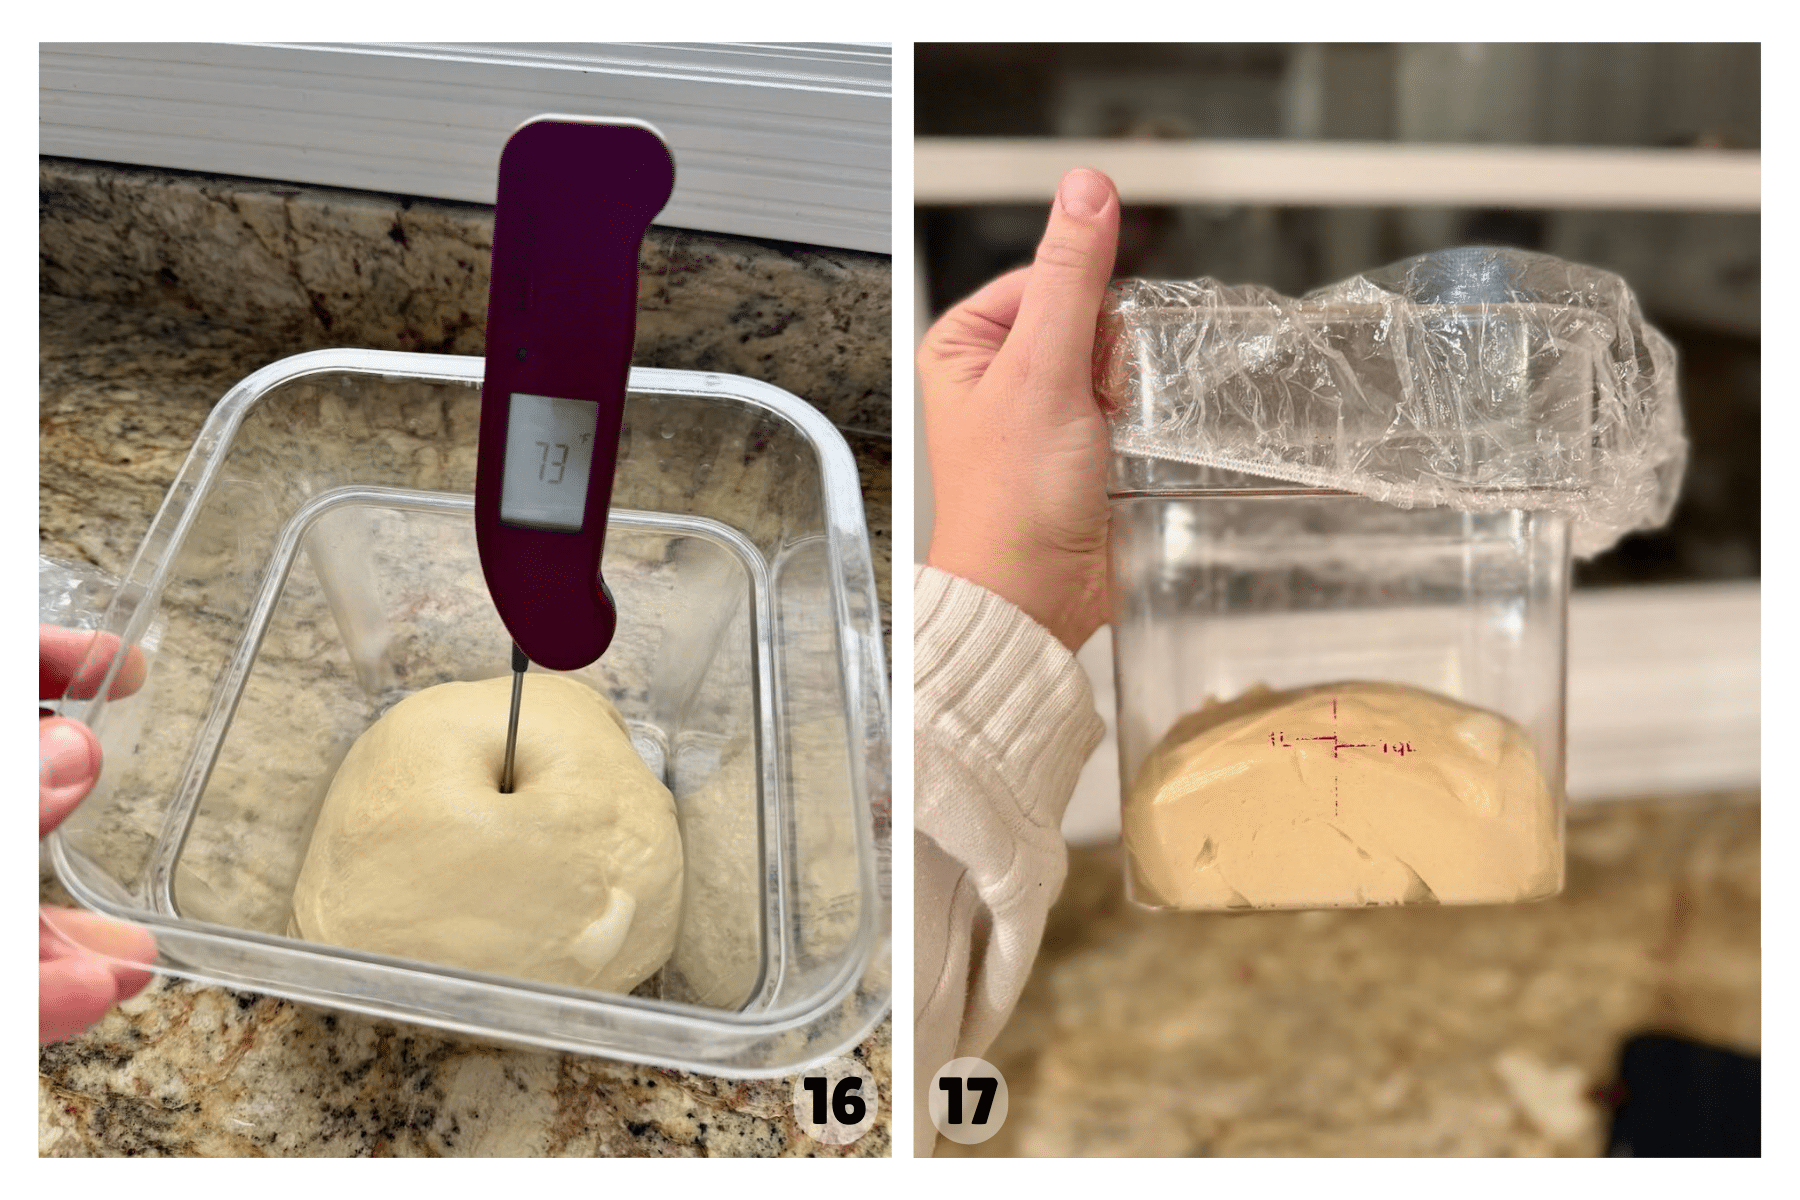
Step 4: Bulk Fermentation. Place the dough in a container. It will feel slightly sticky, which is normal with the butter in this enriched dough. If it sticks to your hands, lightly wet them before handling. Cover and place the dough in a warm spot (around 78°F) for about 4 hours to bulk ferment (Image 16).
The dough will spread, puff up, and begin to fill the container, but it likely won’t double in size at this stage.
Step 5: Overnight Refrigeration (Cold Fermentation). After 4 hours have passed, place the covered dough in the refrigerator overnight. It can stay there for up to 48 hours (Image 17).
Can I shape the dough right away and skip the cold fermentation?Yes, you can. However, this dough can be quite sticky when it’s not chilled, which makes it harder to handle and shape. If you choose to skip the cold fermentation, stick it in the fridge for 30 minutes to an hour to let it chill and expect a softer, stickier dough when shaping.
Shaping the Dough
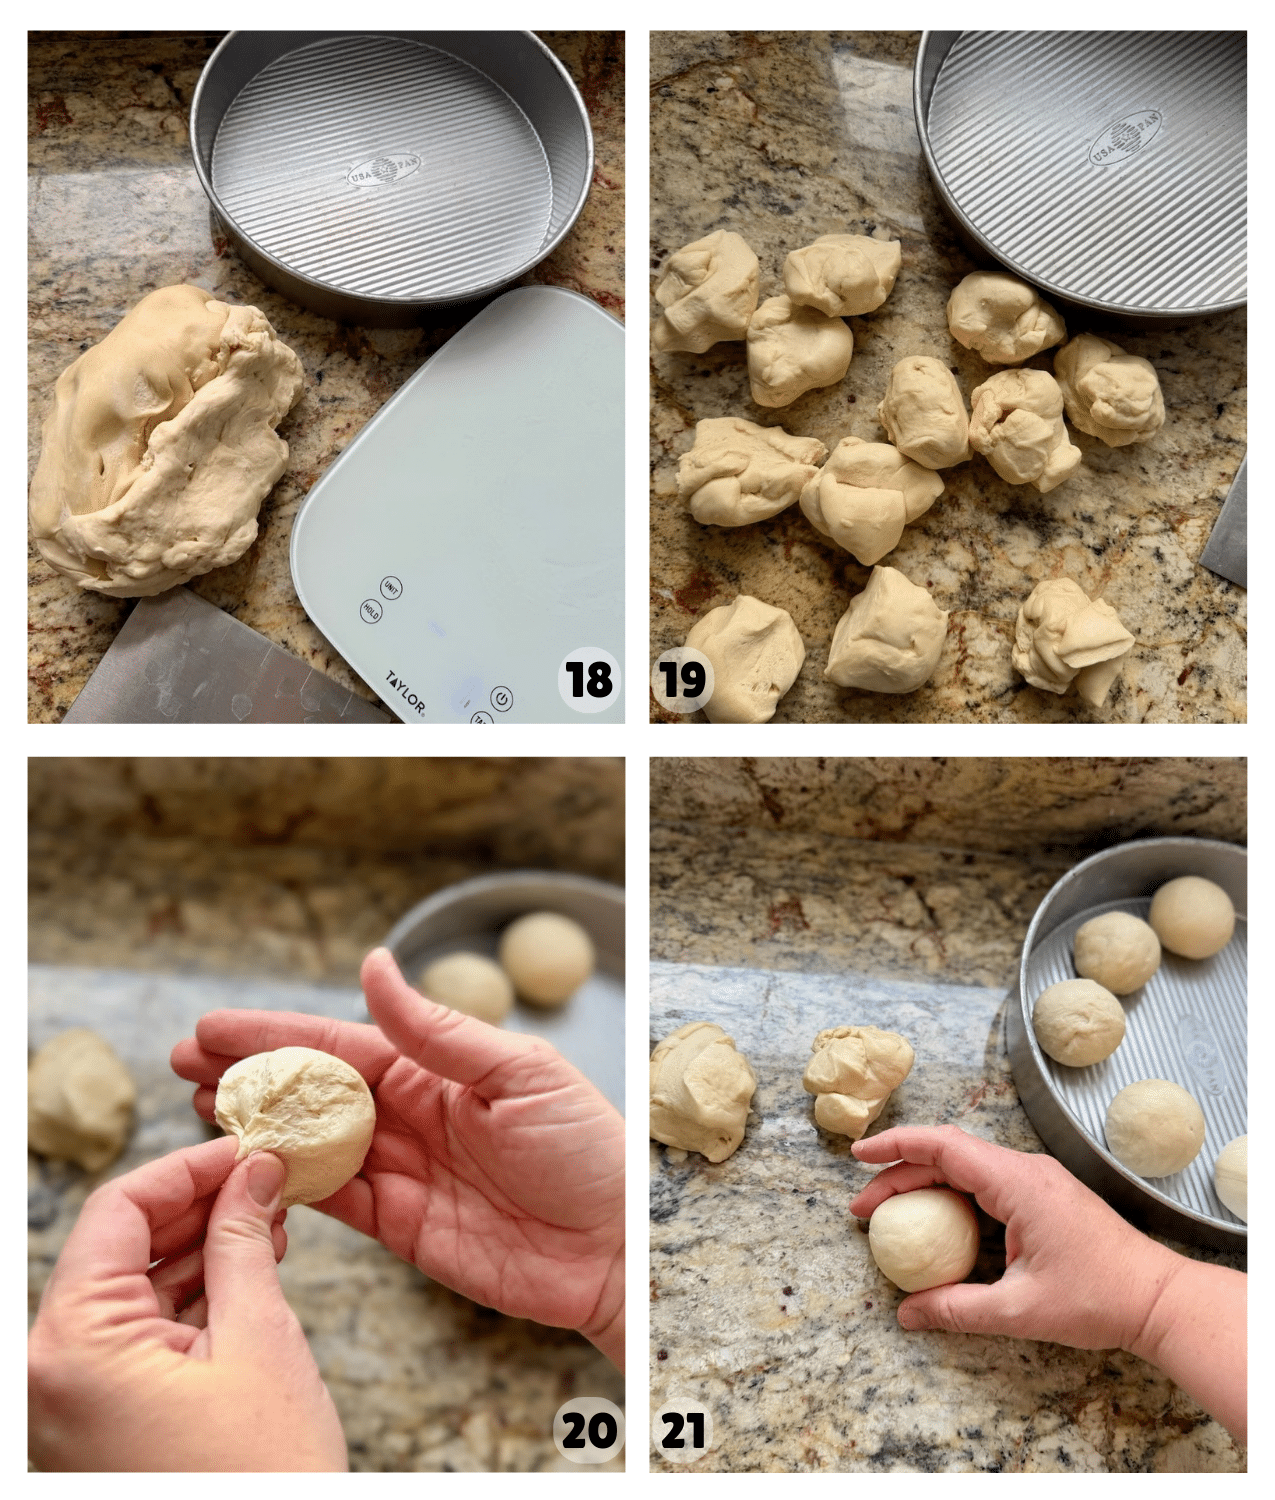
Step 6: Shape Rolls. The next morning, remove the dough from the refrigerator and turn it out onto a clean countertop. The dough may feel firm at first from the cold, but it will become easier to handle as it rests for a few minutes.
Divide the dough into 12 equal pieces (Images 18 & 19). Take each piece and pull or pinch the edges toward the bottom to form a rough ball (Image 20). Then place your hand over the dough in a cupping shape and gently roll it on the counter to seal the bottom and create surface tension (Image 21).
Place each dough ball into a 10-inch round pan (Image 22). Line the pan with parchment paper if it is not nonstick.
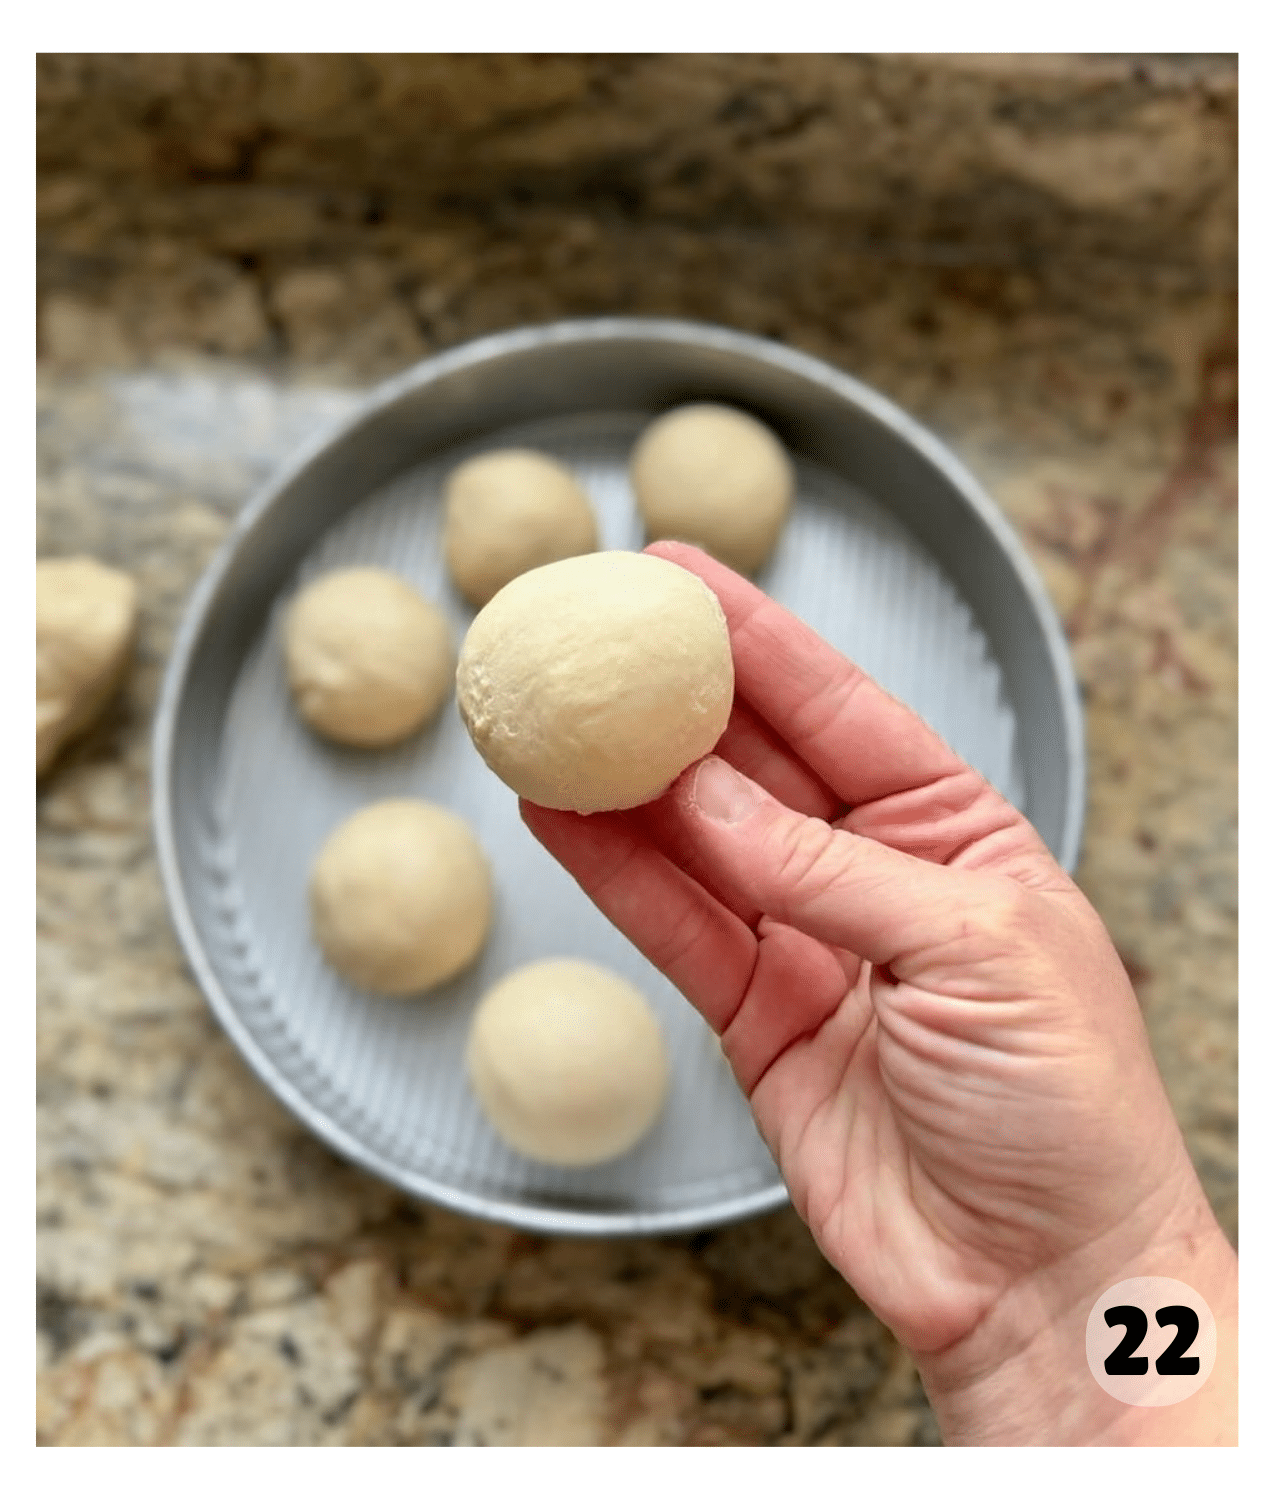
Pan Options: You can also use a 9-inch round pan or a 9×13-inch pan. In a 9-inch pan, the rolls will be more snug and slightly taller. In a 9×13-inch pan, they’ll have more space and won’t be quite as pull-apart.
Proofing (Second Rise)
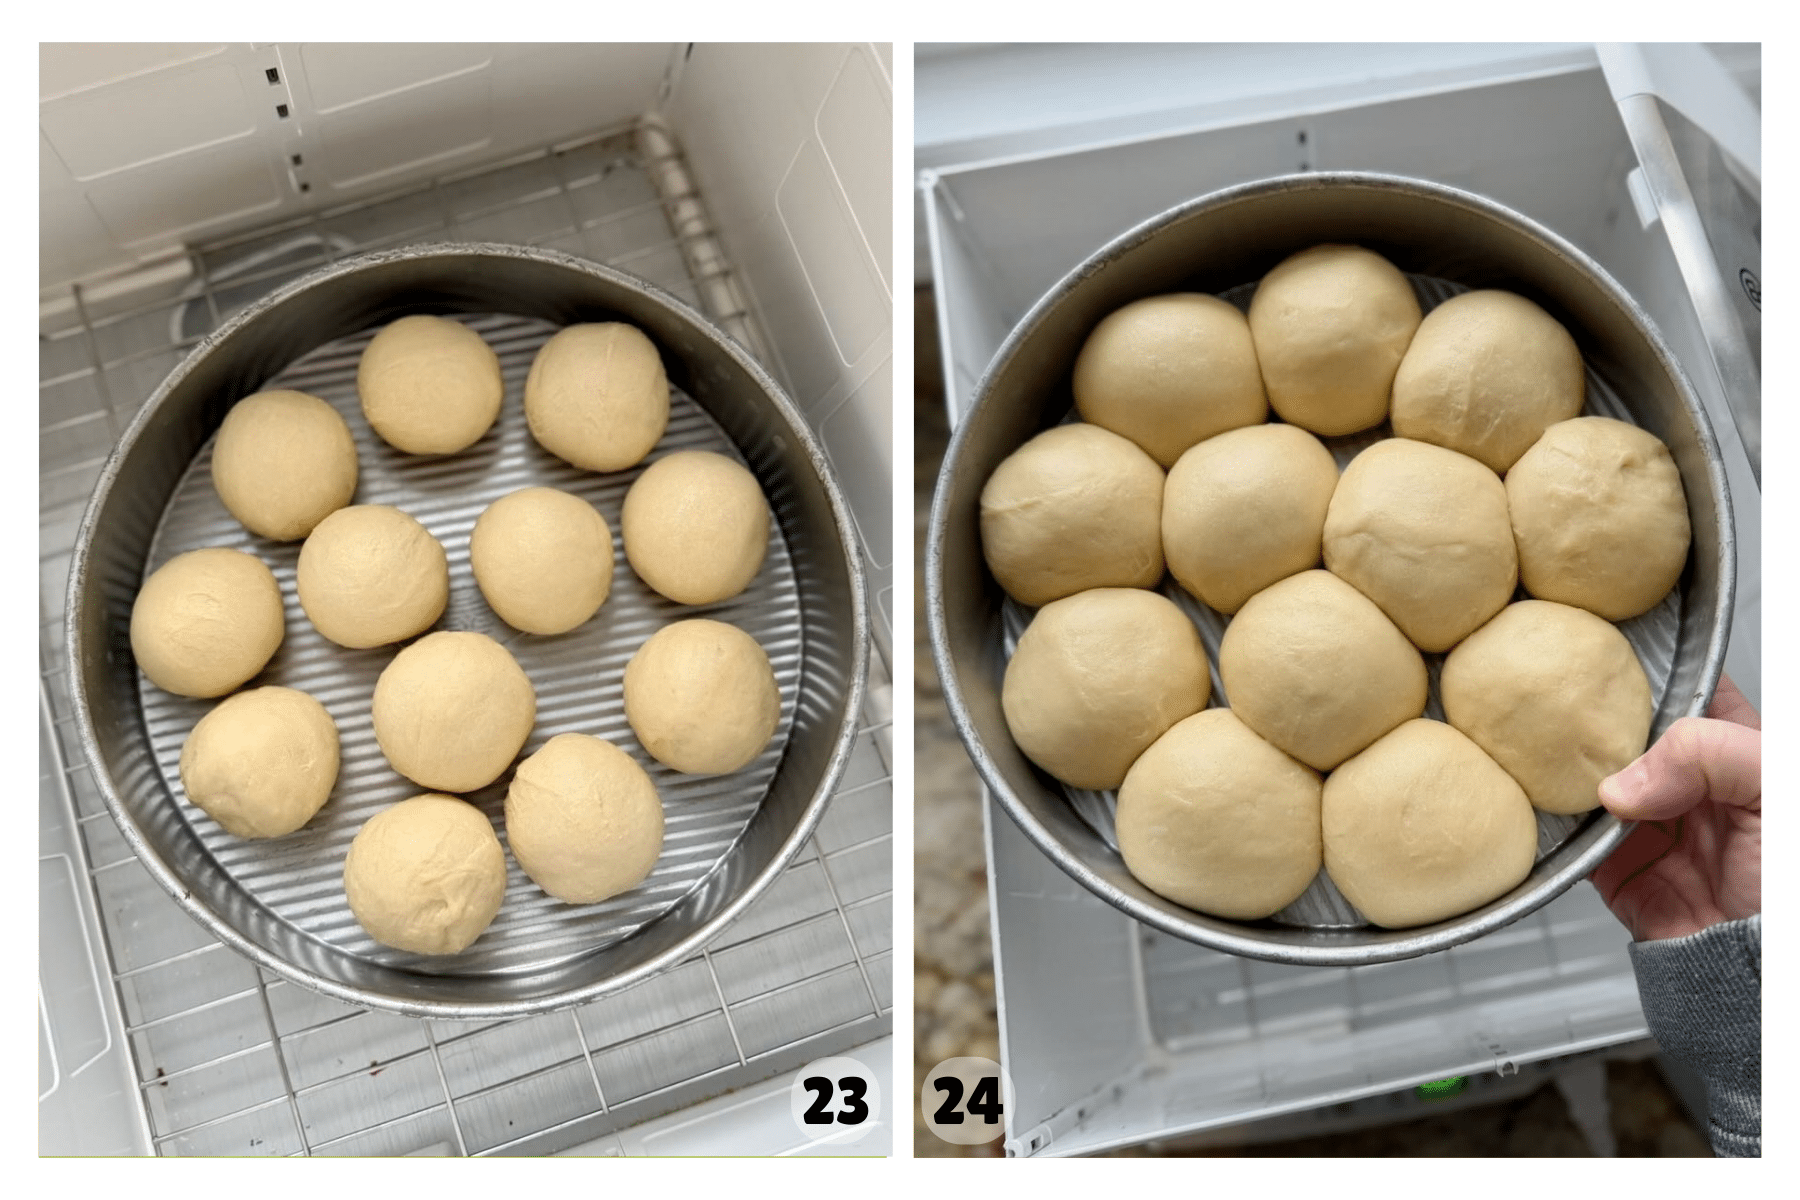
Step 7: Proof. Place the shaped rolls in a warm spot (about 78–80°F) and let them rise until doubled in size and light and airy (Images 23 & 24). In my bread proofer set to 78–80°F, this usually takes about 6–7 hours.
Be sure the rolls have fully doubled before baking for the softest texture and best rise.
Note: Dough temperature will affect timing. Warmer kitchens will speed up the rise, while cooler temperatures (below 78°F) will slow it down. I like using a bread proofer to keep the temperature consistent.
Bake the Rolls
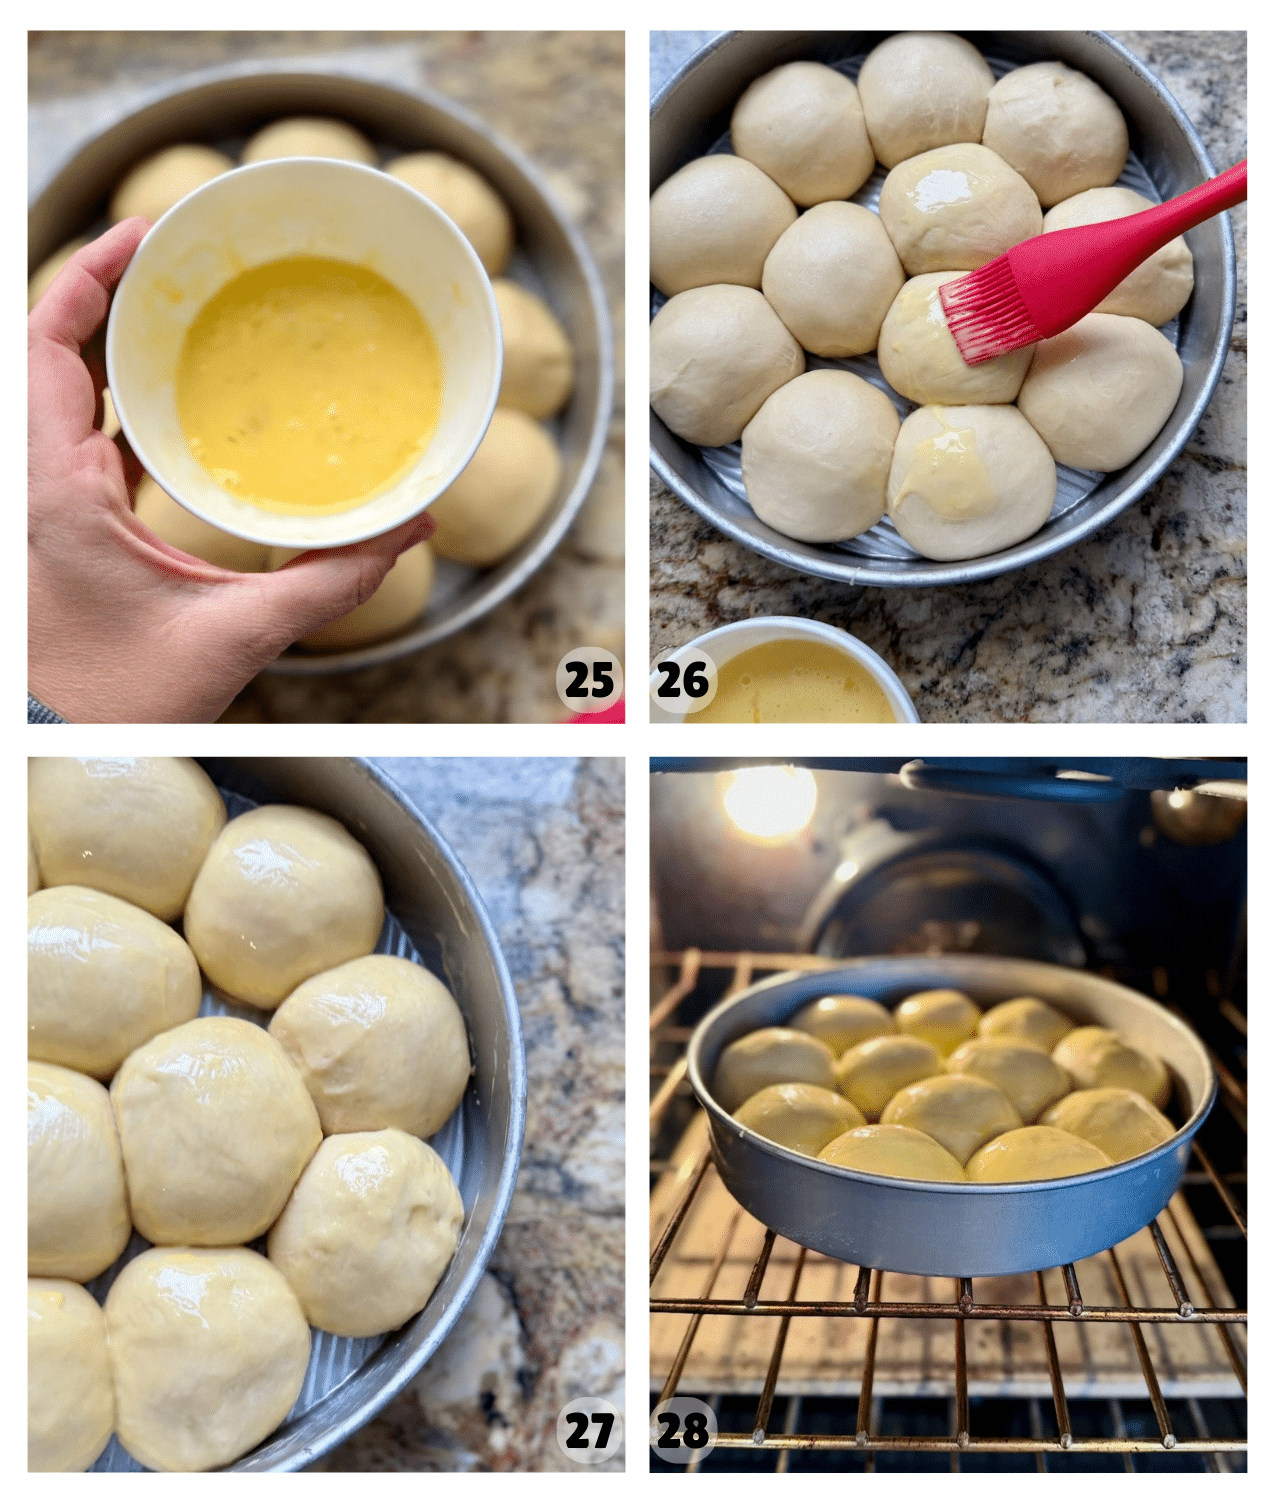
Step 8: Egg Wash & Bake. Preheat the oven to 375°F. In a small bowl, whisk together one large egg with a splash of heavy cream or water (Image 25). Gently brush the egg wash over the tops of the risen rolls (Images 26 & 27).
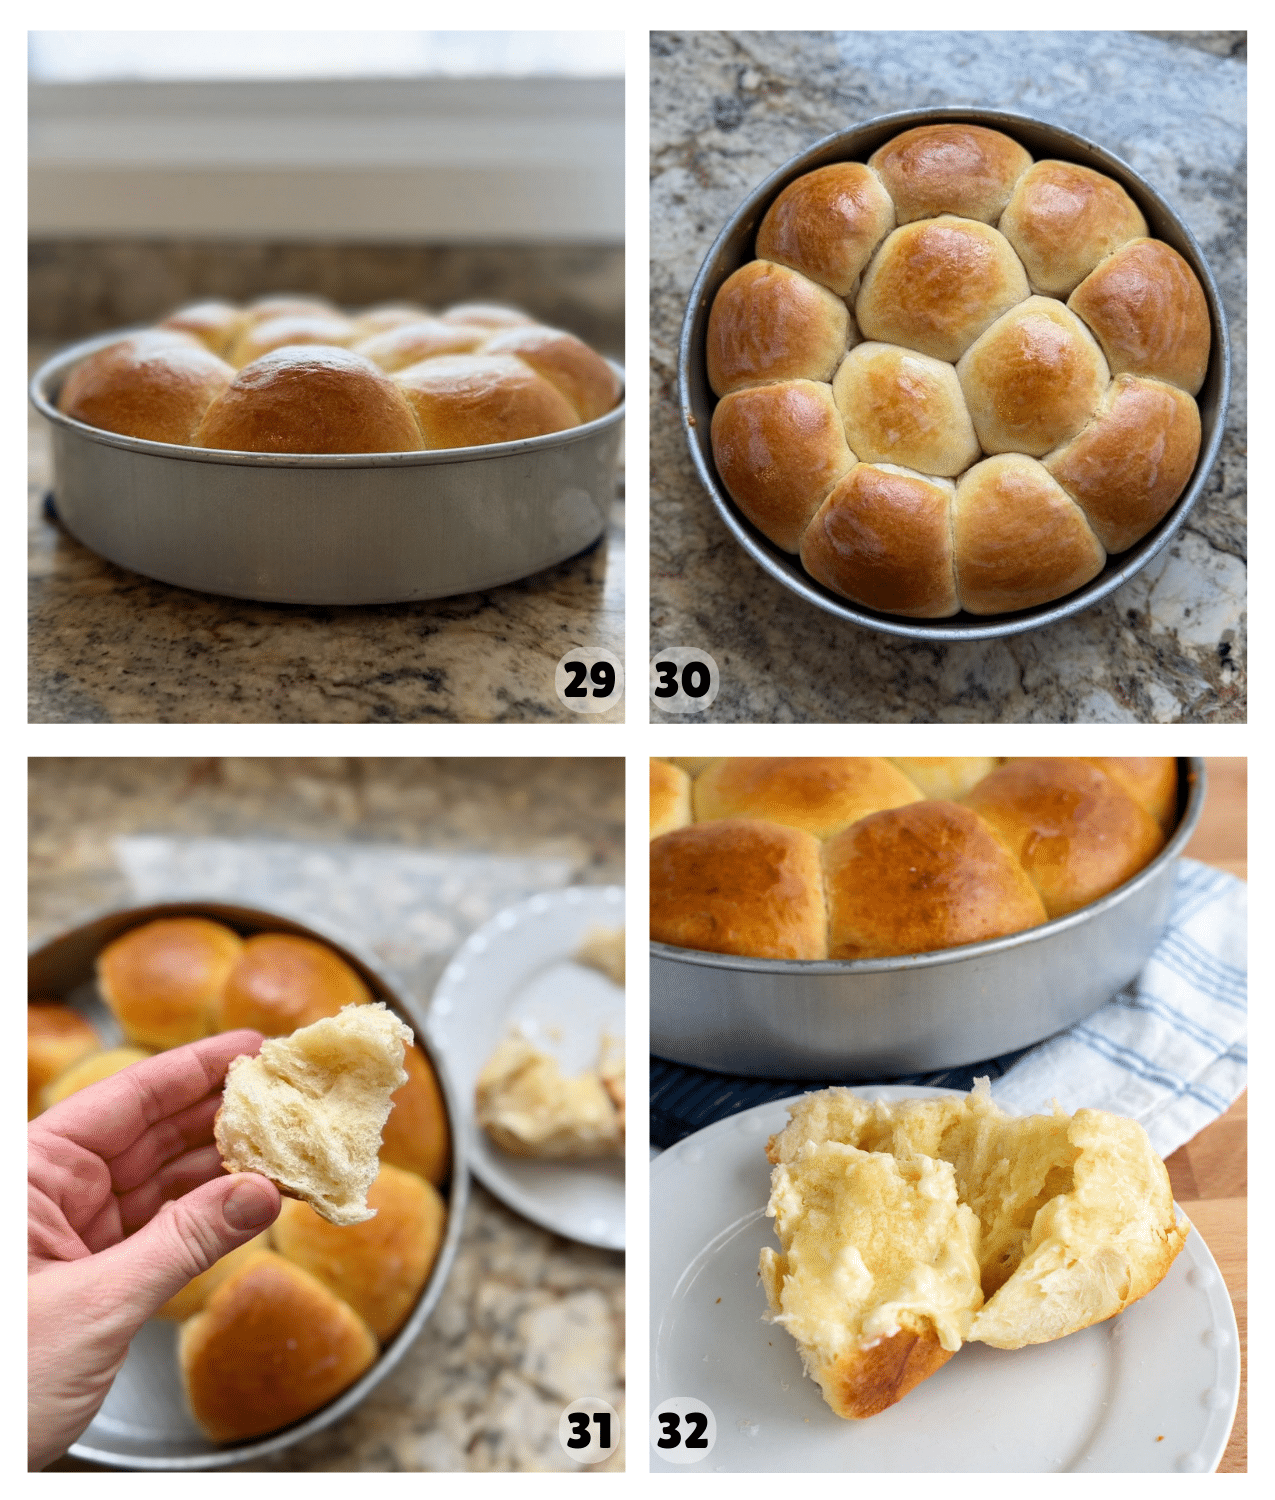
Bake for about 30 minutes, or until the rolls are golden brown and the internal temperature reaches 190–195°F (Image 28). Let them cool slightly before serving (Images 29-32). Enjoy!
How to Store Sourdough Brioche Rolls
Because these sourdough brioche rolls are rich, buttery and made with a yudane, they stay soft for a couple of days at room temperature in a zip-top bag or airtight container.
For longer storage, freeze the baked rolls in an airtight container. When ready to serve, let them thaw at room temperature or warm slightly before serving.
I don’t recommend freezing the unbaked dough for extended periods, as the sourdough can weaken quickly over time in the freezer. If needed, you can freeze the dough for up to 1 week, but for best results, I prefer baking the rolls first and freezing them after baking.
For more tips on prepping ahead, see my guide on how to make rolls ahead of time.
Amy’s Recipe Tip
Brioche takes patience, and temperature really matters. If you don’t have a bread proofer, do your best to keep the dough warm while it proofs, as cooler dough will take much longer to rise.
I never bake brioche until I see a clear, significant rise. If it hasn’t risen enough, your rolls will bake up dense and flat, and all that butter deserves better than that.
Frequently Asked Questions
You don’t have to use the yudane, but it truly makes a softer, more tender brioche. If you’re already investing the time to make brioche, it’s worth the extra few minutes. It helps the rolls stay soft and fresh longer, which is exactly what you want in rich, buttery dough.
If you choose to skip the yudane, replace it with equal amounts of flour and liquid in the dough.
Yes—but be ready to work for it! Mixing and kneading enriched dough by hand (especially with eggs and butter) is doable, but takes longer and gets messy when you add the butter.
Here are a few tips if you’re going the no-mixer route:
Start with a strong dough: Mix and knead everything except the butter until smooth and elastic.
Add butter gradually: Knead in small chunks of softened butter by hand, working it in fully before adding more. It’ll look greasy and messy at first but will come together.
Slap and fold method: Use a “slap and fold” kneading technique to build strength without a mixer. It helps keep the dough from sticking and develops gluten efficiently.
You can get a great result—it just takes more time and a bit of muscle!
Yes. The best way to make these ahead is to refrigerate the dough overnight during the cold fermentation step, then shape, proof, and bake the next day.
I don’t recommend freezing unbaked sourdough dough. Unlike commercial yeast, wild yeast can weaken in the freezer, which can lead to dense or poorly risen rolls.
Instead, bake the rolls first, let them cool completely, then freeze. When you’re ready to serve, thaw at room temperature and warm slightly before serving. They freeze and reheat beautifully.
Dense brioche rolls are usually caused by underproofing. This dough needs a full rise before baking. If the rolls haven’t doubled and feel light and airy, they will bake up dense. Temperature also plays a big role—cool dough will take much longer to rise.
Yes, you can use all-purpose flour, but the rolls may be slightly softer and less structured. Bread flour gives the best results for that classic brioche texture.
Brioche dough is naturally sticky because of the butter in the dough, and this is completely normal. Chilling the dough before shaping makes it much easier to handle.
Popular Sourdough Roll recipes


If you tried these Sourdough Brioche Rolls or any other recipe on my website leave a 🌟 star rating and let me know how it went in the comments below. Happy Baking!

Sourdough Brioche Rolls
Save this for later!
Equipment
- 10 inch round pan a 9 -inch round pan or 9 by 13 pan also work
Ingredients
Levain (1:1:1 about 3-4 hours at 78ºF)
- 55 grams sourdough starter, ripe, bubbly, active, about 1/4 cup
- 55 grams water, about 1/4 cup
- 55 grams bread flour, about 1/2 cup
Mix Yudane
- 75 grams bread flour, see recipe notes, 1/2 cup, plus 1 Tablespoon
- 75 grams boiling water, scant 1/3 cup
Sourdough Brioche Rolls
- 150 grams levain, ripe, bubbly and active, about 2/3 cup
- 150 grams yudane, all of the yudane, cooled to room temperature
- 25 grams whole milk, about 2 Tablespoons
- 45 grams granulated sugar, about 3 Tablespoons
- 3 large eggs, about 150 grams
- 10 grams salt, about 1.5 teaspoons
- 375 grams bread flour, about 2 3/4 cup
- 113 grams unsalted butter, softened, about 1/2 cup, reserved for adding into the dough
Instructions
Mix Levain (1:1:1 about 3-4 hours at 78ºF)
- Mix together the ripe, active sourdough starter with bread flour and water until completely incorporated. Cover and let rise until doubled in size, bubbly and peaked.
Yudane
- About 30 minutes before your levain is ready, whisk together 75 grams flour and 75 grams boiling water. Mix together until it forms a ball. Let cool until the dough is ready to mix.
Sourdough Brioche Rolls
- Mix the Dough: To the bowl of a stand mixer, add the ripe, bubbly and active levain, cooled yudane, milk, granulated sugar, eggs, salt and bread flour. Turn on the mixer and knead for about 5 minutes until the dough is smooth and all the ingredients well incorporated.Note: If you’re using cup measurements, hold back a small amount of the flour and add it gradually as the dough kneads. The dough should feel tacky, but not overly sticky.
- Add Butter: Cut the butter into chunks, about 8-12 pieces. Butter should be firm but soft enough to leave a dent when you press your finger into the butter. Turn the mixer on and add chunks of butter into the dough a little at a time. Continue adding chunks of butter until all the butter is added and incorporates into the dough.
- Knead until Windowpane: Continue kneading the dough on medium speed for 10-15 minutes (this will depend on your mixer and your dough) until the dough passes the windowpane test. To check for windowpane: Stop the mixer. Take your hands and pull up on a portion of the dough. At the beginning stages of kneading the dough, the dough will break as soon as you start to stretch it. As the dough kneads and the gluten strands develop, the dough will stretch thinly without tearing. You will know the dough is finished kneading when the dough does not tear when pulled and you can see light through the dough, like a windowpane.A word of caution: As you knead the dough, the friction from the mixer can heat up the ingredients in the bowl. It is important that the dough doesn't get too warm (above 78ºF) or else the butter will begin to melt and separate from the dough. If you notice this beginning to happen, take a break, stick your dough in the refrigerator to cool down and then continue kneading after the dough cools a little bit.
- Bulk Fermentation: Turn the dough out into a container or bowl. The dough will feel a little sticky. It can help to wet your hands before turning the dough out if it sticks to your fingers. Cover the dough and set in a warm 78ºF place for the 4 hour bulk fermentation.
- Overnight Refrigeration (Cold Fermentation): Stick the covered dough in the refrigerator overnight or up to 48 hours.
- Shape the Rolls: The next morning, pull the dough out of the refrigerator. Dump the dough out onto a clean countertop. It may be difficult to pull out of the container at first because the dough hardens in the refrigerator, but it will be a little easier to work with as it sits out. Cut the dough into 12 equal-sized pieces. Take each piece of dough and pull/pinch up the sides until it forms a ball. Roll the ball on the counter using your hand in a cupping shape (watch video here) to seal the balls and create tension for the roll to rise. Place the dough ball in a 10-inch round pan lined with parchment paper.
- Proof: Place the shaped rolls in a warm, 78-80ºF place to rise until doubled in size and light and airy. I proof my dough in a bread proofer and with the temperature set at 78-80ºF and it takes about 6-7 hours for the dough to double in size. Do not bake these rolls if they have not doubled in size.If your temperature is warmer than this, the fermentation will go FASTER. If the temperature is colder than 78ºF, the fermentation will go SLOWER. I use a bread proofer to keep the temperature consistent.
- Bake: Pre-heat the oven to 375ºF. Whisk together one large egg with a splash of heavy cream or water. Gently brush the egg wash on top of the risen rolls. Bake for 30 minutes until the rolls are baked through and the internal temperature is 190-195ºF. Let cool slightly before serving. Enjoy!
Notes
Nutrition
Nutrition information is automatically calculated, so should only be used as an approximation.


Hi Amy – do you think I could make these as individual slider buns on a baking sheet?
If you’re looking for brioche buns, I would recommend these Sourdough Brioche Burger Buns. But yes, I think you could do that!
I would like to make these for Easter, but would need to double the recipe. Can I just double it, or will that be too much for the mixer so I should make 2 batches?
It will depend a lot on your mixer and how strong the motor is. This recipe requires at least 20 minutes of mixing time, which can overheat some mixers, especially with an increased batch.
I baked a double batch of these rolls today, and used my Bosch mixer without any difficulty mixing the dough yesterday. They are amazingly pillowy and buttery; can’t wait to serve them for tomorrow’s Easter dinner. My son taste tested a roll and grave it an 11/10.
I’m glad they turned out great! Thanks for the review.
We love these soft and fluffy brioche rolls! So good, especially made with a sourdough starter.