Affiliate disclosure: This post may contain affiliate links. Please see our disclosure policy.
A great loaf of sourdough begins with a healthy, active sourdough starter. Learn how to make a sourdough starter completely from scratch in this guide so you can make my easy beginner sourdough bread, my hands off-easy sourdough bread recipe or my artisan-style sourdough bread. When you have a sourdough starter (don’t worry, you can keep it in your fridge!), you never run out of yeast and will always have the ability to make bread.

Save this for later!
Why You will Love Sourdough
Sourdough bread is the bread that people have been making and eating for thousands of years – before the discovery/invention of commercial yeast. Not only does it taste incredible but it has a lot of benefits from the fermentation cycle it goes through. I use sourdough in almost every baked good I make now – from sourdough dinner rolls to our sourdough breakfast pancakes, it’s a powerhouse of good bacteria that I love to bake with.
If you’re new to sourdough, be sure to read “What is Sourdough?”—it explains how sourdough works and the benefits of using it in your kitchen.
What is a Sourdough Starter?
A sourdough starter is a natural culture of wild yeast and beneficial bacteria that work together to ferment and leaven (raise) dough. This article, “How to Feed a Sourdough Starter” breaks down how it all works.
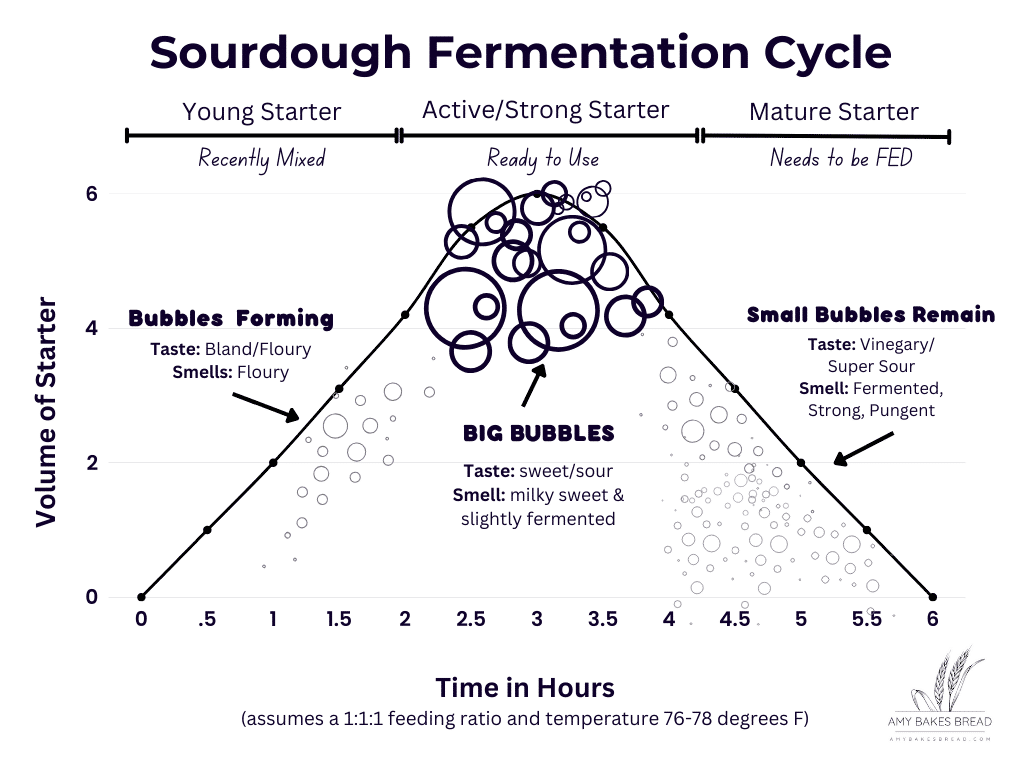
Put simply: Wild yeast produces carbon dioxide, creating gas bubbles that help the dough rise. Bacteria acidify the dough and enhance its flavor. Fresh flour serves as their food. Sourdough starters need regular feeding with flour and water, usually daily or weekly (if refrigerated). The fed starter goes through a fermentation process where the starter rises and then falls as the wild yeast and bacteria work together to consume the starches in the flour. The starter then needs to be fed again to start the process over again.
Don’t let this chart scare you off! It’s really pretty simple -the starter is fed, it rises and then it falls and then it is fed again and the cycle starts over. When you make a sourdough starter from scratch you are culturing the wild yeast and bacteria that will go through this process.
Where can I get a Sourdough Starter?
Hear me on this – there is no one right way to get a sourdough starter. These are the most popular ways people obtain sourdough starter:
- Get some from a sourdough-baking friend. Check your local neighborhood groups or ask a friend who bakes sourdough for some of their starter. I guarantee someone will be willing to share!
- Purchase some online. I like the one that King Arthur flour sells because it is ready to go when it arrives to you and all it needs is one or two feedings. You can also purchase a dehydrated starter and rehydrate it yourself.
- Make your own. The steps below will walk you through how to make a sourdough starter from scratch. This option will take the longest, usually 2-3 weeks, but is a rewarding experience if you have the patience. Download my sourdough starter tracking sheet to get started quickly.
Ingredients and Tools You’ll Need

1. A kitchen scale: I highly recommend using a scale for most consistent results. I know, it’s difficult to change over if you’ve been using volume measurements most of your life (that was me too!), but sourdough recipes are more difficult to get the “feel” of because they are higher hydration and it often takes a LOT of practice before you will understand the feel of the dough. A scale is going to make your sourdough bread better and recipes easier to follow.
2. About 2.5 lbs whole wheat flour (or rye flour): The microorganisms in whole grains are what wild yeast love to feed off of. Using whole wheat or especially rye flour will help culture the starter much more quickly.
3. About 2.5 lbs white all-purpose (or bread) flour: All-purpose or bread flour is more extensible and will rise higher with large bubbles. Having a balance of whole wheat and white flour in your starter gives you the best of both worlds with a balanced flavor and higher rise.
4. Filtered or bottled water: Tap water can sometimes have small amounts of chlorine or chloramine in it which is not good for creating a sourdough starter. Using filtered or bottled water is going to produce the best results. Once you’ve established your starter (meaning it is predictably rising/falling), you can switch over to tap water as long as your water has no chlorine/ammonia in it. When you are ready to make the switch, save a little bit of your starter beforehand – just in case it is not ready, in which case you won’t need to start over.
5. 2 wide-mouth jars and rubber band: I like a wide-mouth mason jar that is clear on the outside, wide enough to stick your hand in, and easy to mark with a rubber band.
7. A rubber spatula: This is optional but I like using one to stir down my starter and get all the excess off the sides. It makes it easier to mix thoroughly and see the rise take place.
8. A rubber band to mark your jar. You can also use a dry erase marker or anything that will act as a mark to help you see the growth of the starter throughout the process.
9. A thermometer: Proper temperature is critical for best starter results. Use a thermometer to take the temperature of your starter and do your best to keep the starter around the 76-80ºF range where wild yeast and bacteria are the most active together. Find a warm appliance, use a proofing box or a dough mat or even try your oven with the light turned on/off to keep the temperature consistently warm.
8. My sourdough starter worksheet: Print out my sourdough starter worksheet. This gives you all the information you need to make a sourdough starter and has a place to take notes so you can remember when you fed the starter, how the starter is acting, and anything else that will help you troubleshoot if needed.
Timeline of Making A Starter
Here’s a quick overview of what feeding a starter looks like. Use a combination of all-purpose and whole wheat or rye flour. Once you get to day 4 if you are seeing activity (bubbles), you can start feeding your starter every 12 hours (morning and night) to speed up the process. Keep the starter temperature consistently around 76-80ºF for best results.
Note: There is not a lot of prep time or even time required during the day to make a starter – just about 5 minutes. Total time will take about 2-3 weeks.
| Day | Flour | Water | Starter | Time |
| Day 1 | 100 grams flour (50 all-purpose/50 whole wheat or rye) | 125 grams | none | cover and let sit 24 hours |
| Day 2 | 100 grams flour (combo) | 115 grams | 75 grams | cover and let sit 24 hours |
| Day 3 | 100 grams flour (combo) | 115 grams | 75 grams | cover and let sit 24 hours |
| Day 4 | 100 grams flour (combo) | 100 grams | 30 grams | 24 hours OR every 12 hours |
| Day 5 | 100 grams flour (combo) | 100 grams | 30 grams | 24 hours OR every 12 hours |
| Day 6 AND ONWARD (another week or two is typical) | 100 grams flour (combo) | 100 grams | 30 grams | 24 hours OR every 12 hours |
How to Make A Sourdough Starter
Mixing the Starter: First 24 hours

Step 1: Place a clean jar on a digital scale. Tare (zero) the scale. Add 100 grams flour (50 grams of whole wheat flour and 50 grams all purpose flour) to the jar.

Step 2: Add 125 grams warm filtered water to the jar. Stir the starter, mixing completely and using a spatula to scrape down the sides of the jar.

Step 3: Lightly cover the top of the jar with a loose lid or plastic wrap.

Step 4: Put a rubber band around the jar and mark where the starter is. Set in a dark, warm (78-80 ºF) place for 24 hours.
Day 2: Second 24 hours
If your starter doesn’t show any signs of activity (bubbles/smell, etc…) wait another 24 hours before moving on to Day 2.

Step 5: Place your second jar on a digital scale. Tare the scale. Take the lid off your sourdough mixture. It may have some bubbles, it may not. Stir it together. Put 75 grams of the mixture into the new jar. Feed it 100 grams flour (50 whole wheat/50 white) and 115 grams water.

Step 6: Stir together, scraping down the sides of the jar. Mark the jar with your rubber band. Lightly cover and set in the same warm spot for 24 hours. Throw away the leftover from the first jar.
Sourdough Starters are Resilient! If you forget to feed it one day, don’t worry. Just feed it when you remember. In most cases it will come right back.
Day 3: Third 24 hours
- Repeat the process from day 2.
- Sometimes by day 2 or 3 you see a burst of activity that is FALSE RISE (see photo below) that will die down by day 3 and 4. Don’t be discouraged if this happens. This is normal (though it doesn’t happen to everyone) as the bacteria/wild yeast are culturing. Your starter is not ready yet. Just keep feeding it.

Day 4 and Onward – Until Rising and Falling Predictably (Plan for 2-3 weeks)

- Place a clean jar on a digital scale. Tare the scale.
- Take the lid off your sourdough mixture. It may have some bubbles, it may not. It may be starting to rise or it may not. If it has a thin layer of liquid (water separation) or acetone (it’s not quite hooch yet), stir it into the starter.
- Put 30 grams of the mixture into the new jar. Feed it 100 grams flour (50 whole wheat/50 white) and 100 grams water.
- Stir together, scraping down the sides of the jar.
- Mark the jar with your rubber band.
- Lightly cover and set in the same warm spot for 24 hours.
Repeat this process of feeding and discarding until your starter is doubling & rising/falling predictably (multiple days in a row). At this point you can also transition your starter over to feeding it only all-purpose or bread flour if desired.
Did I Kill My Starter? Many people often think they killed their sourdough starter, when what really happened is that they left it without feeding it for a period of time and it developed a dark/gray liquid on top. This did not kill your starter. It is preserving your starter and it means your starter wants to be fed again. Don’t throw it out! Take a small Tablespoon of starter from the bottom of the jar and feed it.
Progression Photos of a Starter
Sometimes it helps to see this progression of a sourdough starter in pictures. These photos show a top-down view and a side view of what you are looking for over the 2-3 weeks it takes to culture a sourdough starter.


When is the starter ready to use?
Your starter is ready to use when it:
- Is rising and falling predictably (at the same time every day). Mark the jar when you feed the starter and watch periodically throughout the day for a rise. You want your starter to rise to about double in size within a day before it is ready to make bread.
- Has bubbles throughout the starter when it reaches that “peak” risen height. If you are using whole wheat or rye flour, there may not be quite as many bubbles or as high of a rise, but there will still be some.
- Has a milky/sweet smell when the starter reaches its peak height that gets more sour as it falls down.
Next Steps
When you go through a process of making a starter from scratch and it is finally ready, you may be wondering what to do next! Do you feed it forever?! How do you actually make bread?
- Make your First Loaf. Use my Beginner Sourdough Recipe to make your first loaf of sourdough bread.
- Refrigerate Your Starter: When you aren’t using your starter, it’s time to refrigerate it. I like to stick it in the fridge at its bubbly, active state. When you want to use it again, pull it out, feed it, let it get active and bubbly and use it in a recipe. If you aren’t planning to use it I like to feed it weekly to keep it active, but it can stay in your refrigerator for a LONG time. A thick layer of dark liquid does not mean you killed your starter – it just needs to be fed! My guide to Sourdough Starter will help you troubleshoot.
- Learn about Feeding Ratios: Switch up your feeding ratios to fit with your life. When you feed more starter, the starter will be active and ripe earlier. Feeding less starter will take longer for the starter to activate. You’ll want to read my guide on Sourdough Starter Ratios for more information.
- Keep a Backup: Always keep a backup of starter in your refrigerator or dehydrate some that you could reactivate in case something happened to your starter.
Amy’s Recipe Tips
- Creating a sourdough starter from scratch often takes 2 – 3 weeks or longer. Stay patient. Just keep feeding it!
- Temperature is very important! If you’re not seeing any movement – check your temperature!
- Whole wheat or rye flour are also important to a starter activating- add some in if you haven’t!
- Toss the “discard” during the weeks you are building your sourdough starter. This discard is not good to eat because it’s full of excess yeast and bacteria. Once your starter is predictably rising and falling it’s okay to start using it in sourdough discard recipes.
- If you ever see orange/pink or fuzz on your starter, that is mold. Mold spores do not go away through feeding it. Unfortunately you will need to throw it away and start over.
Frequently Asked Questions
The float test can sometimes indicate that your starter is ready, but it’s not always reliable. If your starter consistently doubles in size after feeding and then falls back down, you don’t need to rely on the float test to determine if it’s ready to bake with.
To perform the float test – Feed your starter. Mark the jar. Wait for the starter to rise and double in size. As soon as it doubles in size and peaks, take a small spoonful (about a teaspoon) and gently drop it into a glass of water. If it floats, it’s a sign that your starter is airy and active.
However, even if your starter doesn’t pass the float test, it may still be ready to use—trust the signs of consistent rising and falling over a simple water test!
If your starter smells very acidic or even unpleasant—like garbage—don’t worry! This is completely normal during the first week or so. Think of it as a science experiment: you’re cultivating wild yeast and bacteria, and depending on your environment and the type of flour you’re using, the smells can vary. Over time, these odors will balance out, and you’ll start noticing the milky-sweet aroma of a healthy, ripe sourdough starter.
However, if your starter consistently smells like acetone (nail polish remover), it’s likely hungry and needs to be fed more frequently. Adjusting your feeding schedule should help bring it back to a more balanced state.
If your starter is very runny at the end of its fermentation cycle, it likely needs to be fed again. A thin, watery consistency usually means it’s hungry and has consumed all available nutrients.
If your starter is separating, with liquid (water separation) forming on top or between layers, check that you’re using weight measurements rather than volume. Measuring by volume can lead to inaccurate ratios since flour and water don’t have the same density. Also, ensure your scale is working properly to maintain consistency.
If separation continues, try adding a little extra flour when mixing to help stabilize the texture. Feeding your starter more frequently or adjusting the flour-to-water ratio slightly can help maintain a thicker, more balanced consistency.
Many people often say they killed their sourdough starter when what they really mean is that they left it without feeding it for a period of time and it developed a dark/grey liquid on top. This did not kill your starter. It is preserving your starter and it means your starter wants to be fed again. Don’t throw it out! Take a small Tablespoon of starter from the bottom of the jar and feed it.
The only way you truly kill your starter is if it becomes contaminated with mold. If you ever see orange/pink or fuzz on your starter, that is mold. Mold spores do not go away through feeding it. Unfortunately, you will need to throw it away and start over.
I understand why feeding and discarding sourdough starter might feel wasteful. However, I see it as an essential part of cultivating the wild yeast and bacteria that allow you to bake with sourdough indefinitely. Even if you’re not directly consuming every bit of flour, it’s doing important work in maintaining a healthy starter.
That said, if you want to reduce flour usage, you can make a smaller starter by cutting all the ingredients in half. Over time, you can maintain just a small amount and build it up quickly whenever you’re ready to bake. Once your starter is ready to bake with, you can use the excess discard in sourdough discard recipes that are delicious and then you never have any sourdough waste.

Easy Sourdough Recipes
I always recommend starting out with some easy beginner recipes – my beginner sourdough bread, sourdough crackers and sourdough pancakes are some of my favorites, along with these ones!
Most Popular Easy Sourdough Recipes


If you tried Making a Sourdough Starter from Scratch or any other recipe on my website leave a 🌟 star rating and let me know how it went in the comments below. Happy Baking!

How to Make a Sourdough Starter
Save this for later!
Equipment
- 2 16 oz clear jars with wide mouth and lid
- rubber band or dry erase marker
- sourdough starter worksheet optional
Ingredients
- whole wheat flour, or rye flour, see recipe notes
- all-purpose flour, or bread flour, see recipe notes
- filtered or bottled water, see recipe notes
Instructions
Day 1
- Place a clean jar on the kitchen scale. Tare the scale to zero. Pour 50 grams of whole wheat flour and 50 grams of all-purpose flour into the jar. Add 125 grams warm (80-90ºF) filtered water. Stir well until the flour and water are incorporated. Use a dry erase marker or rubber band to mark the jar at the point the starter has been mixed. Cover lightly with the lid (don't screw the top on tightly) and store in a dark, warm (76-78º F) place for 24 hours.
Day 2 & 3
- After 24 hours, check on the starter. You may or may not see any signs of fermentation or activity. If you see nothing, let the starter sit for another 12-24 hours before moving on to day 2 & 3.
- Place a new/clean jar on the scale. Tare the scale to zero. Add 75 grams of the fermented mixture to the jar. Discard the rest (throw it away). Add 50 grams whole wheat flour and 50 grams all-purpose flour to the jar. Add 115 grams warm (80ºF) water to the jar. Stir well until the mixture is combined and mark with the rubber band/dry-erase marker. Cover loosely and let rest in a dark, warm place for another 24 hours.
- After 24 hours, check on the starter. This is day 3. Repeat the steps from day 2, adding 75 grams of the fermented mixture to a new clean jar along with 50 grams whole wheat flour, 50 grams all-purpose flour and 115 grams warm water. Stir together until combined. Cover and rest. in a dark, warm place for another 24 hours.Note: It is possible you will see a surge of activity on day 2 or 3 that drops off to nothing in the days after. This is normal (though it doesn't happen to everyone) as the bacteria/wild yeast are culturing. Your starter is not ready yet. Just keep feeding it.
Day 4
- Mix down the starter in the jar with a small spatula. Place a clean jar on the kitchen scale. Tare the scale to zero. Add 30 grams of the stirred-down mixture (starter) to the new jar. Discard the rest. Add 50 grams whole wheat flour and 50 grams all-purpose flour to the jar. Add 100 grams warm (80ºF) filtered water to the mixture. Stir together with a spatula. Mark the jar with a rubber band to watch for growth. Cover loosely and store the jar in a warm 78-80ºF place for 24 hours.
Day 5 and Onward Until Sourdough Starter is rising and falling predictably – multiple days in a row
- Repeat the steps of Day 4, placing 30 grams of the fermented mixture in a jar with 50 grams whole wheat flour and 50 grams all-purpose flour and 100 grams bottled water and stirring together until your sourdough starter is rising and falling predictably. Note: Creating a sourdough starter from scratch often takes 2-3 weeks of feeding until the wild yeast and bacteria are cultured and working together to be able to raise a loaf of bread.
After 2-3 Weeks
- During the First Week: You may notice some very pungent smells coming from your sourdough starter. That can be normal (depending on your environment and the flour you are using). You may also notice some bubbles and the starter becoming more runny shortly before the starter is ready to be fed.During the Second Week: Often during the second week you will start to notice very small rising taking place (this is where marking the jar comes in handy). Take note of the rhythm it starts to develop or rising and falling. If your starter seems to be producing a lot of liquid or smelling of acetone before you feed your starter during this time, you may want to move to feeding twice a day as your starter is showing signs that it needs to be fed again.Some starters will double in size by the end of the second week. Judge the percent rise based on where you marked the jar with your rubber band. Once your starter is doubling in size after every feeding a few days in a row, it can be used to make a loaf of bread.During the Third Week: Do not be alarmed if your starter takes a 3rd week to become fully active. Sometimes we skip a day and sometimes our temperature or environment play more of a factor than we realize. Continue feeding your sourdough starter and watching for any signs of rising or falling. If you aren't watching closely, this could happen during the daytime and by the time you get to your starter in the evening, it has already fallen back down.
Starter is Ready to Use
- You will know your sourdough starter is ready to use when it doubles in size, predictably after every feeding. It will have bubbles throughout the jar and a mild/milky aroma when it hits that peaked/doubled height. As your starter falls back down, it will smell more acidic, and that is your cue to feed it again.Note: Once your starter is predictably doubling in size, you can transition it over to feeding it only all-purpose or bread flour if desired. I like to gradually make this switch by decreasing the amount of whole wheat flour and increasing the amount of all-purpose flour over a couple of days.
Video
Notes
- Creating a starter from scratch is a long process. Plan for 2-3 weeks at MINIMUM of daily feeding a starter. It doesn’t take much time, but it does take consistency.
- Choose the same time every day to feed your starter (give or take a few hours). If you forget to feed it, feed it when you remember.
- Sourdough is very temperature-dependent. Keep your starter as close to 78-80ºF as possible throughout the process and use your thermometer to check.
- Throw away all the “discard” your starter produces while you are creating a starter from scratch. The levels of wild yeast and bacteria are not good for eating yet. When your starter is predictably rising/falling and repeats the same behavior a few days in a row, you can now use the discard in discard specific recipes.
- If you ever see pink/orange or fuzz, that is mold. Mold spores cannot be removed from a starter through feeding. Unfortunately, you will need to start the process over.
Sourdough Beginner Guide
 What is Sourdough?
 How to Make a Sourdough Starter
 How to Feed and Maintain a Sourdough Starter
 When Is Sourdough Starter Ready to Use? Easy Signs to Look For
 What is Sourdough Discard?
 How and Why to Make Levain
 Sourdough Timeline for Beginners: How To Fit It Into Your Day
 How Temperature Affects Sourdough
 Sourdough Starter Ratios Explained
 Essential Tools for Baking with SourdoughSourdough Frequently Asked Questions
 How to Dehydrate and Rehydrate Sourdough Starter
 How to Add Sourdough Discard to Any Recipe
 How to Replace Yeast with Sourdough Starter
 Adjusting the Sour Flavor in Sourdough Bread
 Sourdough Artisan Bread Guide
 How to Bake Sourdough in A Loaf Pan
 Adding Inclusions to Sourdough Artisan Bread
Need More Help? Take a Sourdough Class with Amy Bakes Bread


Hi Amy – I am new to sourdough starter and am very excited about this process. I am going to follow your steps from “How to Make a Sourdough Starter”. I do have a question on the flour amount. I like to start small. Can I cut the flour and water amount to half from your recipe?
Thank you!!
I would follow the amounts given in the recipe, as your starter needs time to be fed and grow. Once you have an established starter, you can feed it according to a ratio that gives you the amount of starter you want. Hope that helps!
Thank you!
thanks so much
hello Amy. I have a starter that is 7 days in. I just read for your starter recipe that you use whole wheat or rye mis until the end when you can start using your starter and then you decrease wheat until it’s all wheat flour. I have a starter using all type 00 flour, I have gone thru the false rise but not much bubbles and activity after that. can I start feeding the whole wheat right in at 32 grams right away or gradually? I want to get it more along this process to see if it makes it.
Yes, I would start feeding that right away. It’s going to give the microorganisms that a starter needs to develop and will help your starter strengthen more quickly.
Hi Amy!
I’m on day 28 of making my starter and I can’t get it to peak around the 4 hour window. It’s been consistently peaking around 8 hours the last 3-4 days and feeding it 1:1:1 ratio. I’ve also had it covered in a proofing mat at a consistent 79 degrees the entire time. Any suggestions on how to speed up the fermentation to peak closer to 4 hours? Also, can I start using it since it’s been consistent for 3-4 days as long as I’m using it at its peak?
Any suggestions are much appreciated! Thanks!!
Have you tried a mix of whole wheat and white flour? The whole wheat flour can help to speed up fermentation. I like to use 20-30 grams of whole wheat and the rest white flour when I feed my starter.
I found you 14 days into starting for the first time. I bought all supplies needed. I’m 17 days in, my starter is pourable, does not rise much, but it smells like sourdough. It’s a pleasant smell. I am about to give up but I made an investment so I have to keep going. I’m going to give this starter 30 days and start over with your recipe for a starter and book. Today I’m going 2 feed it a second time and see what happens. I have a warmer and internal temp is 78. So I just have to be patient. This is like a “pet “.
Keep going! Sourdough definitely requires patience, especially at the beginning!
I am new at this. I just ordered Amy‘s book. Since I live at 8000 feet will this effect my starter or baking?
Thank you
High altitude can impact baking. In general, we recommend shortening the bulk fermentation time because higher altitudes can cause a faster fermentation. Many people also suggest modifying the hydration (ratio of water to flour), although I don’t have a lot of experience working at high altitudes with sourdough, so I can’t give you more specifics than that. I hope that helps!
I used your guide to create my starter and it doubles in size consistently feeding it once day (30g starter, 100g water 100g flour mix APF & whole. It doubles in size and has lots of bubbles within 6hrs. When I feed it a 1:1:1 ratio, with APF to make lavein for baking it takes 12hr to rise and there are no bubbles, is this normal? The starter is in a warm spot between 79-80degrees.
Usually a 1:1:1 ratio is ready in 3-4 hours, so that is a bit unusual. How old is your starter?
Hello! This is my first time making a starter and I’m on day 6 following your recipe. For the first 3-4 days, it was doing everything you mentioned (false rise, few bubbles). But when switching to only using 100 grams of water, the starter is obviously going to be thicker. So is it normal to then have a hard surface that forms on top? The temperature has remained the same and I’m weighing everything correctly, so I hope this is just a normal part of the process. I can’t mix it back into the starter when starting the next day bc it’s hard, so I just toss it out and use 30 grams of the starter underneath. Thoughts? Thanks!
That sounds like a normal part of the process! Just keep going and keep feeding!
Hi Amy! I started my starter about 10 days ago and unfortunately used another site that told me to add 1 cu. fI and 1 cu. water. My starter was so runny! I discovered your IG and web page and your tip on using grams saved me! I was definitely using too much water. Could I just keep it going with your recipe above? And what day would I start on? Thank you!
Using grams is definitely a game changer when it comes to sourdough baking! And yes, I’d just resume from where you are (1-2 weeks) and keep feeding until your starter is rising and falling predictably before you bake with it. Happy baking!
Would like to read more on gluten free starter a recipes. I enjoy bread, so it’s very imputing stat out right
Hi Diana – I don’t give resources for gluten free sourdough because it is different than regular sourdough (that relies on gluten for it’s dough development). I recommend following someone who bakes gluten-free specific recipes I would recommend the following sources for help:
For a beginner – Mary Thompson – https://amzn.to/49cSAUm
For a more advanced gluten free sourdough bakes – Aran Goyoaga – https://amzn.to/4qNCjf7
Hope that helps!
Hi Amy! I’m on day 3 now. Just fed my starter for the second time and it’s acting exactly as your recipe describes (I had a false rise on day 2). If I choose to start feeding my starter twice a day, when do you recommend I start doing that and how much should I feed it?
Example, your chart says 100g flour : 100g water : 30g starter from day 4 onwards. Should I halve that every 12 hours if I start feeding twice a day? Which would make every feeding 50g flour : 50g water : 15g starter?
Is it necessary to even switch to feeding my starter twice a day or can I stick to every 24 hours?
Thank you!!!
I would feed it the amounts listed in the chart. Feeding it every 12 hours instead of 24 hours is if you are seeing consistent activity (bubbles, rising, etc.). Hope that helps!
I only have 1 liter jars. Will that be two larger to try to start a new starter?
That should be plenty of space!