Affiliate disclosure: This post may contain affiliate links. Please see our disclosure policy.
You’ve got your sourdough starter—now what? Whether you made a starter from scratch (I’ve got an easy guide for that!), rehydrated a dehydrated starter, or purchased one ready to go, you’re officially in the world of sourdough baking. Now it’s time to learn how to feed your sourdough starter, maintain it, and keep your starter healthy for all your future sourdough bakes.
This guide will walk you through the simple science of the fermentation cycle and how to care for your starter—whether you’re baking every day or just once a week. From feeding schedules to fridge storage, you’ll find everything you need to confidently maintain a strong, active starter and start making delicious sourdough bread.

Save this for later!
Table of Contents
- What Is a Sourdough Starter?
- Understanding the Sourdough Fermentation Cycle
- Ingredients Needed to Feed a Sourdough Starter
- Tools Needed to Feed a Sourdough Starter
- How to Feed a Sourdough Starter (Basic Method)
- My Favorite Sourdough Discard Recipes
- How to Keep Your Starter Strong
- When is your Starter Ready to Use?
- Fridge vs. Counter Storage
- How Much Should You Feed Your Starter?
- Feeding A Sourdough Starter Without A Scale
- Common Issues + Troubleshooting
- Sourdough Starter Frequently Asked Questions
- New to Sourdough?
- Beginner Sourdough Recipes
- How to Feed and Maintain A Sourdough Starter Recipe
What Is a Sourdough Starter?
A sourdough starter is a living culture of wild yeast and beneficial bacteria. Put simply, these natural organisms work together to ferment dough. During this fermentation process, a sourdough starter not only helps bread rise without the need for commercial yeast but also enhances flavor, improves digestibility, and helps keep baked goods fresher for longer. It’s a pretty incredible culture to bake with! –> WHAT EXACTLY IS SOURDOUGH? MORE INFORMATION HERE
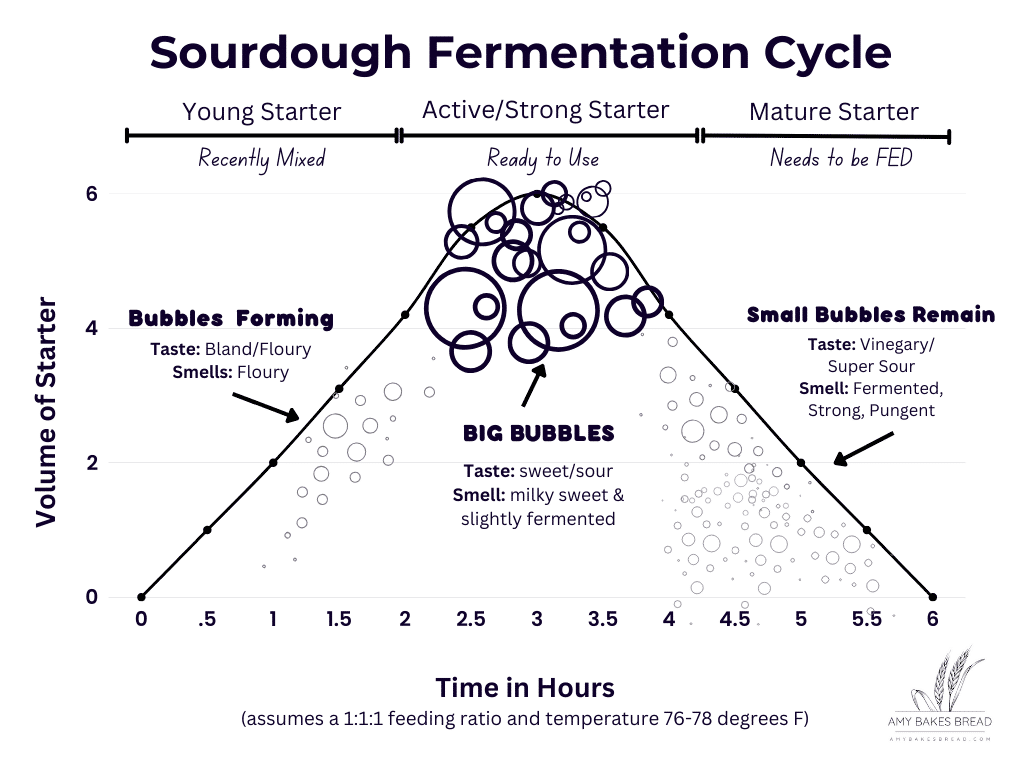
Understanding the Sourdough Fermentation Cycle
Once you have your sourdough starter, maintaining it comes down to a simple cycle of feeding, rising, and falling. This process keeps the wild yeast and bacteria healthy and active.
How the Sourdough Cycle Works
- Feed your starter: Take a small amount of mature/ripe (or mildly overripe) starter and mix it with fresh flour and water.
- Mark the jar: Use a rubber band or piece of tape to mark the starter’s level in the jar—this helps you watch it rise and fall.
- Fermentation begins: The starter will rise as the yeast and bacteria consume the fresh flour and produce gas. It will fall once they run out of food.
- Discard and refresh: When the starter peaks or slightly over-ripens, you take a portion of the fermented starter out to feed again and discard the rest. This starts a new fermentation cycle.
Ingredients Needed to Feed a Sourdough Starter
- Sourdough Starter: This is your base culture—whether you made one from scratch using my easy guide, got one from a friend, or purchased it, this is what you’ll be feeding and maintaining.
- Flour: I typically use all-purpose or bread flour as my main flour. If my starter seems sluggish, I’ll mix in a little whole wheat or rye flour—both contain more nutrients and can give your starter a natural boost.
- Water: Most water works just fine, especially for an established starter. I use tap water with great results. Just make sure it’s free of chlorine or chloramine—if your tap water is heavily treated, you may want to let it sit out overnight or use filtered water.

Tools Needed to Feed a Sourdough Starter
To feed a sourdough starter, you just need a couple of tools:
- Clear Jar with a lid: A transparent jar lets you easily see bubbles and how much your starter has grown. Use a lid that isn’t airtight—this allows gases to escape without letting your starter dry out. A mason jar or a jar made specifically for sourdough works great.
- Kitchen Scale: I highly recommend using a digital kitchen scale for feeding your starter. Weight measurements are far more accurate than volume, especially with sourdough’s high hydration levels. This helps ensure consistency and sets you up for success.
- Spatula or scraper: Use a spatula or scraper to mix your starter thoroughly and scrape down the sides of the jar. This keeps things tidy and makes it easier to monitor rise and bubbles.
- Rubber Band or Dry Erase Marker: Mark the starter’s level right after feeding to easily track how much it has risen. This is the best way to tell when your starter has doubled or peaked and is ready to use.
How to Feed a Sourdough Starter (Basic Method)

Here’s an example of how to feed a sourdough starter. The numbers can and will change based on how much starter you want and need for the recipes you are making. This is a simple 1:1:1 feeding that will show you the process:
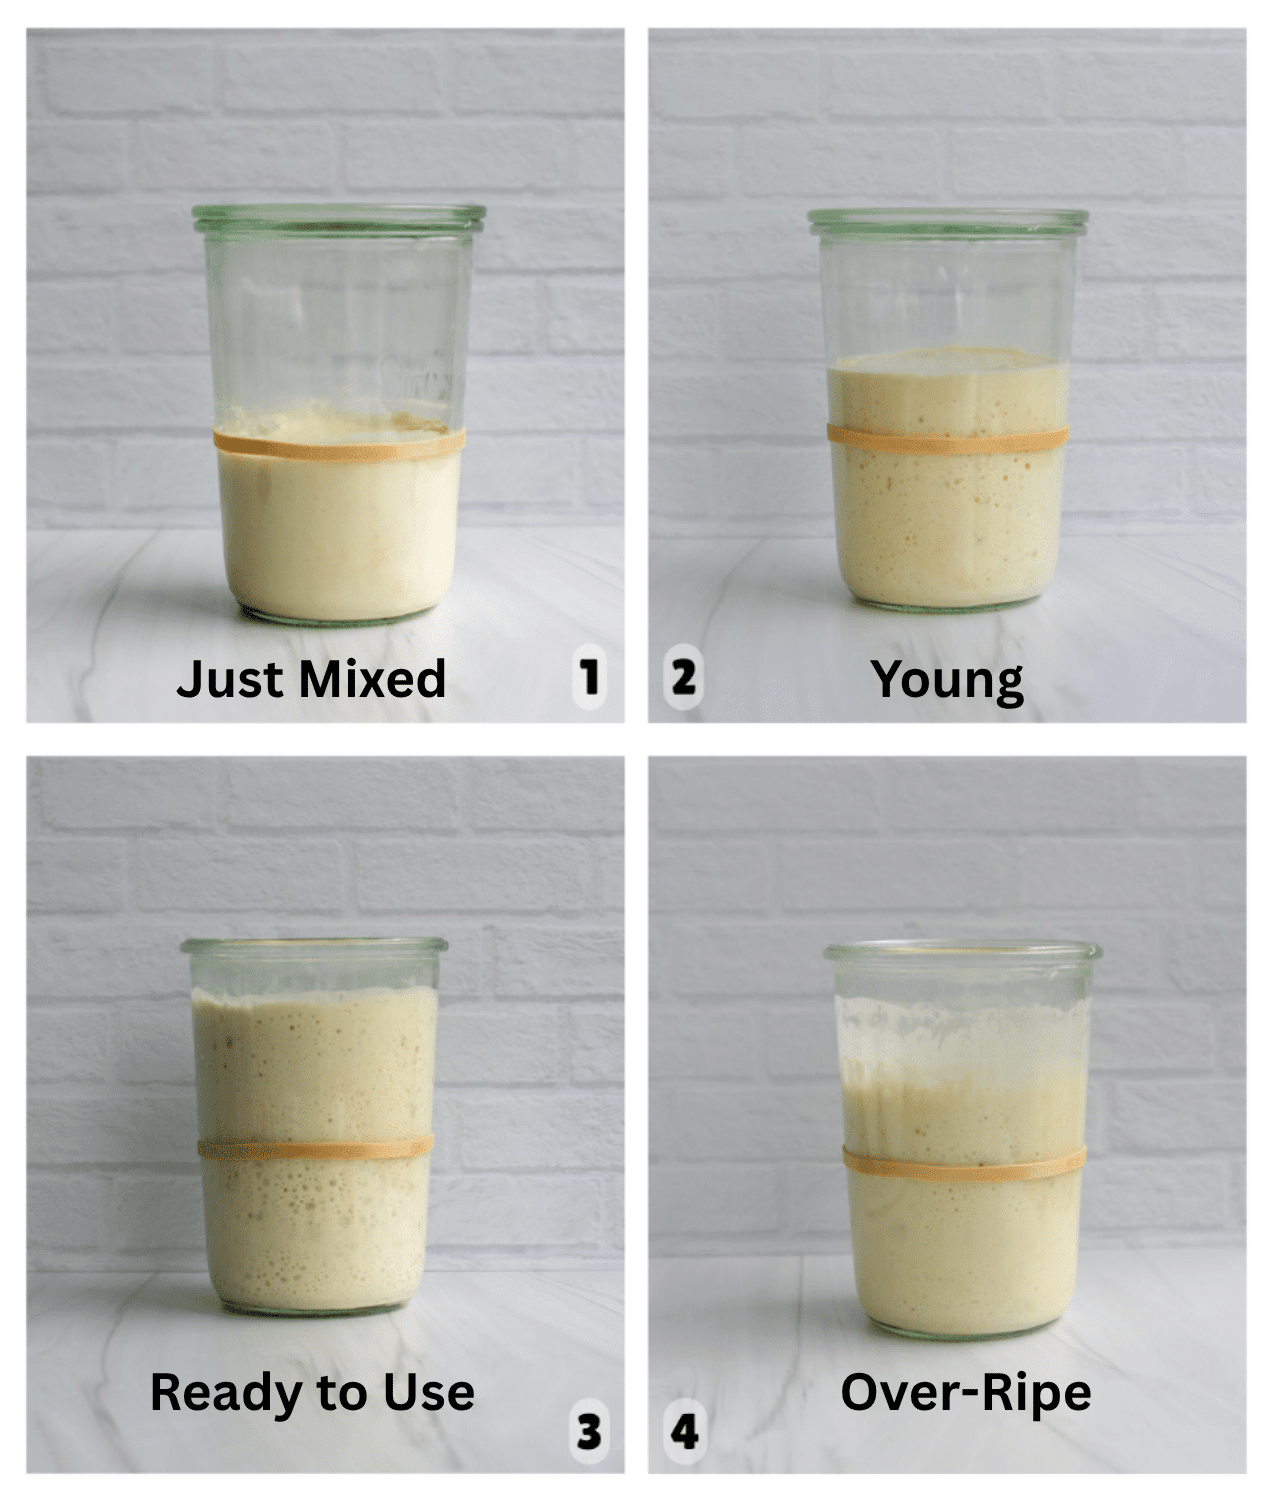
- Take 50 grams of ripe or over-ripe sourdough starter. Place it in a jar (Image 1).
- Add 50 grams flour and 50 grams water (Image 2).
- Mix together until combined (Image 3).
- Scrape down the sides of the jar and mark with a rubber band or dry erase marker (Image 4). Cover with a loose-fitting lid or plastic wrap and set in a warm place to rise.
Over the next few hours, the sourdough starter will rise until just about doubled (or tripled) in size. At that point, it has become active with many active yeast in the starter and is ready to be used in a recipe.
Sourdough Discard Tips
One key part of maintaining a sourdough starter is discarding excess starter and feeding only a small portion to make a new batch. This leftover portion, called sourdough discard, can be thrown away or used in recipes made just for discard.
Sure, you could feed all of the inactive starter to make it active again, but that often leads to way too much starter. Instead, we “discard” the extra we’re not feeding this time around. It also has the benefit of not carrying over too much acid, which can lead to a sluggish starter.
But here’s the good news: many bakers (like me!) hate wasting that discard, so we put it to good use in all kinds of delicious discard recipes. Sourdough discard is a byproduct of starter maintenance that I absolutely love using in quick bakes like muffins, crackers, pancakes, waffles, and more.
Keeping A Smaller Starter – No Sourdough Discard Method: You might decide to keep a smaller starter, which helps reduce discard in the first place. The size doesn’t matter much—you can always build more starter using basic ratios. Try this – grab a small jar, add 1–2 grams of starter, 20 grams of flour, and 20 grams of water. Mix and let it rise. Store it in the fridge until you’re ready to mix up a larger batch of starter to bake with.
My Favorite Sourdough Discard Recipes


Feeding Frequency
The more you feed your sourdough starter, the more active and strong it becomes. For a healthy, reliable starter, I like to feed it again before it completely falls back down in the fermentation cycle.
- Room Temperature: Feed daily, or even twice a day, depending on your baking schedule and how active you want your starter.
- Refrigerated: Feed once a week to keep your starter alive and ready to revive when needed.
Consistency is key. Regular feedings with the same flour-to-water ratio help build a strong, predictable starter you can count on.
What happens if you miss a feeding? Don’t worry—missing a feeding isn’t the end of the world! Just feed your starter as soon as you remember. It might look sluggish or smell extra sour, but with a little care, it’ll bounce right back.
How to Keep Your Starter Strong
A healthy starter makes good bread. It’s one of the most important parts of a great sourdough loaf. A strong, active starter should rise and fall predictably after each feeding.
To keep your starter strong:
- feed it consistently (at least once a week if stored in the fridge)
- keep it in a warm environment (76–80ºF is the sweet spot)
- use fresh flour and water
- avoid letting it sit too long without feeding, especially if it becomes very overripe
- adjust your feeding ratios as needed
If your starter seems sluggish, give it a few consistent room-temperature feedings to help build it back up to strong and active again.
Can you feed your starter too much? It’s very unlikely, but if your starter is kept warm and fed multiple times a day, it can become overly active. If this happens, try using cooler water and adjusting your feeding ratio so it takes longer to peak.
When is your Starter Ready to Use?
Your starter is ready when it has doubled in size, looks bubbly, and has just reached its peak before starting to fall back down.
For a full breakdown of each stage and exactly what to look for, read this guide: When Is Sourdough Starter Ready to Use
Signs to Look For When Sourdough Starter is Ready to Use
- Double or tripled in size
- Full of bubbles
- Domed top with starter just starting to fall back down
- Smells mildly milky sweet when it reaches peak height
- Rising and falling predictably
Fridge vs. Counter Storage
If you only bake once a week or want to keep things low-maintenance, storing your sourdough starter in the refrigerator is the way to go. Feed it just once a week, and it will stay healthy and ready when you need it.
Here’s how I use my refrigerated starter:
- I feed it using a 1:1:1 ratio (equal parts starter, flour, and water by weight).
- After feeding, I let it sit at room temperature until it has almost doubled and reached its peak.
- Then I store it in the refrigerator.
When I’m ready to bake, I check how long it’s been since my starter was last fed:
- If it’s been 24–48 hours since feeding and the starter still looks peaked, bubbly, and smells sweet and milky, I’ll use it straight from the fridge into my dough or use it to mix a levain for my dough. No need to warm it up first—just use warm water in the mixture to give it a boost.
- If it’s been longer than 48 hours or I just want to refresh my starter, I discard and feed it again. I don’t bother bringing it to room temperature—just use warm water to help kick-start fermentation. Then I let it rise until it’s nearly doubled and either:
- Use it in a recipe, or
- Stick it back in the fridge to maintain for another week.
This flexible routine keeps my starter strong and ready to go without needing daily attention. If you’re feeding your starter weekly, this method works beautifully. But if your starter has been sitting for longer or seems sluggish, just give it a couple of room-temperature feedings to revive it before baking.
How Much Should You Feed Your Starter?
The amount you feed your starter affects how quickly it becomes active and when it will be ready to use.
You can control this by adjusting:
- the amount of starter you keep (more starter = faster rise, less starter = slower rise)
- the temperature (warmer = faster fermentation, cooler = slower)
This gives you flexibility to make your starter ready when you need it, whether you’re baking the same day or planning ahead.
For example: I keep my sourdough starter around 78ºF as it is the sweet spot for wild yeast and bacteria to work together. If kept at that temperature:
- A 1:1:1 feeding (equal parts starter, flour, and water) will typically peak in about 3–4 hours, making it great for same-day baking.
- A 1:10:10 feeding (a small amount of starter with more fresh flour and water) will take longer to peak, around 10–12 hours, making it ideal for overnight use.
For a full breakdown of feeding ratios and a timing chart, read this guide:
Sourdough Starter Ratios
Feeding A Sourdough Starter Without A Scale
If you’re new to baking with sourdough, I highly recommend using a kitchen scale. Sourdough bread is a high-hydration dough (high liquid/water content), and most new bakers are still learning how it should feel and look. Using weight (grams) is much more accurate and gives you the best chance at success.
That said, if you’re using volume measurements, here are a few tips:
- Flour and water don’t weigh the same. Equal weights of flour and water are not equal in volume.
- A rough guideline is to feed 1/4 cup of starter with about 1/4 cup of water and 1/2 cup of flour.
- Mix until you get a thick batter consistency—not too runny, not too stiff.
If you choose to feed by volume, just know you’ll need to pay closer attention and be ready to adjust as you go. Be flexible—sometimes you’ll need to add more flour or water to get the right texture in your starter or your dough.

Common Issues + Troubleshooting
When you’re just getting started with sourdough, it can be a little tricky to interpret what your starter is trying to tell you. Don’t worry—it’s normal to have questions! You can check out my full list of Frequently Asked Sourdough Questions, but here are answers to some of the most common issues:
Signs Your Sourdough Starter is Hungry
- It may have some bubbles but looks flat.
- It may have a runny texture and smell overly sour or vinegary.
- You might notice a layer of hooch (a thin, grayish liquid) on top.
What to do:
Feed it with fresh flour and water! A hungry starter just needs some nourishment to get back to rising strong. You may need to feed it a couple of times at room temperature to build strength.
Sourdough Starter is Bubbling But Not Rising
- Bubbles mean there is some microbial activity, but if it’s not rising, it could be:
- Too cold (move it to a warmer spot)
- Too thin (try a thicker consistency)
- Weak (needs more frequent feedings)
What to do:
Feed it at and keep it in a warm spot (around 76–78°F). Track it with a rubber band or marker to watch for growth. As soon as it rises to its peak height, feed it again and watch for more growth. If your starter is acting very sluggish, adding in some whole wheat or rye flour to your feeding can also help.
Sourdough Starter Smells Bad
- A healthy starter smells pleasantly tangy and milky sweet. If it smells overly acidic, it needs to be refreshed.
What to do:
Don’t panic—bad smells often come from neglect. Discard all but a small spoonful of starter, then feed with fresh flour and water. Repeat this for a few feedings until it’s active and smelling healthy again.
I Killed my Sourdough Starter!
The good news? You probably didn’t.
Starters are very resilient. Even if it looks flat, separated, or smells strong, chances are it just needs a few good feedings. If there’s mold (fuzzy, pink, or orange), then yes—toss it and start over. Otherwise, give it a chance to recover. A layer of black with liquid hooch at the top actually preserves your starter in the fridge – it is not mold!
Sourdough Starter Frequently Asked Questions
Sourdough starter can last indefinitely as long as there’s no mold. Storing it in the refrigerator helps preserve it—just feed it weekly to keep it healthy.
You can also dehydrate your starter as a backup, so you always have a way to revive it if needed.
You don’t have to stir your starter, but you can if you want to. Stirring helps redistribute the yeast and bacteria, which some bakers believe promotes more even fermentation. Others skip it entirely. Personally, I haven’t noticed much difference either way—do what works best for you!
Yes, you can keep your starter on the counter if you’re feeding it daily and baking often. If you’re not planning to use it for a while, it’s best to refrigerate it to slow down fermentation and reduce the need for frequent feedings.
It’s technically possible to overfeed a sourdough starter, but it’s not likely if you’re feeding it in reasonable amounts. Feeding too frequently without giving the yeast time to ferment can dilute your starter. That said, regular feeding generally makes your starter more active and healthy—just give it time between feedings to do its job.
You can, but it’s less predictable. An inactive starter or sourdough discard won’t have as much rising power, so your bread may not rise as high or as reliably as it would with a fully active starter. For best results, use discard in recipes that don’t rely on rise—take your pick from my popular sourdough discard recipes.
New to Sourdough?
Start with my step-by-step sourdough beginner guide, or try one of the beginner-friendly recipes below.
If you’re ready to focus on baking classic artisan-style sourdough bread, you can also explore my sourdough artisan bread guide for more in-depth techniques.
If you want everything laid out step by step, I’ve put it all together in my Beginner’s Guide to Sourdough Cookbook and my online sourdough course.
Beginner Sourdough Recipes


If you have a question or used any of these tips for Feeding and Maintaining a Sourdough Starter or any other recipe on my website leave a 🌟 star rating and let me know how it went in the comments below. Happy Baking!

How to Feed and Maintain A Sourdough Starter
Save this for later!
Equipment
- sourdough starter jar with lid any 16 oz jar will work with cover
- mixing tool or spatula
- rubber band or dry erase marker
Ingredients
- 50 grams sourdough starter, about 3 Tablespoons, ripe and active or over-ripe and needs feeding
- 50 grams all-purpose or bread flour, about 1/3 cup
- 50 grams water, about 3 Tablespoons
Instructions
- Take 50 grams of ripe or over-ripe sourdough starter. Place it in a jar. Add 50 grams water and 50 grams flour. Mix together until combined. Scrape down the edges and mark with a rubber band or dry erase marker so you can judge how much the starter has risen. Cover the jar with a loose fitting lid or plastic wrap and set in a warm 78ºF place to rise.Note: This recipe shows an example of a 1:1:1 feeding ratio. I recommend a minimum of equal weights of starter, flour and water be fed at any feeding. You can adjust the actual amounts to work for you.
- Over the next few hours, the sourdough starter will go through a fermentation cycle where it will begin to rise. Once it has at least doubled in size and reaches a peak height, it will be very bubbly throughout and smell milky sweet. If your starter is being kept around 78ºF, it will be peaked and active in about 3-4 hours. At this point the starter is ripe, active and ready to be used in a sourdough recipe.
- If you do nothing to it, the starter will continue through the fermentation cycle and will fall back down. It will become runny and will need to be re-fed to be used as active starter again. Discard (throw away or store in the refrigerator to use in a discard recipe) 100 grams of the starter. Feed the remaining 50 grams of over-ripe starter with 50 grams of water and 50 grams of flour to begin the cycle again.
- Continue this cycle of feeding and then discarding the sourdough starter to keep your starter active and strong. You can re-feed the starter any time as it falls back down. At a minimum, once the starter has completed the fermentation cycle, it should be fed again. I find it helpful to change my feeding ratio, alter the temperature, and use my refrigerator to make a sourdough starter work for me (see recipe notes for more information).
Video
Notes
Nutrition
Nutrition information is automatically calculated, so should only be used as an approximation.


If you refrigerate the dough before shaping, should you let it rise before refrigerating?
It depends on which recipe you are using!
So I wonder if you can offer any advice. I don’t consider myself a newbie because I baked exclusively with sourdough about fifteen years ago, but various moves and life happened and I got out of the habit over ten years ago. I’m ready to start my sourdough journey again, so I obtained some starter from a friend but then ended up leaving it in the fridge for a month or so because of sicknesses and life craziness. So about two weeks ago I brought it out to revive. The first feeding it basically did nothing, even after over 48 hours. I kept at it, feeding it freshly milled wheat flour, warm water, keeping it in my oven with the light on… all the things. Finally, a few days ago, it rose well, so I fed it one more time for good measure, let it rise, then pulled out a small amount to make the levain for your sourdough pizza dough recipe. For the levain, I fed it with bread flour instead of wheat flour, but still used warm water and kept it in my oven. By the next morning it hadn’t risen at all (maybe half a centimeter, basically nothing). I left it alone for many more hours, it still did nothing, so last night I took some out, fed it with whole wheat flour again, warm water, put it back in the oven. By this morning it had only risen about a centimeter. I can see some bubbles but once again, it’s not really doing anything. I’m using a scale to measure everything, and I don’t know what I’m doing wrong! I’ve never had a starter not come back to life, and I’ve never babied one like this! I’ve always just kept it on my counter in the past, even though I keep my house pretty cold. But I’ve never struggled to keep a starter active before! Any other advice? I am on well water, so no chlorine. I feel like I’ve tried every tip I can find! Help! (By the way I ended up making your sourdough starter pizza dough on Sunday instead, since my levain didn’t rise, and everyone loved it! Even my non-pizza loving son!)
It sounds like your starter needs a bit more TLC to rise and fall predictably before it’ll be ready to bake with. I would start by feeding your starter a few more times so that it is rising and falling more predictably. I’m sorry it is giving you trouble!
Amy,
I need to add to my starter cause I don’t have enough for either a discard or enough to use to make all things sourdough! Can you help advise how I can make more starter with the measly amount I have currently?
Thank you Shelle
Check out this post on sourdough starter ratios. Changing your feeding ratio will change when your starter is ready to be fed again. If you feed it more frequently, then you’ll have more discard to use. You can also scale up or down your starter with your feeding ratio too. Hope that helps!
Hello! Your site is very informative and helpful. I am getting courage to take the next step and do different things with my sourdough. I did have a question around feeding the starter. I feed mine weekly, and feed it rye flour. Only when I do my bake feed do I switch to AP. I notice that my rye based starter is thicker and less like to get really bubbly when it peaks. But once I feed it AP the night before i start a bake, it’s airy and bubbly and light. Does this seem ok? My breads are fine(ish) but i always have wondered about this. Thanks!
Is there a reason you feed your starter with rye flour? I find that all purpose and bread flour do get more activity and rise. Whole wheat and rye tend to be a bit more sluggish to rise. Have you experimented with feeding your starter with half rye and half AP? You might want to play around with the ratio of rye to AP flour if you want to see different results.
i have been browsing your website…lots of great information…and I have learned a lot…I know how to make a starter, etc…have baked some bread before….however…
I click on a recipe: eg: How to make a Sourdough Loaf Bread on your website…it lists ingredients like levain, water, flour, coconut oil, honey, etc. But, it doesn’t say how much of each! I’ve searched the whole article, but don’t see it.
can you send me the recipe? listing how much starter, how much water, how much flour, etc., and how much of the other ingredients?
If you click “jump to recipe” or scroll all the way to the bottom you will find the recipe card with complete amounts and directions. Happy baking!
Hi Amy,
I’ve been growing my starter for 3 weeks & although there’s a bubbly top, it appeared to have an amber liquid below it & the rest of the starter. I’m using bread flour to feed with filtered tap water. The starter has never doubled or grown, apart from the bubbly top. Should I throw out the starter & start again? I first started the starter with rye flour & discarded it for the first week of growing. But have not discarded in the last 2 weeks.
If the liquid is pink or orange, that can be a bad sign and you would need to re-start your starter. Otherwise, you might be describing hooch, which is a normal by-product of sourdough (not sure which color hue of amber your starter is). You may need to keep feeding it and give it more time. A starter should be fed regularly (every 12-24 hours) to start rising and falling predictably. As part of that process, you should be discarding the excess. Hope that helps!
Thank you for the detailed information!
So glad you found it helpful! Happy Baking!
I have recently purchased the sourdough starter jar kit that has a temp band on it, exactly how do I use it? I will be making a loaf this weekend and would like to incorporate this into my baking. Thank you so much, I have learned so much from this article. Keep the great recipes coming.
The temperature band is helpful so that you know the temperature of your sourdough starter. It can help you predict how long it will take your starter to rise and be ready to use. You can read more about sourdough and temperature here: https://amybakesbread.com/beginner-guide-how-temperature-affects-sourdough/
I made a starter and when it was ready, I made a loaf of bread that did not turn out well. Meanwhile I put the starter in the refrigerator for 24 hours as was not expecting to make more bread right away. I had discarded and fed the starter before refrigerating. Once i realized i wanted to make a new loaf, I took out the starter, discarded and fed the starter and now I am on my third round of feeding and discarding every 12 hours and have not seen any bubbles or rising. I admit last night my starter went down in the 60s for a part of the time (this was during the 2nd round of discarding/feeding). I discarded and fed again at the 12 hour period this morning. Should i just keep discarding/feeding until the starter comes back to life or do i need to do something else. Thank you in advance.
I would keep up that discarding and feeding. How old is the starter? If that was your first loaf and it didn’t turn out well it’s possible the starter needed a few more days of feeding – the more you feed it, the more active the starter becomes.
How can I print this article out? I’m old school and like to study , highlight , and re read content to learn.
I’m not sure if you can print it out. It will depend on your computer. I do have all of this information and more coming out in my new cookbook in September: https://amybakesbread.com/cookbooks/
Thank you!! sorry for the repeat messages. 🙂 have baked several things. Your recipes are great!!
Glad you are enjoying them!