Affiliate disclosure: This post may contain affiliate links. Please see our disclosure policy.
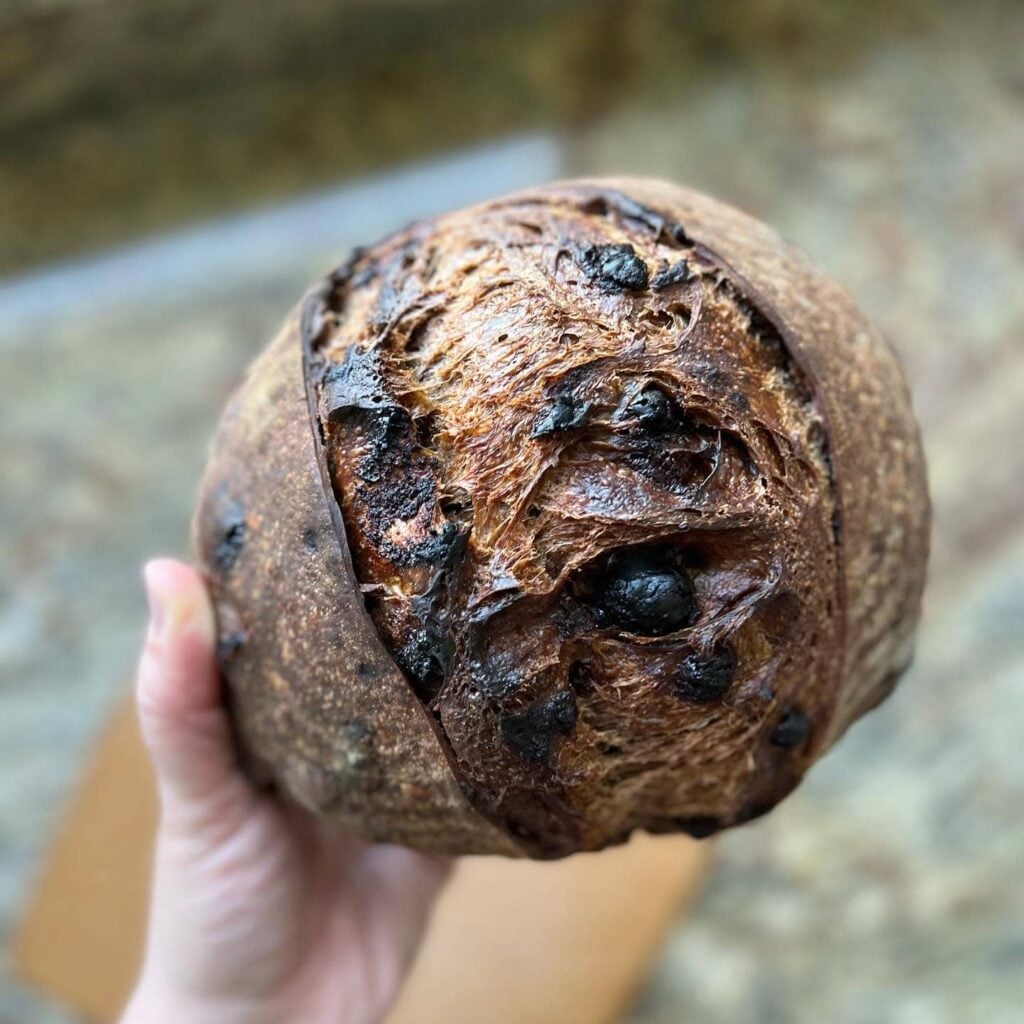
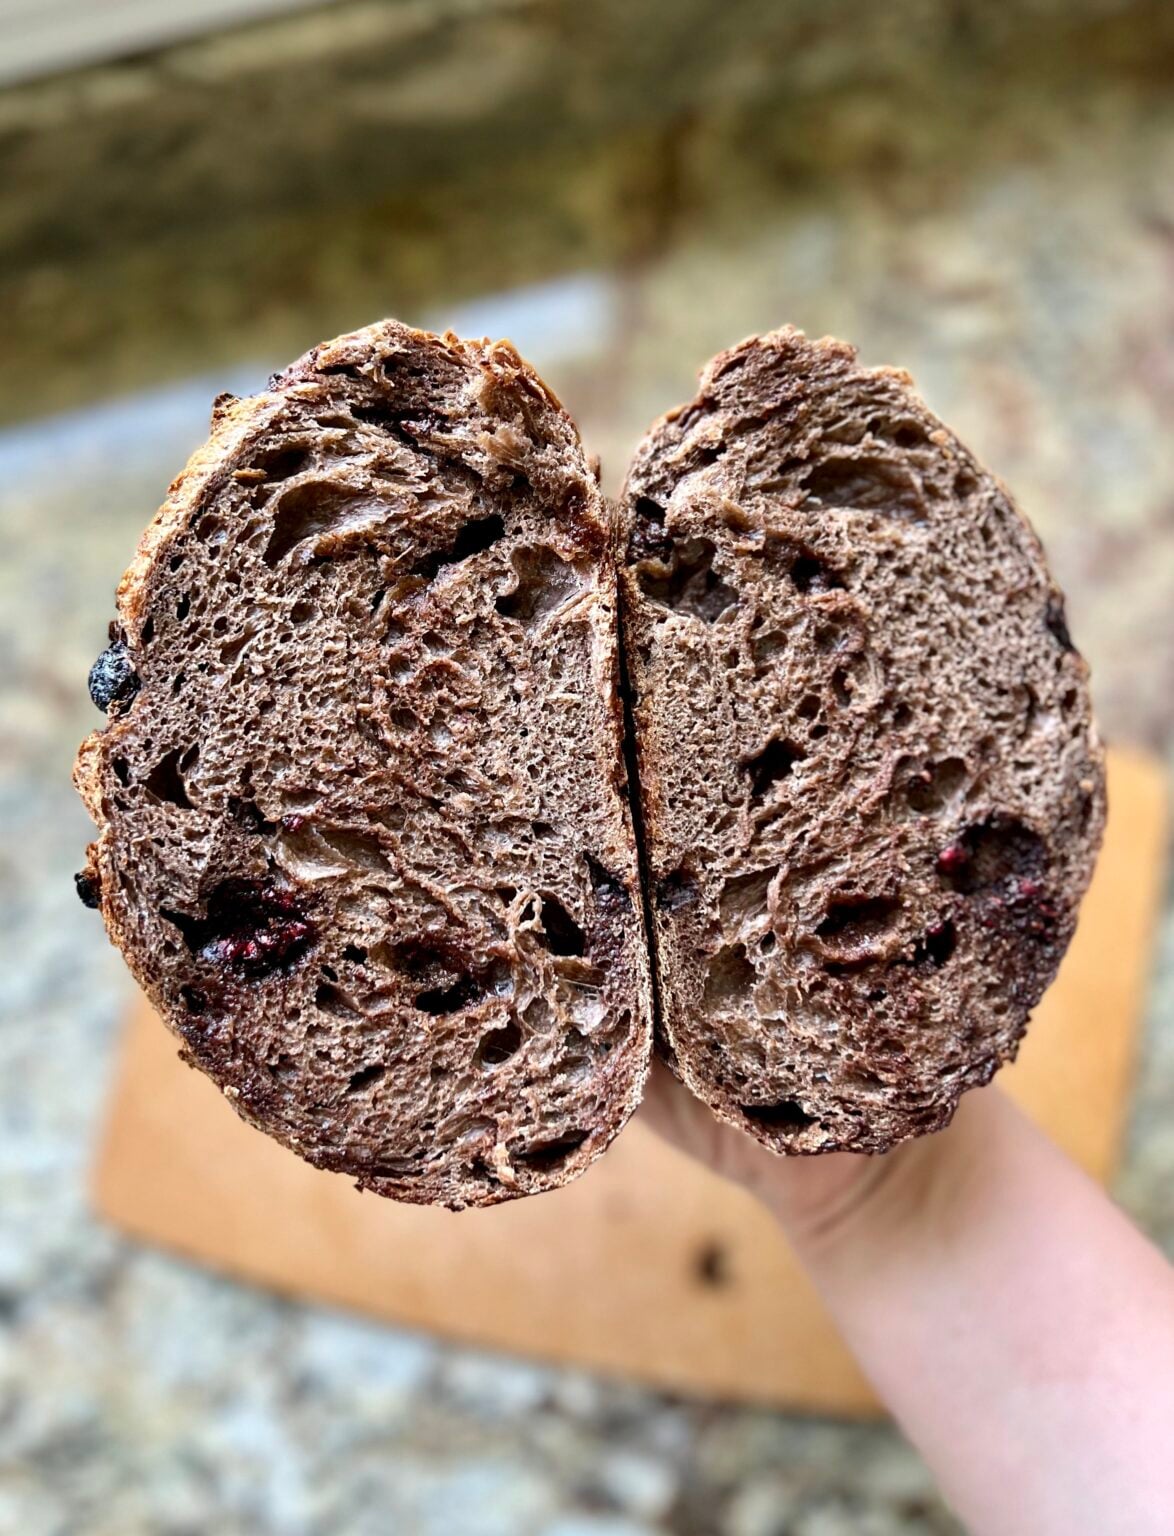
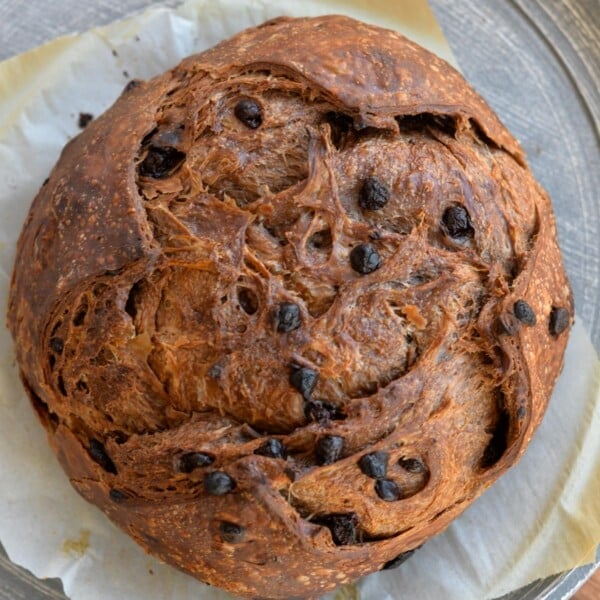
I’m a chocolate lover through and through, so of course I had to create this Double Chocolate Sourdough Bread. With cocoa in the dough and chocolate chips scattered throughout, this loaf delivers rich chocolate flavor with double the chocolate. It starts with bloomed cocoa powder, giving it a soft, tender crumb and just enough sweetness to feel special without being overpowering.
Add in some chocolate chips or chopped chocolate, just like my favorite Sourdough Chocolate Chip Brioche, and the result is a chocolate lover’s dream come true! Pockets of chocolate throughout a tender chocolate dough. You’ll want to make it ASAP – along with my rich Chocolate Sourdough Focaccia Bread or even more buttery Sourdough Chocolate Croissant Loaf!
Save this for later!
Table of Contents
- Quick Look: Sourdough Chocolate Bread
- Why You’ll Love Chocolate Sourdough Bread
- Important Ingredients
- Substitutions
- Sourdough Baker’s Timeline
- How to Make Chocolate Sourdough Bread
- How to Store Leftovers
- Amy’s Recipe Tip
- Frequently Asked Questions
- Popular Chocolate Sourdough Recipes
- Chocolate Sourdough Bread Recipe
Quick Look: Sourdough Chocolate Bread
- Prep Time: 30 minutes
- Fermentation Time: 26 hours
- Bake Time: 45 minutes
- Total Time: 27 hours, 15 minutes
- Servings: 16 slices
- Calories: ~156 kcal per slice (based on nutrition panel)
- Cook Method: baked in a Dutch oven
- Flavor & Texture: soft, deep chocolate flavor with a crispy outside
- Difficulty: Medium – this loaf uses more advanced sourdough and baking techniques; an autolyse, lamination and blooming the cocoa power.
Why You’ll Love Chocolate Sourdough Bread
- Chocolatey – Just like my Chocolate Sourdough Focaccia Bread, this recipe uses a bloomed cocoa powder method for a rich chocolatey bake that is rich and delicious. For more chocolatey goodness, check out my roundup of The Best Chocolate Sourdough Recipes.
- Chocolate Artisan Sourdough Loaf – I love an artisan loaf with a sweet twist. Sourdough doesn’t mean sour bread, and this is a delicious sweet loaf. For more sweet artisan loaves, try my Apple Cinnamon Sourdough Bread or this Almond Croissant Sourdough Loaf.
- 100% Sourdough Recipe – This is a loaf made with sourdough starter for a fully fermented and natural rise. For a sourdough discard chocolate loaf, try this Chocolate Muffin Sourdough Bread too!
- Slightly Sweet- This loaf is lightly sweet (not dessert-sweet), making it perfect for breakfast, brunch, or a sweet snack.
New to Sourdough? If you are new to sourdough, learn how to make a sourdough starter from scratch and check out my Free Sourdough Beginner Guide. Using naturally fermented sourdough will take much longer, but you will love the fermentation benefits and the flavor!
Important Ingredients
- Sourdough Starter – Use an active/ripe sourdough starter (doubled in size/bubbly/mild sour aroma) to mix the levain.
- Dutch Processed Cocoa Powder: Using a dark/dutch processed cocoa powder gives this chocolate croissant sourdough bread a rich chocolate flavor.
- Coconut Oil – This recipe calls for coconut oil. The coconut oil softens the crumb and helps bloom the cocoa powder when heated. You can substitute any neutral flavored oil.
- Sugar – Granulated sugar adds just a little bit of sweetness to this loaf that counterbalances the unsweetened cocoa powder.
- Bread Flour – I use bread flour at 12.5% protein content in this recipe.
- Salt – Salt enhances the flavor, don’t leave it out!
- Milk Chocolate Chips – Milk chocolate makes this chocolate bread sweet. If you prefer to use a semi-sweet or dark chocolate, the bread will not taste as sweet but will still be delicious. Choose your favorite chocolate chips to add to the dough.
See the recipe card for full information on ingredients and quantities
Substitutions
- Sourdough Starter: Use an active starter instead of the levain in this recipe.
- Chocolate Chips: I use milk chocolate chips in this recipe, but you can substitute with semi- sweet chocolate chips or even dark chocolate chips if you prefer.
- Bread Flour: This loaf would also work with all-purpose flour. I would decrease the water by about 20 grams if substituting all-purpose flour for the bread flour.
- Coconut Oil: I don’t think this bread tastes like coconut, but you can substitute any neutral flavored oil instead of the coconut oil in this bake if you prefer.
- Add-Ins: This recipe already includes chocolate chips, but I think dried cherries, chopped nuts, or another dried fruit would work really well among other inclusions you could add to this sourdough bread.
Sourdough Baker’s Timeline
A sample baking schedule helps me when baking with sourdough. Sourdough takes much longer to rise than traditional bread. This schedule helps me plan my bake.
A few notes: This schedule assumes the dough temperature is 78ºF throughout the process.
| Day 1 | Levain/Mixing/Bulk Fermentation/Shaping/Cold Fermentation |
| 8:00 AM – 11:30 AM | Mix Levain. Let sit at 78 degrees F for about 3-4 hours until doubled/bubbly and ripe. |
| 10:50 AM | Bloom Cocoa Powder: Mix together coconut oil and cocoa powder. Warm in the microwave or on the stove until bloomed. Let cool before adding to the dough. |
| 11:00 AM | Autolyse: Mix bread flour and water, let sit for 30 minutes to an hour until levain is ready. |
| 11:45 AM | Begin Bulk Fermentation Mix Dough |
| 12:15 PM 12:45PM 1:15 PM 1:45 PM | Stretch and Fold #1 Stretch and Fold #2 Stretch and Fold #3 Laminate Dough and add chocolate chips |
| 3:45 PM | Bench Rest |
| 4:15 PM | Shape Dough Begin Cold Fermentation |
| Day 2 | Bake |
| 9:00 AM | Bake and Enjoy! |
How to Make Chocolate Sourdough Bread
Mix the Levain
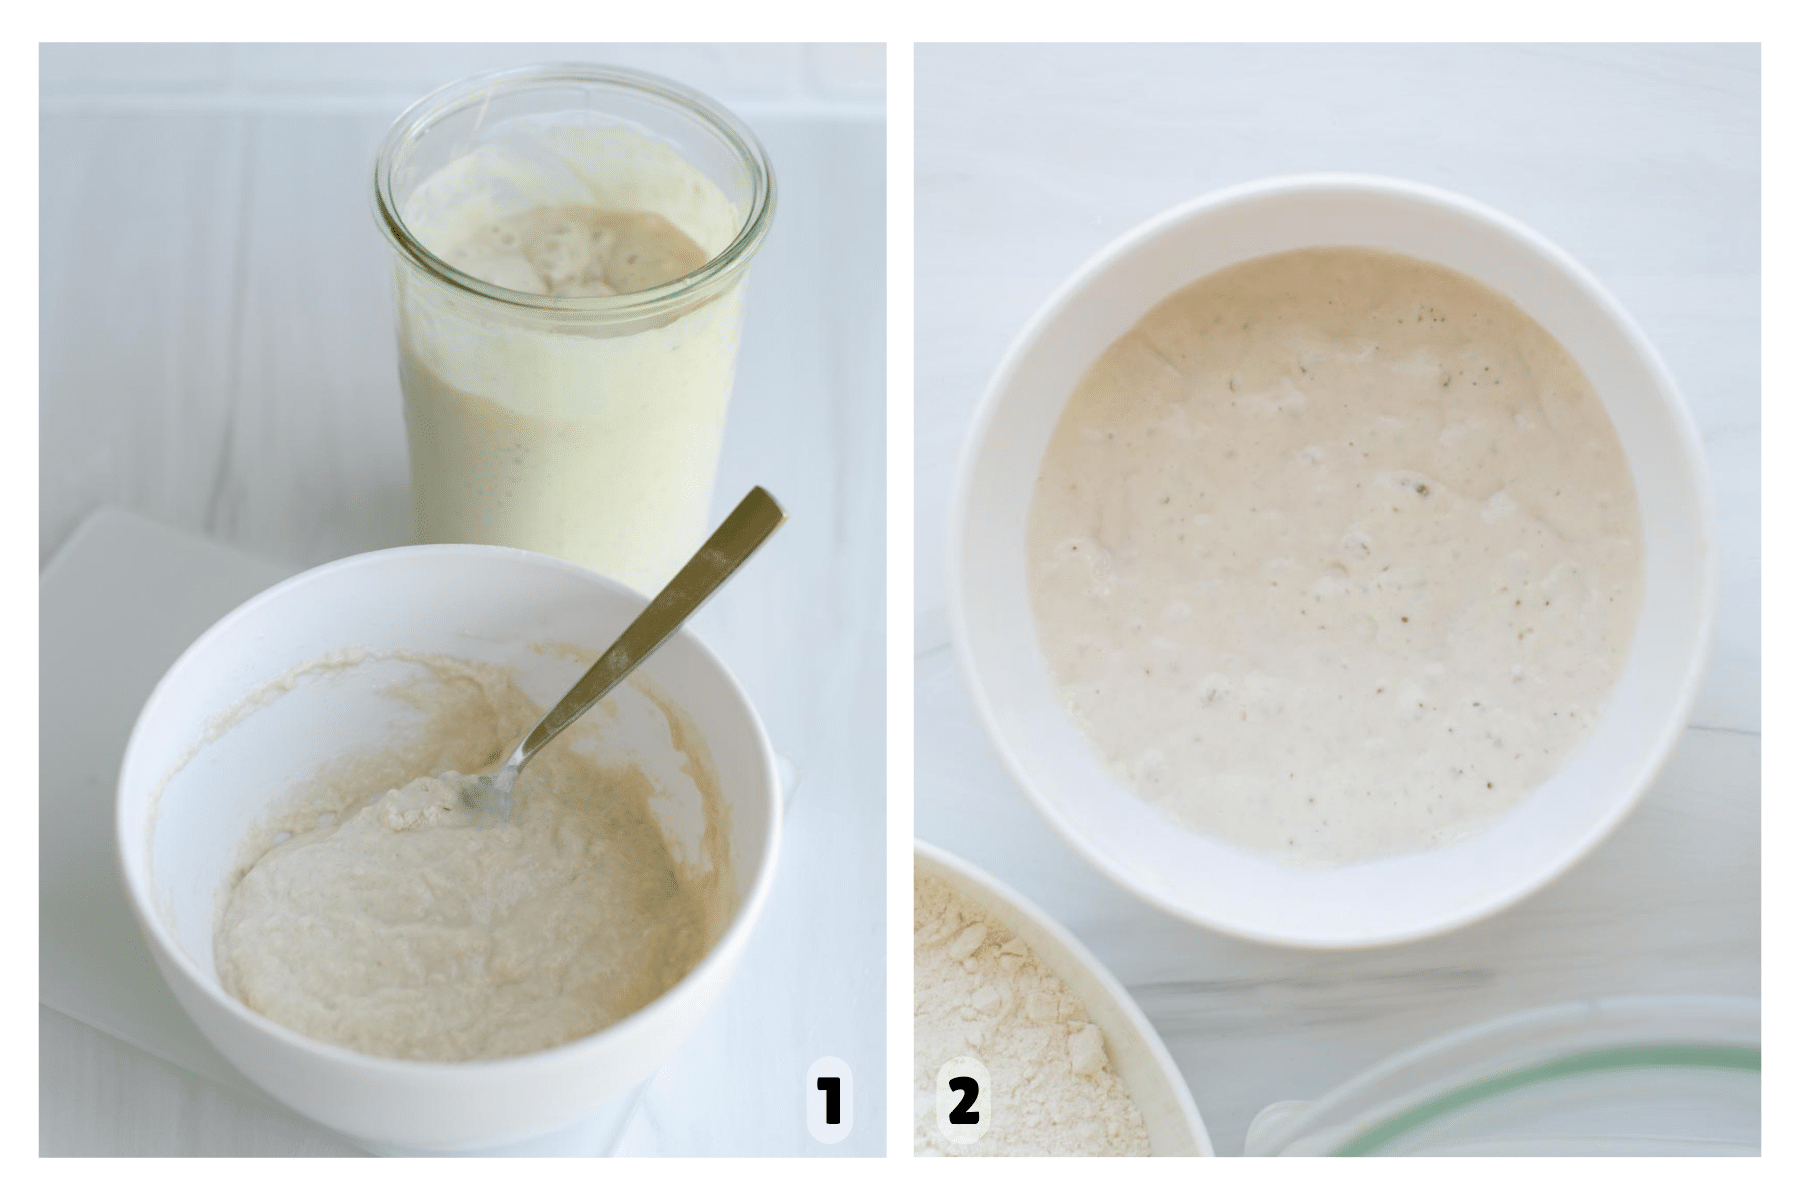
Step 1: Mix Levain. This recipe calls for a 1:1:1 levain mixed the same day you mix the dough. It should take 3-4 hours until it’s ready to be mixed with the dough, if you keep the levain temperature at 78ºF. Combine the ripe starter, water, and bread flour (Image 1). The levain is ready when it has doubled in size, has lots of bubbles, a slightly sour aroma and is just about to start going down from its peak height (Image 2).
If you prefer to mix the levain the night before, you can mix a 1:10:10 Levain that is ready in 12 hours or overnight. Combine 50 grams of water, 50 grams of bread flour, and 5 grams of mature sourdough starter. Let rest overnight until it has doubled in size and is bubbly and active.
Sourdough Starter: If you have a ripe, bubbly active sourdough starter, you can substitute it for the levain in the recipe. 100 grams of levain is equal to 100 grams of sourdough starter.
Bloom the Cocoa Powder
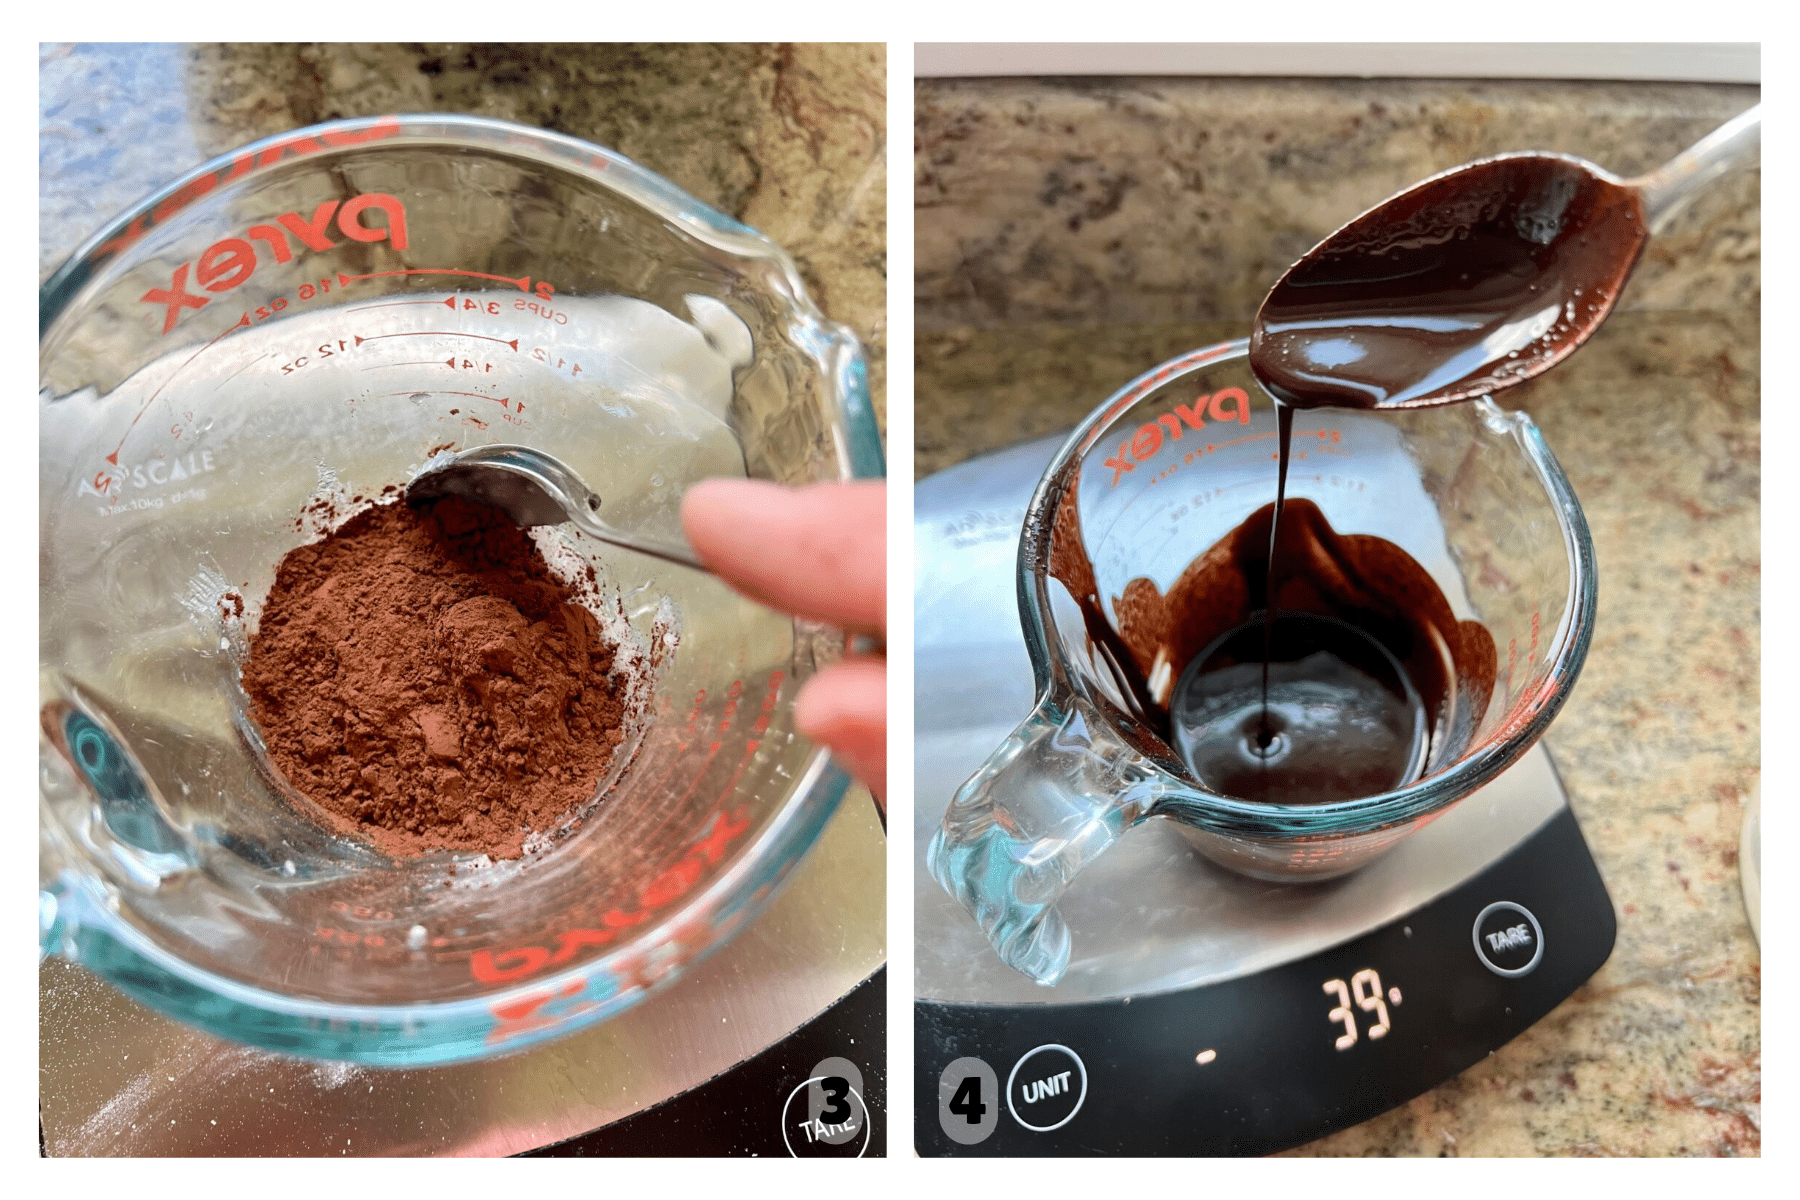
What is “Blooming” Cocoa Powder? “Blooming” cocoa powder is a process of mixing liquid (oil in this case), with cocoa powder before adding it to the recipe. This process helps the cocoa powder release its full flavor potential. It deepens and makes the chocolate flavor more intense.
Step 2: About an hour before mixing the dough, warm the coconut oil and cocoa powder together over the stove or in the microwave. It doesn’t need to come to a boil, but should be fairly warm. Stir together until combined (Images 3 & 4). Let cool completely before using in the recipe.
Mix the Dough
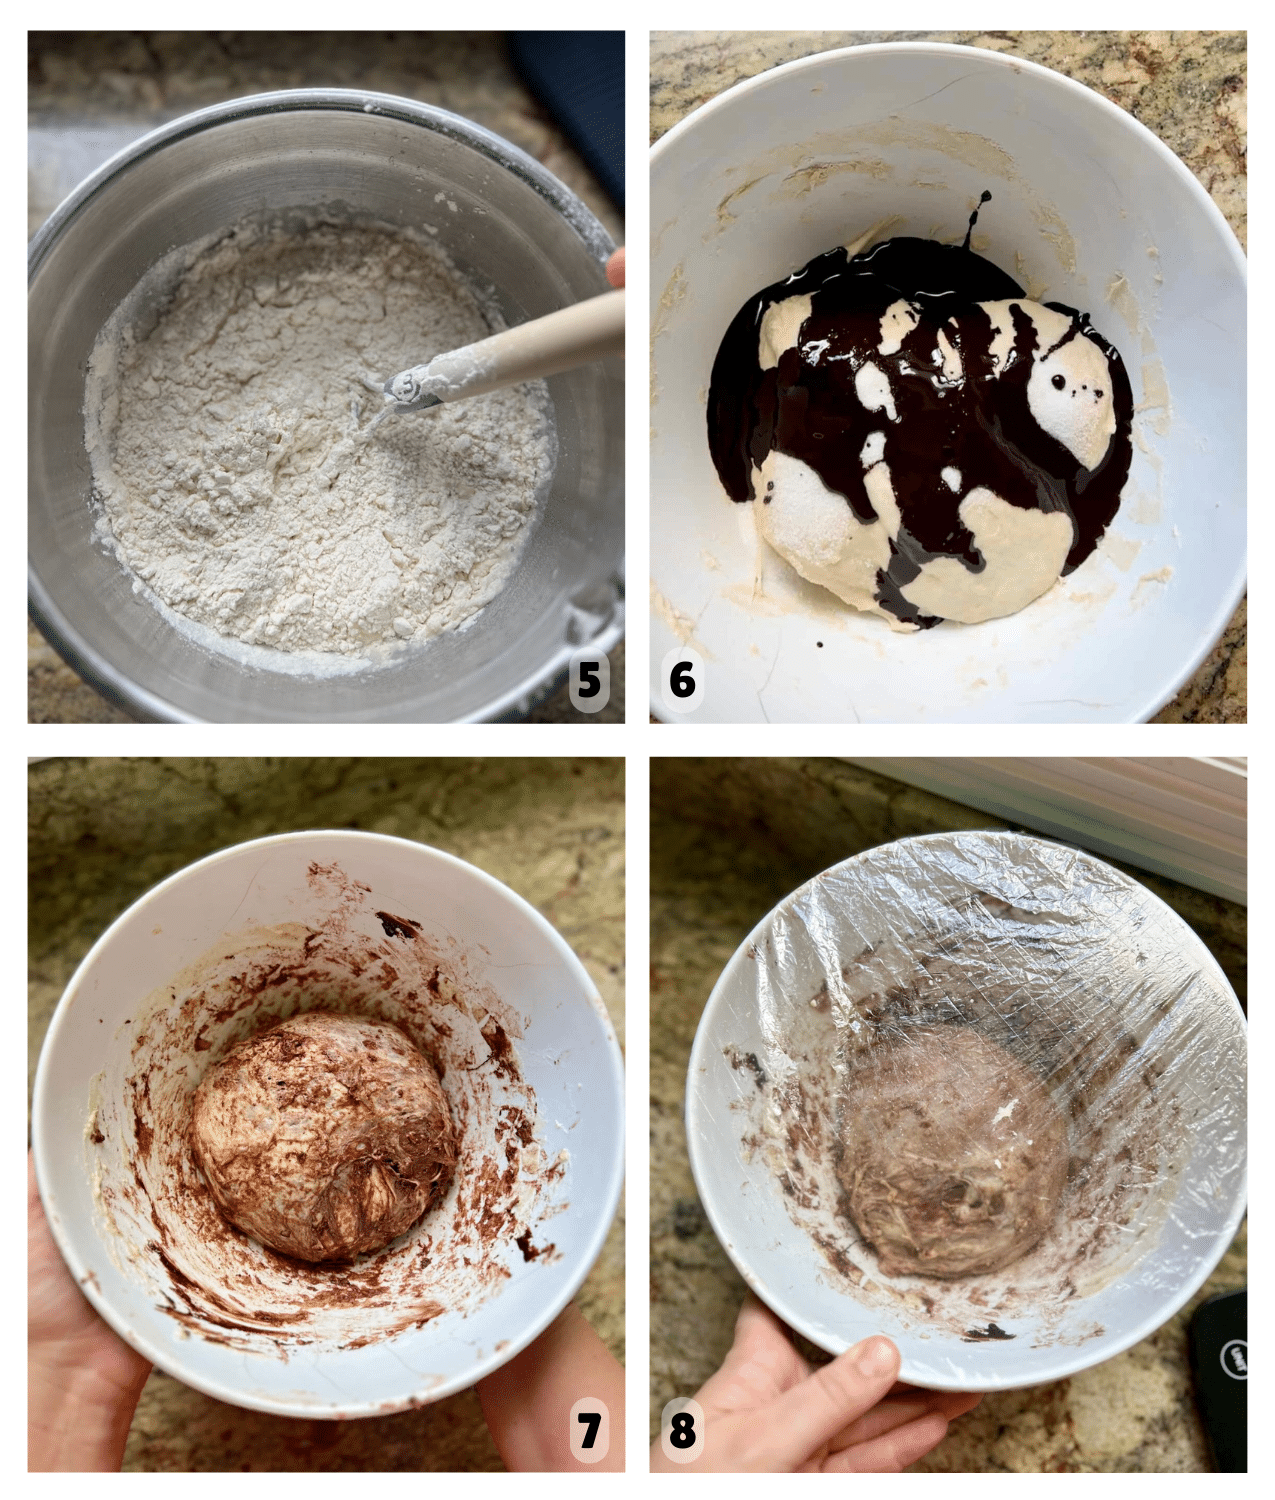
Step 3: Autolyse. I use an autolyse method in this double chocolate sourdough bread. It helps strengthen the gluten strands in the dough and gives a better overall texture and crumb to this bread. An hour before the levain is ready, mix together the bread flour and water in a large bowl (Image 5). Cover the dough and let it rest for an hour.
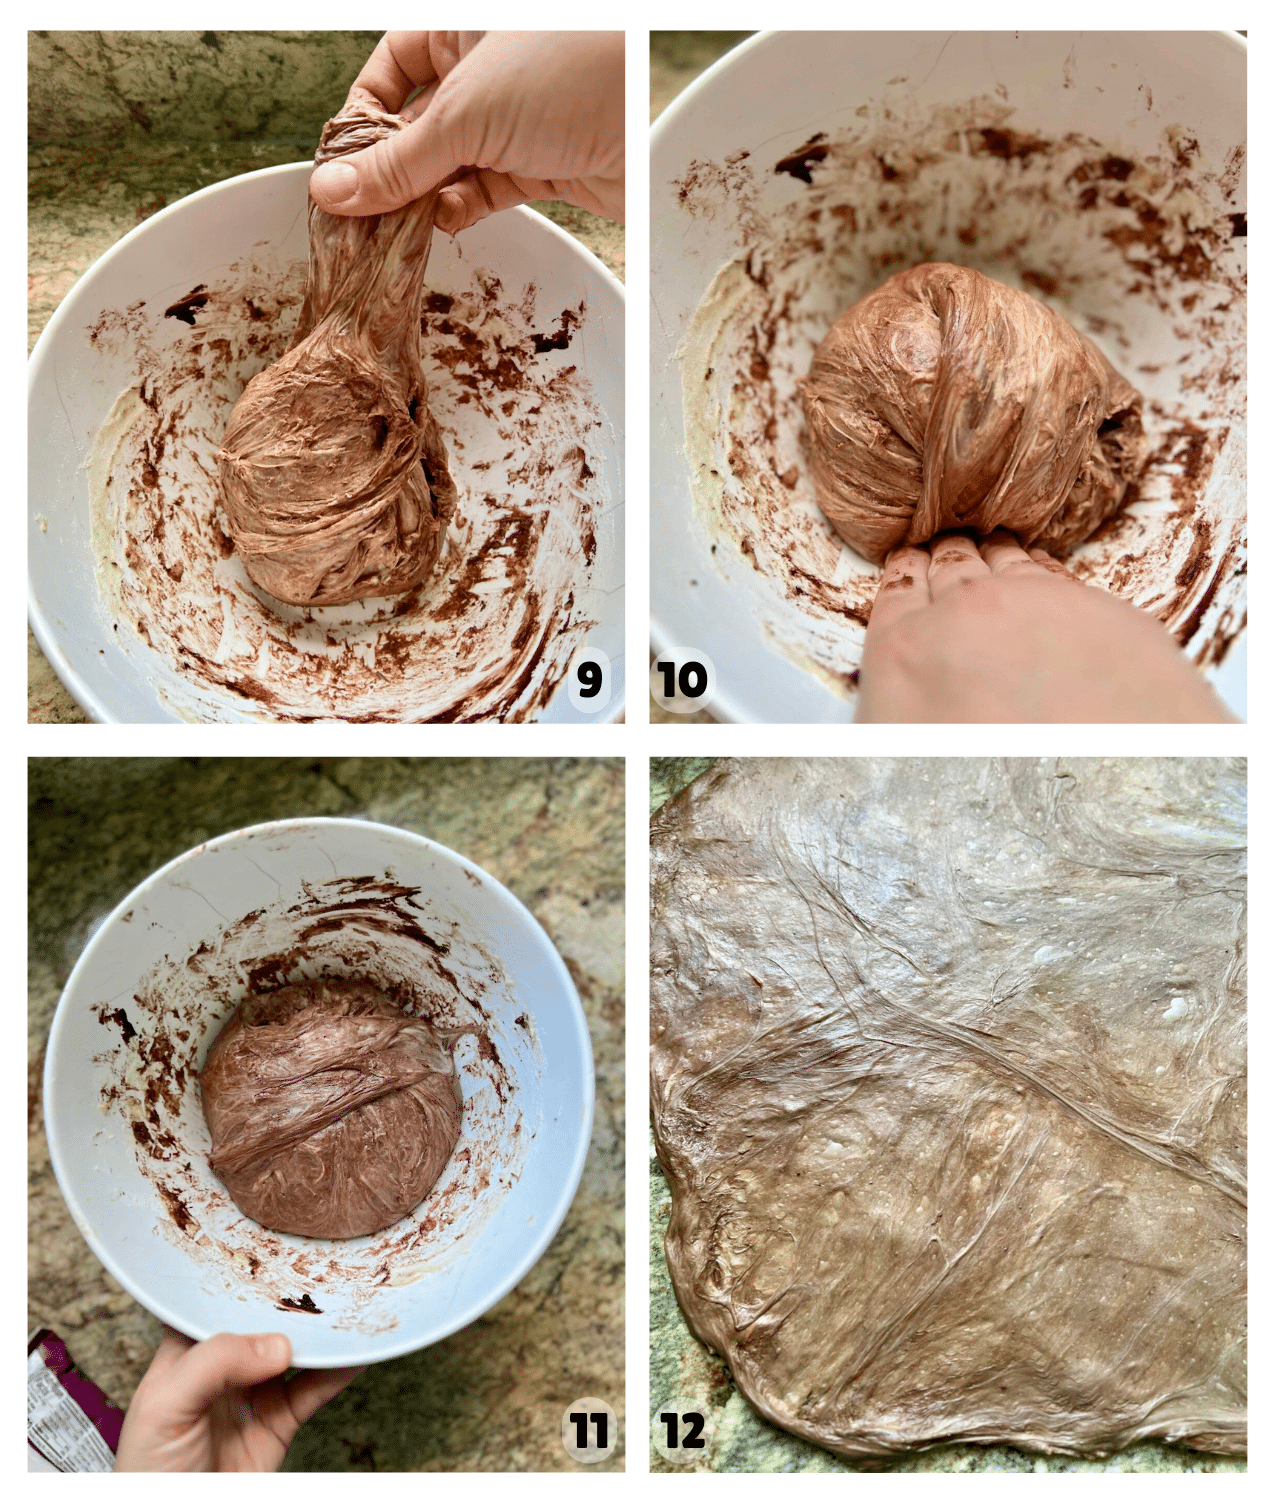
Step 4: Mix the Dough. Add the sugar, salt, ripe levain and cooled cocoa mixture to the autolysed dough (Image 6). Pinch chunks of dough and reincorporate them together gently. Pick up one side of the dough and fold it over on itself. The dough will be sticky. Wet your hands as needed and continue to work with the dough, gently kneading until all the ingredients are incorporated and the dough is smooth (Image 7). Transfer the dough to a plastic container or a glass bowl if desired and cover (Image 8).
Do I have to autolyse? You don’t have to. If all of your ingredients are ready at the same time, you can mix everything together at once. The dough may not be quite as well developed, but it will still bake up and taste great.
An autolyse simply gives the dough a head start. When flour and water sit together, gluten begins forming and aligning on its own, which helps strengthen the dough before mixing.
Bulk Fermentation
Step 5: Bulk Fermentation. The total bulk fermentation time is around 4-5 hours, from the time the levain is mixed in the dough to when the dough is shaped and then put in the refrigerator. During this bulk fermentation, I do some sets of stretch and folds and use the lamination method to add the chocolate chips to the dough.
Stretch and Fold: To “stretch and fold,” use a wet hand (so it doesn’t stick to the dough). Reach down to the bottom of the bowl of dough and pull the dough up and over the top of the dough (Images 9 & 10). Turn the bowl 1/4 turn and repeat the stretch and fold. Turn another 1/4 turn and repeat. Perform one more 1/4 turn with stretching and folding the dough (Image 11). Cover and set aside. Let rest for 30 minutes and then repeat the series of stretch and folds. You will complete a total of 3 sets of stretch and folds, waiting 30 minutes between each. Watch the stretch and fold video here.
Lamination: 30 minutes after your third set of stretch and folds, stretch the dough onto a clean counter as thin as you can without tearing it (Image 12). When the dough is fully stretched, sprinkle 3/4 of the milk chocolate chips over the dough. Fold the dough up and sprinkle the rest of the milk chocolate as you fold the dough up into a little package and place it back in the bowl. Cover and let rise. This step helps strengthen gluten strands and gives even disbursement to the chocolate.
Finish the bulk fermentation by letting the dough rest for another 1-2 hours until it has risen about 40% and has scattered bubbles across the surface.
What About Temperature? Temperature plays a role in how long this bread takes to rise. I like to keep my dough around 78ºF for the best and most predictable results. If your dough is cooler, it will take longer to rise, and you’ll want to wait for a higher percentage rise before shaping. Warmer dough will rise faster and will need to be shaped earlier to avoid overproofing.
Shape the Dough

Step 6: Pre-Shape/Bench Rest. Once the dough has risen about 30-40%, has a few bubbles scattered around the top and feels extensible and aerated, it’s time to shape the dough. Prepare a banneton or small bowl. Place a kitchen towel or hair net in the bowl and liberally flour. If you use the hair net, you may not need to use much flour. Pre-shape the risen dough by dragging it into a circle on the countertop, using a bench scraper or your hands and letting the dough rest for about 30 minutes uncovered.
Step 7: Shape. After letting your dough rest for about 30 minutes, it’s time to shape! Going around in a circle, pull the dough to the side and then gently fold it on top of itself, repeating until you have a package of dough that is tightly pulled into a round or oval shape, depending on which shape you plan to bake (Image 13). Place the shaped loaf into the prepared banneton or bowl.
Amy’s Tip: If you use a hair net liner in your banneton there’s no need to add any extra flour when shaping. This is my preferred method.
Cold Fermentation
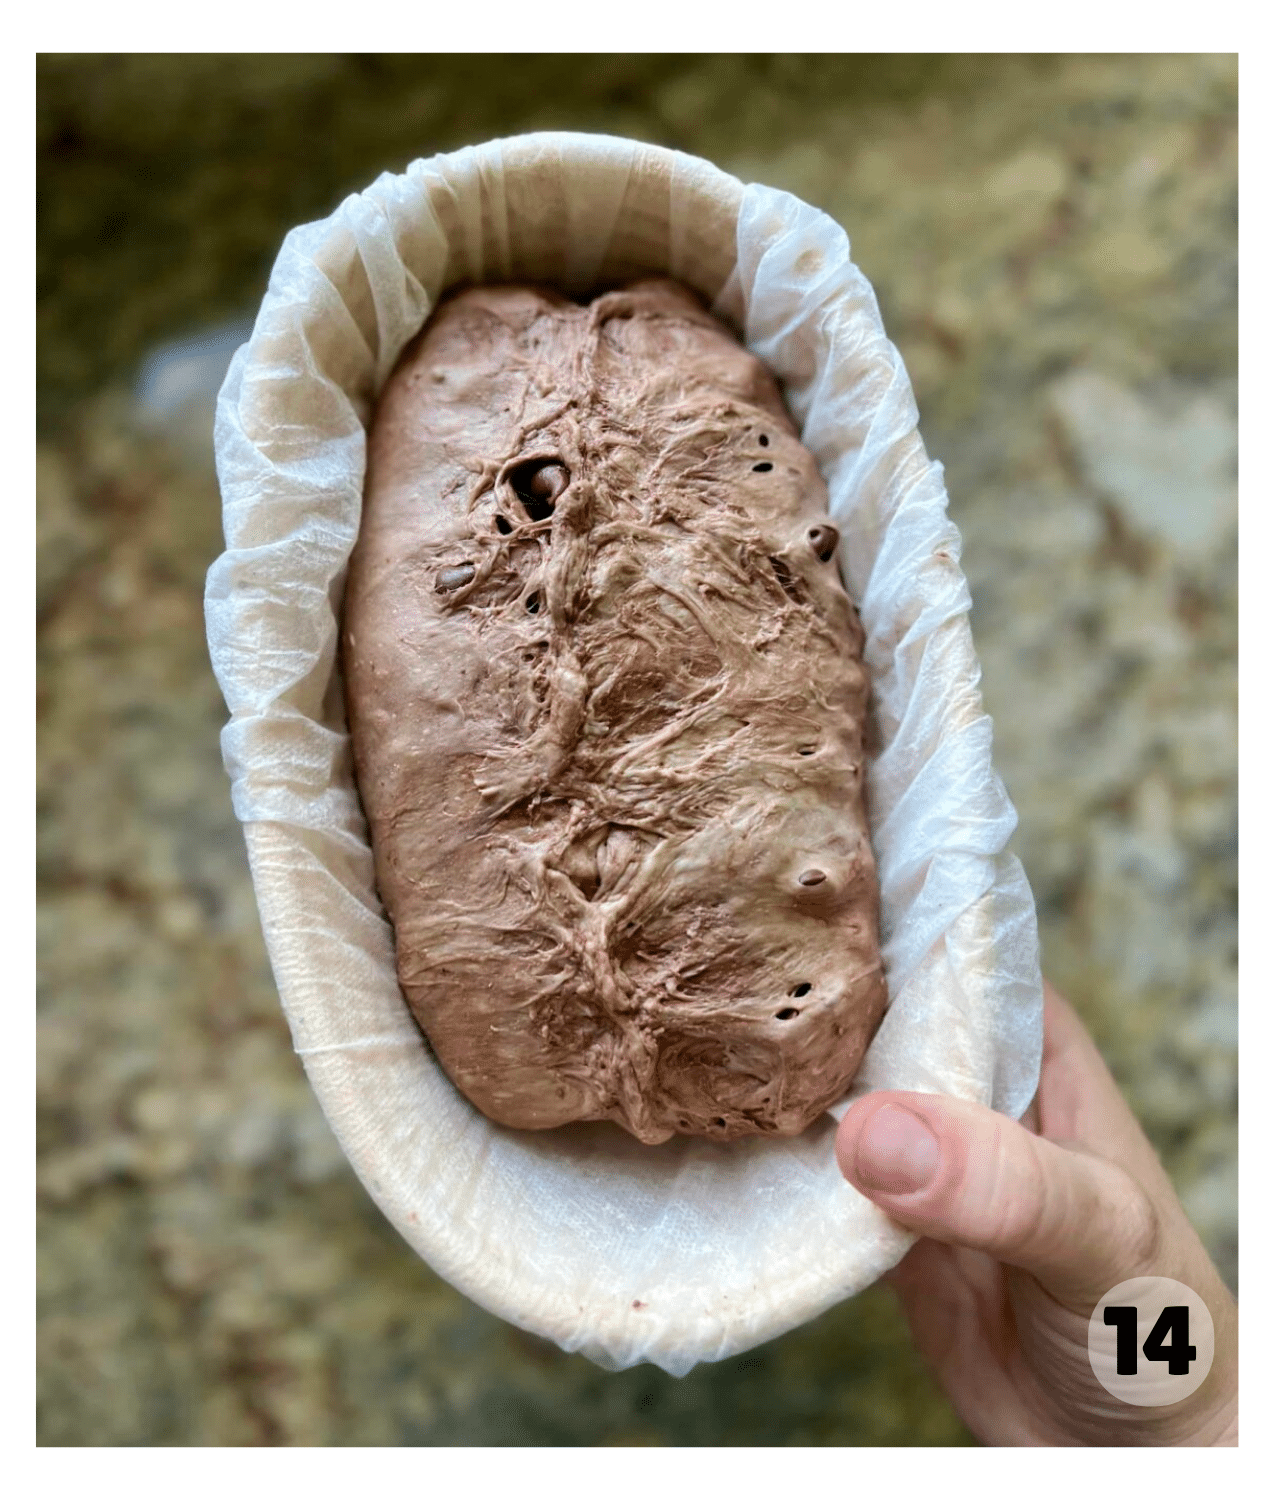
Step 8: Cold Fermentation. Cover the banneton basket or bowl with plastic wrap or a plastic shower cap and place it in the refrigerator for 14–20 hours (Image 14). If it goes a little longer, that’s usually fine, up to 48 hours, depending on the temperature of your refrigerator.
Same Day Baking: If you’d like to bake this loaf the same day, let it finish rising for about 2–3 hours, then chill the dough for 30 minutes to 1 hour before turning it out, scoring, and baking.
Bake the Chocolate Sourdough Loaf
Step 9: Pre-heat the Oven: Put a dutch oven (top and all) into the oven and preheat to 450ºF. Allow the dutch oven to heat for about 30 minutes at 450ºF.
No Dutch Oven? No Problem! Learn how to bake sourdough in a loaf pan instead!
Step 10: Scoring the Dough: Once preheated for 30 minutes, pull the loaf out of the refrigerator. Remove the plastic wrap (this is easy to do straight out of the refrigerator if the dough is chilled –not easy if the dough warms up) and place a piece of parchment paper on top of the bread dough. Flip the dough over so that it is now sitting on the parchment paper, seam-side down.
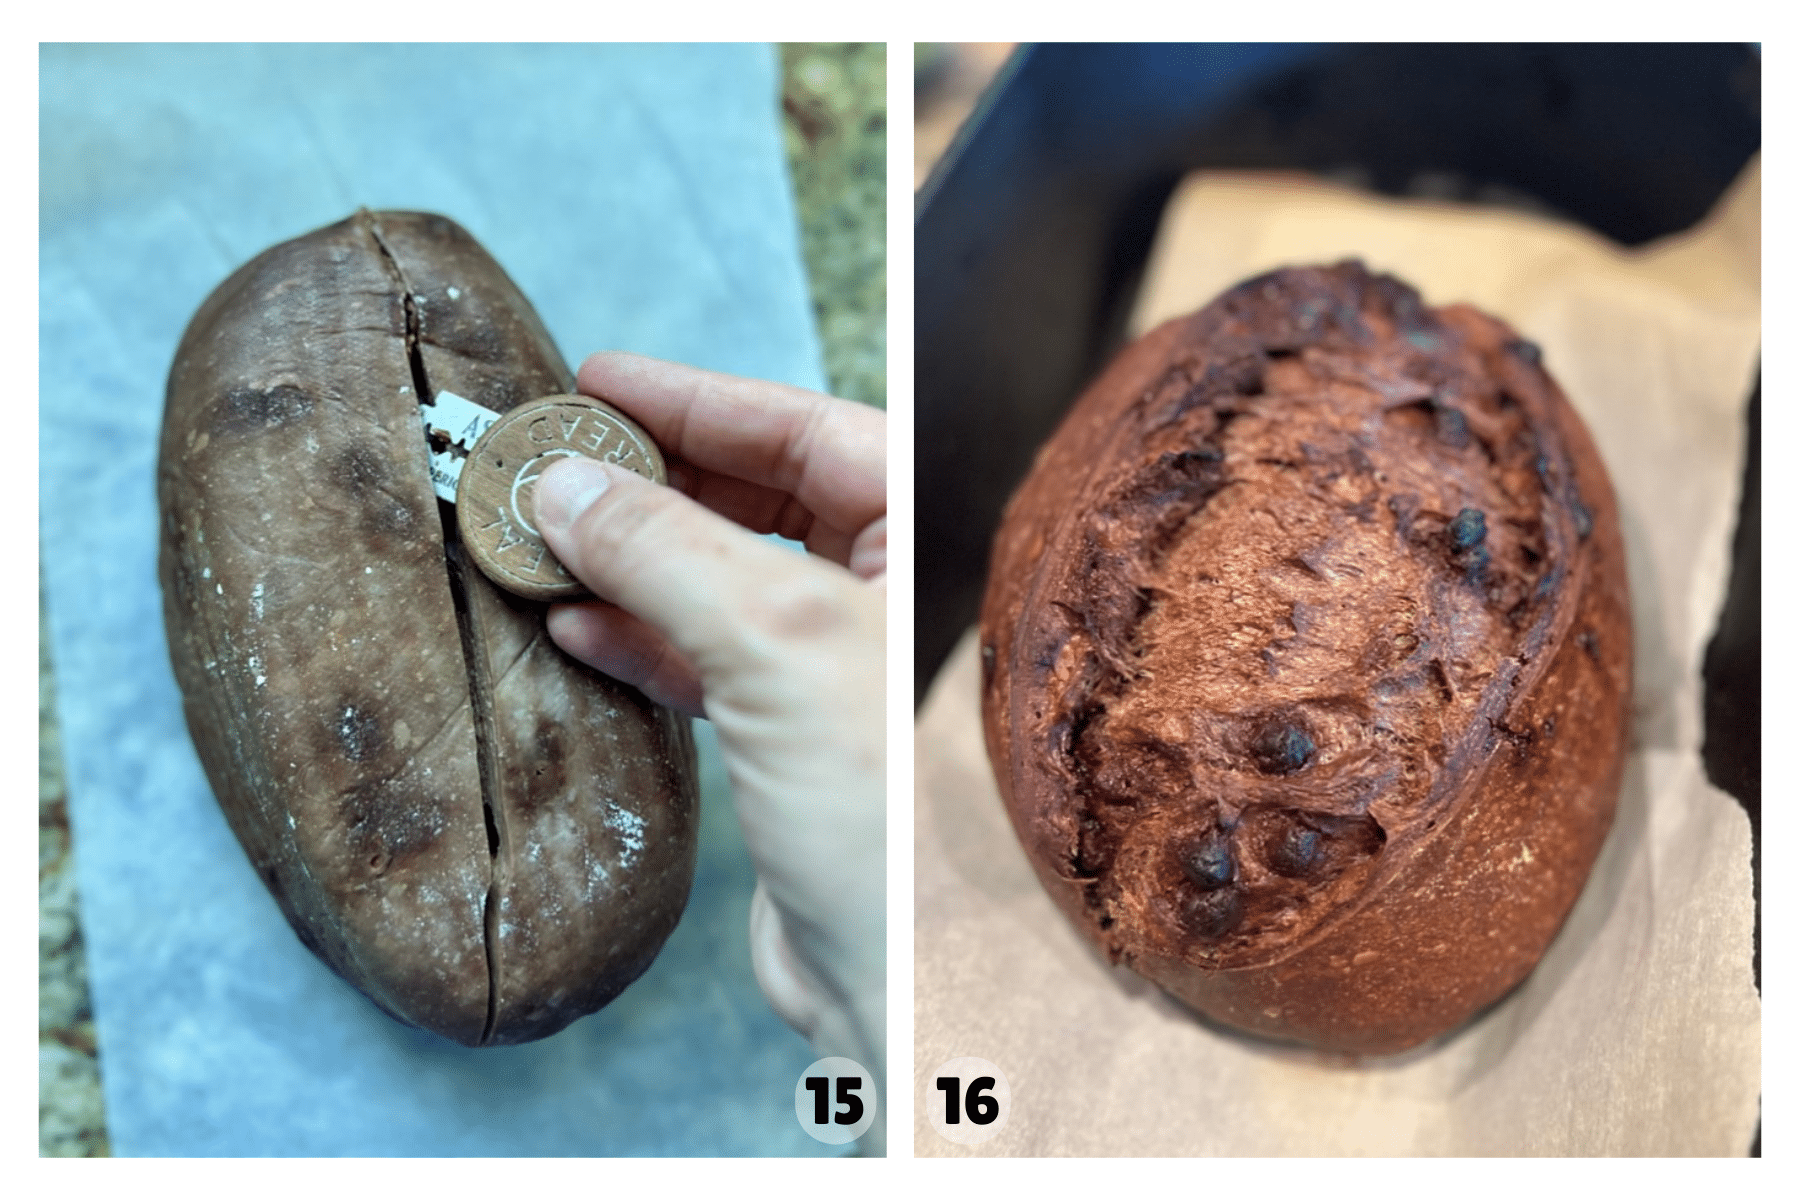
Take off the bowl/banneton and kitchen towel. Smooth the flour over the top of the dough (add a little extra for more contrast if desired) or leave the flour off completely for no contrast. Use a bread lame, razor blade or very sharp knife to score the dough (Image 15).
Bake the Bread: Carefully remove the dutch oven with hot pads. Take the top off and place the dough into the dutch oven (including parchment paper – this helps with the transfer). Be very careful not to touch the sides of the dutch oven. Put the dutch oven into the oven. Bake for 25 minutes.
Once 25 minutes are up, take the top off the dutch oven. Reduce the temperature to 400ºF and continue baking for 20 minutes until the bread is fully baked and registers an internal temperature of 205-210ºF (Image 16). Remove to a wire rack to cool completely before slicing. Enjoy!
Baking Change: I used to preheat the Dutch oven to 500ºF and bake the loaf at 450ºF for the entire bake. Because this loaf contains a little more sugar, I found it could brown too quickly and occasionally burn at those higher temperatures. I’ve since adjusted the baking temperatures to help prevent over-browning while still getting a great rise and crust.
How to Store Leftovers
Let the loaf cool completely, then slice and freeze in an airtight container or zip-top bag for up to 3 months. You can even put sheets of parchment paper between each slice if your slices stick together. Thaw at room temperature or toast straight from the freezer.
Amy’s Recipe Tip
- Don’t Judge by Color: Because the dough is already dark from the Dutch-processed cocoa, it’s hard to tell when it’s “browned.” Use an instant-read thermometer to ensure the center has reached 205-210°F to avoid a gummy center.
- Prevent Bottom Burning: Because of the sugar in the dough and the chocolate chips, this loaf is more prone to scorching when baked at high temperatures. To prevent burning, place a baking sheet on the rack below the Dutch oven to deflect heat, or add a thin layer of uncooked rice to the bottom of the Dutch oven. Place parchment paper over the rice before setting the dough inside.
Frequently Asked Questions
Yes. You can substitute any flavor of chocolate you like. I usually prefer a darker chocolate but with the rich cocoa flavor in this loaf I like the sweetness the milk chocolate brings.
Use any neutral-flavored oil in place of the coconut oil. Coconut oil makes the crumb of this loaf extra soft, which I love, but any oil should work.
Yes. I love adding freeze dried chocolate covered raspberries to this chocolate sourdough bread recipe.
Popular Chocolate Sourdough Recipes


If you tried this Chocolate Sourdough Bread or any other recipe on my website leave a 🌟 star rating and let me know how it went in the comments below. Happy Baking!

Chocolate Sourdough Bread
Save this for later!
Ingredients
Levain (1:1:1, about 3-4 hours at 78-80ºF)
- 35 grams ripe sourdough starter, bubbly/active/doubled in size, about 2 Tablespoons
- 35 grams flour, about 1/4 cup
- 35 grams water, about 2 Tablespoons
Chocolate Sourdough Bread
- 20 grams coconut oil, about 2 Tablespoons
- 20 grams cocoa powder, about 3 Tablespoons
- 450 grams bread flour, about 3 1/4 cups
- 300 grams water, about 1 1/4 cups
- 100 grams levain, scant 1/2 cup
- 20 grams granulated sugar, about 4 teaspoons
- 7 grams salt, about 1 teaspoon
- 100 grams milk chocolate chips, see recipe notes, about 2/3 cup
Instructions
Day 1: Levain/Mix/Bulk Fermentation/Shape/Cold Fermentation
- Levain: Make levain by mixing together ripe sourdough starter, flour and water. Set aside for 3-4 hours at 78-80ºF.
- Autolyse: About an hour before the levain is ready, mix together the bread flour and water. Let rest for about an hour.
- Bloom Cocoa Powder: About an hour before mixing the dough, warm the coconut oil and cocoa powder together over the stove or in the microwave. Let cool completely before using in the recipe.
- Mixing: Add ripe levain, sugar, salt and bloomed cocoa mixture to the top of the dough. Pinch chunks of dough and reincorporate them together gently. Pick up one side of the dough and fold it over on itself. The dough will be sticky. Wet your hands as needed and continue to work with the dough until it is smooth and all the ingredients are mixed and the dough is smooth. Transfer the dough to a plastic container or a glass bowl if desired.
- Bulk Fermentation: Over a total of 3.5-4 hours, perform 3 sets of stretch and folds every half hour and a resting period. This schedule assumes the temperature of the dough is 78-80ºF. If it's colder than this, bulk fermentation will take longer. Warmer dough will move faster.
- To “stretch and fold,” wet your hand (so it doesn’t stick to the dough). Reach down to the bottom of the bowl of dough and pull the dough up and over the top of the dough. Turn the bowl 1/4 turn and repeat the stretch and fold. Turn another 1/4 turn and repeat. Perform one more 1/4 turn with stretching and folding the dough. Cover and set aside. Watch a video of the process here.
- Stretch and Fold #1: 1 hour into bulk fermentationStretch and Fold #2: 30 minutes later, stretch and fold againStretch and Fold #3: 30 minutes later, stretch and fold again. You should notice the dough feeling more cohesive and strong during this stretch and fold, and not needing very much folding to come together.
- Lamination: 30 minutes later, on a clean counter top, stretch the dough as thin as you can without tearing it. When the dough is fully stretched, sprinkle 3/4 of the milk chocolate chips over the dough. Fold the dough up and sprinkle the rest of the milk chocolate as you fold the dough up into a little package and place back in the bowl. Cover and set aside. See post for pictures.
- Finish Bulk Fermentation: Finish the last 1.5 hours of bulk fermentation with the dough covered at 78ºF. You will notice the dough puff up and rising about 30-40% before proceeding with shaping.If your dough is cooler, this will take longer and you will want to look for a larger percentage rise before shaping the dough.
- Pre-Shape: Tip the bowl upside down, allowing the dough to fall onto a clean counter surface. Be gentle to avoid degassing the dough as much as possible. Wet your hands and the bench knife if needed and push the bench knife under the dough on one side and your free hand on the other side to tuck the dough under itself. The goal is to introduce some tension into the dough. Repeat this process, going around in a circle until you have a ball of dough, tucking the chocolate chips that pop out back under the dough if possible.
- Bench Rest: Let the dough rest uncovered for about 30 minutes at room temperature. The dough will flatten a bit during this period of time. This allows the gluten in the dough to relax and prepares the dough to be shaped.
- Shaping: Prepare a bowl or banneton. Place a kitchen towel or hair net in the bowl and liberally flour as needed. Sprinkle a little flour on top of the dough if desired. Using a bench knife, lift the dough up off the counter and place it on top of the countertop – floured side down. This ensures that the flour is staying mainly on the outside of the dough.Going around in a circle, pull the dough sideways towards you and then fold up to the top of the round. Move 90 degrees and repeat the same process pulling the dough sideways and then folding up to the top. As you continue this process around the dough, increase the tension as you pull. Gather the bread into a circle and place into a lined bowl. If any of the chocolate chips pop out of the dough, remove them or stick them on the bottom side of the bread dough.Note: It is possible to shape the dough without any extra flour. The dough can stick to the kitchen towel but doesn't stick to the hair nets if cold proofed.
- Cold Fermentation: Cover the dough with the tea towel/shower cap/plastic wrap and refrigerate overnight or up to 14-20 hours. If you want to bake the same day, you can let the dough rise for about 2-3 hours until puffed up and risen. Then bake according to recipe directions.
Day 2: Bake the Bread
- Preheat the oven: Put a Dutch oven (top and all) into the oven and preheat to 450°F for 20 minutes. You are working with very high temperatures, so make sure you have some good hot pads. Once preheated for 20 minutes, pull the loaf out of the refrigerator. Remove the covering. Place a piece of parchment paper on top of the dough. Flip the dough over so it is now sitting on the parchment paper. Take off the bowl/banneton and the kitchen towel.
- Scoring: Smooth the flour over the top of the dough (add a little extra for more contrast if desired) or leave the flour off completely for no contrast. Use a bread lame or very sharp knife to score the dough. Take the bread lame and score an X into the center of the dough, about 1/2 to 1 inch deep. Score straight from the refrigerator on the cold dough for best results. This is not a loaf for intricate scoring.
- Bake: Carefully remove the dutch oven from the 450ºF oven with hot pads. Take the top off and place your bread into the dutch oven (including parchment paper – this helps with the transfer). Be very careful not to touch the sides of the dutch oven. Put your hot pads back on before you pick up the lid of the dutch oven and place it on top of the bread. Put the whole dutch oven back into your oven. Bake at 450ºF for 25 minutes. After 25 minutes, take the lid off the Dutch oven and reduce the temperature to 400ºF. Continue baking for 20 minutes until the bread is baked through and reaches 195-200ºF temperature. Remove the Dutch oven and let the bread cool on a baking rack. Enjoy!
Notes
Nutrition
Nutrition information is automatically calculated, so should only be used as an approximation.


Loved this recipe, just made it and added 50g of espresso to replace some of the water. It added a deep, rich taste to the bread. Have a feeling this one won’t last long!
Yum! Thanks for sharing.
Lovely flavour, plan to use leftovers in a bread and butter pudding
Yum! That sounds like a great way to use up these leftovers. Enjoy!
Wow! This is delicious. I followed your recipe but made 3 mini loaves to share. They came out beautiful.
I’m glad they turned out great! Thanks for the review.