Affiliate disclosure: This post may contain affiliate links. Please see our disclosure policy.

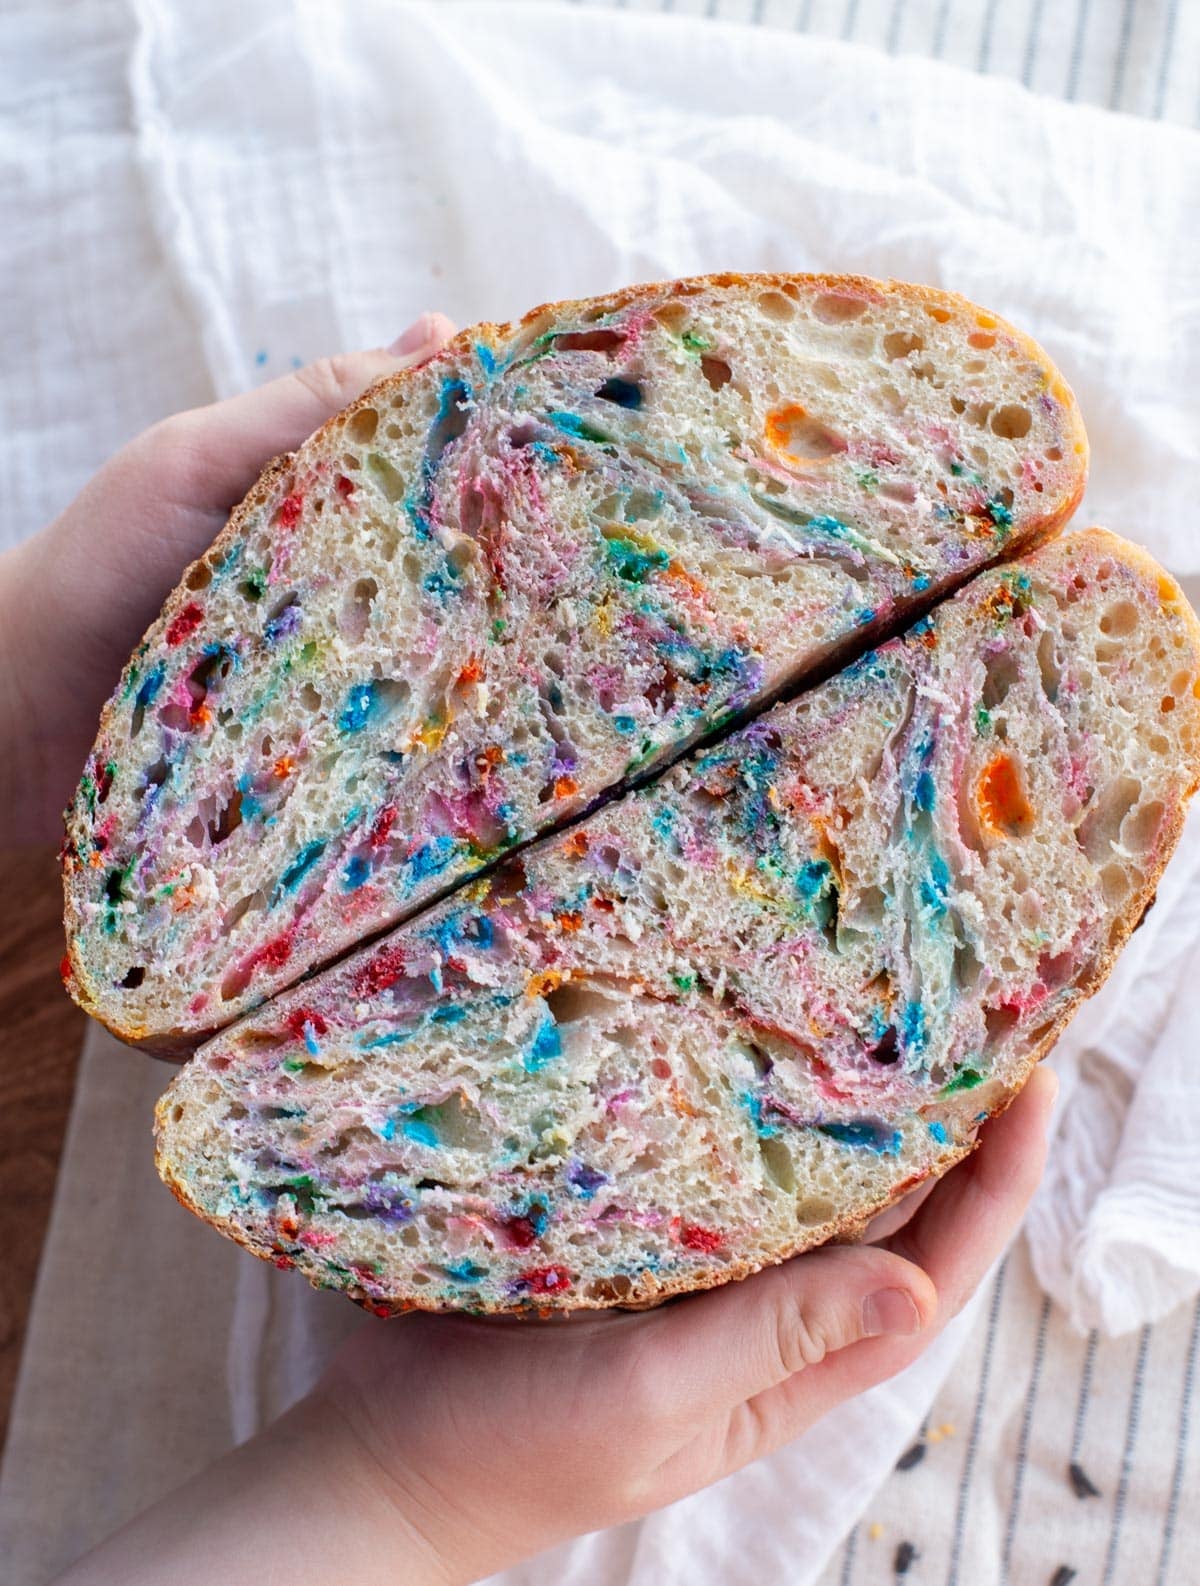
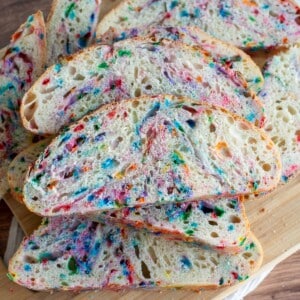
This loaf is ready to party! Funfetti Sourdough Bread is a playful twist on a classic artisan loaf, combining naturally leavened dough with colorful rainbow sprinkles and a hint of vanilla-almond flavor. The result is a soft, tender crumb with just enough sweetness to feel special without turning it into cake.
This loaf is perfect for birthdays, celebrations, or any day that could use a little extra joy – and my kids LOVE it! Whether you serve it toasted with butter or enjoy it straight from the cutting board, this funfetti sourdough is guaranteed to bring smiles with every slice.
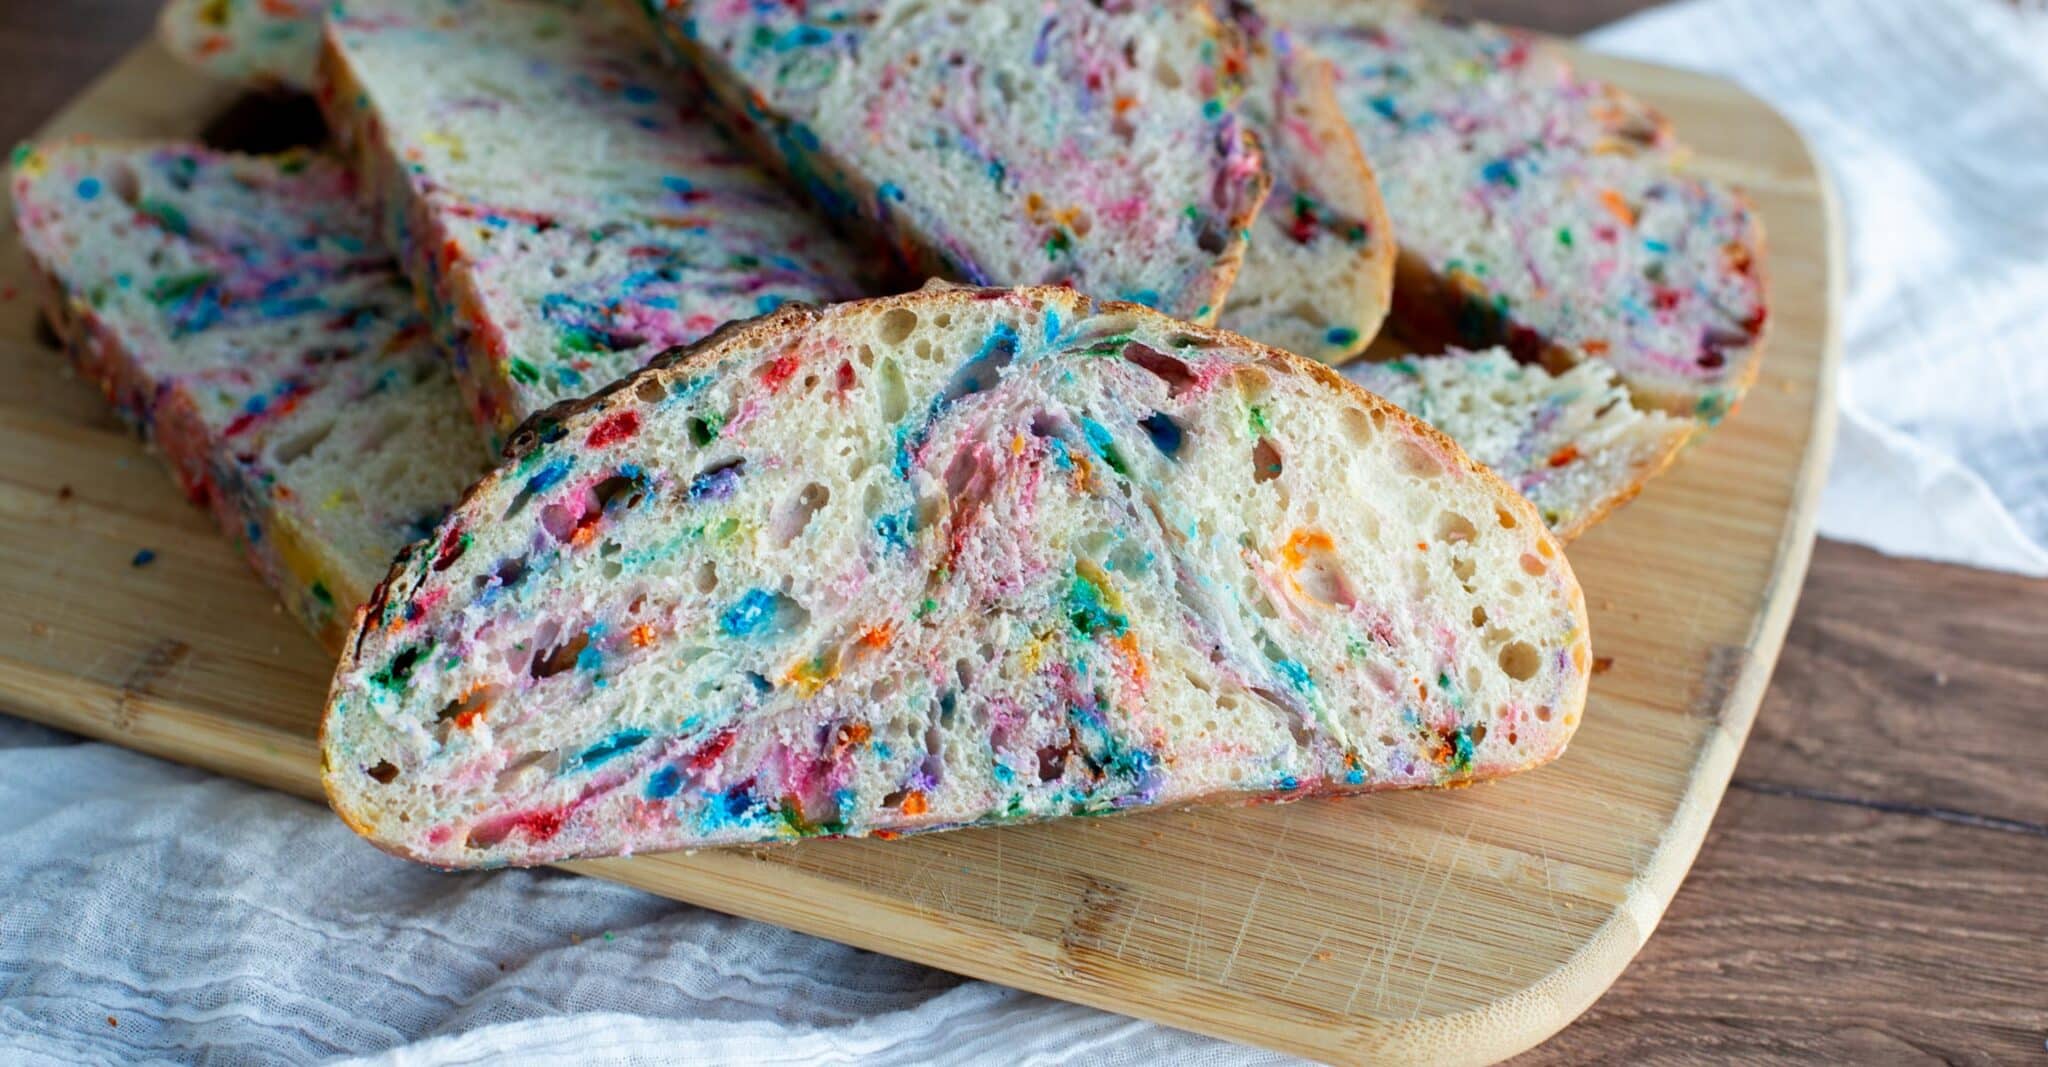
Table of Contents
- Quick Look: Funfetti Sourdough
- Why You’ll Love Funfetti Sourdough Bread
- Tools I use for Funfetti Sourdough
- Important Ingredients
- Substitutions
- Sourdough Baker’s Timeline
- How to Make Funfetti Sourdough Bread
- How to Store Leftovers
- Amy’s Recipe Tip
- Frequently Asked Questions
- Popular Sweet Sourdough Bread Recipes
- Funfetti Sourdough Bread Recipe
Quick Look: Funfetti Sourdough
- Prep Time: 30 minutes hands on time
- Fermentation Time: 24 hours
- Bake Time: 45 minutes
- Total Time: ~ 25 hours
- Servings: 12 slices
- Calories: ~202 kcal per serving (based on nutrition panel)
- Cook Method: dutch oven at 425ºF
- Flavor & Texture: birthday cake flavor with a crisp crust and soft middle
- Difficulty: Medium, easy to mix but sprinkle inclusions can be a little bit wet
SUMMARIZE AND SAVE THIS RECIPE CONTENT ON:
Save this for later!
Why You’ll Love Funfetti Sourdough Bread
- Sourdough Celebration – This funfetti bread is just so fun! A colorful, sweet sourdough loaf like this filled with rainbow sprinkles makes the perfect special birthday breakfast or serve it at any special celebration. For more colorful and fun recipes, try these Sourdough Donuts or this Sourdough King Cake.
- Easy Adaptation of a Classic Loaf – This recipe is based on my Classic Sourdough Bread, but with some added sugar, sprinkles, vanilla, and almond extract to make for a sweeter and more festive loaf.
- Lightly Sweet & Fully Sourdough – Just like my favorite Chocolate Chip Sourdough Brioche or this Sweet Braided Sourdough Bread, this is a lightly sweet loaf. It’s not sweet enough that I consider it a dessert, but it has enough sweetness to be a little breakfast or afternoon treat.
- Taylor Swift Favorite – Whether or not you are a “Swiftie”, it’s fun to know you’re baking with the best of them! As Taylor Swift herself shared on the New Heights podcast, she’s experimented with Funfetti Sourdough too!
New to Sourdough? If you are new to sourdough, learn how to make a sourdough starter from scratch and check out my Free Sourdough Beginner Guide. Using naturally fermented sourdough will take much longer, but you will love the fermentation benefits and the flavor!
Tools I use for Funfetti Sourdough
If you’ve seen my essential sourdough tools page, you’ll recognize most of these. This Funfetti loaf is a higher hydration dough, so these are the tools I use to get that crisp crust and soft interior we love. You don’t need to buy all the tools to make great sourdough, but these definitely make my life a little easier.
- Digital Kitchen Scale: This recipe was tested using weight measurements (grams are my preference), so I highly recommend using a scale for the most accurate results. I’ve included cup measurements too, but a scale really makes a difference.
- Dutch Oven: My go-to for a crispy crust and soft middle. It traps steam, which helps the dough expand before the crust sets. You can also bake this loaf in a loaf pan if you prefer.
- Bread Lame: I use this to score the dough before baking. A sharp knife or razor blade works too.
- Banneton (Proofing Basket): A 9-inch round or oval basket helps the dough hold its shape while proofing. I’ve also used a mixing bowl lined with a towel with great results.
- Bench Knife: Especially helpful with this slightly tackier dough. It makes pre-shaping and handling much easier.
- Dough Whisk: Great for mixing in the levain, sugar, and extracts without overworking the dough early on.
Important Ingredients
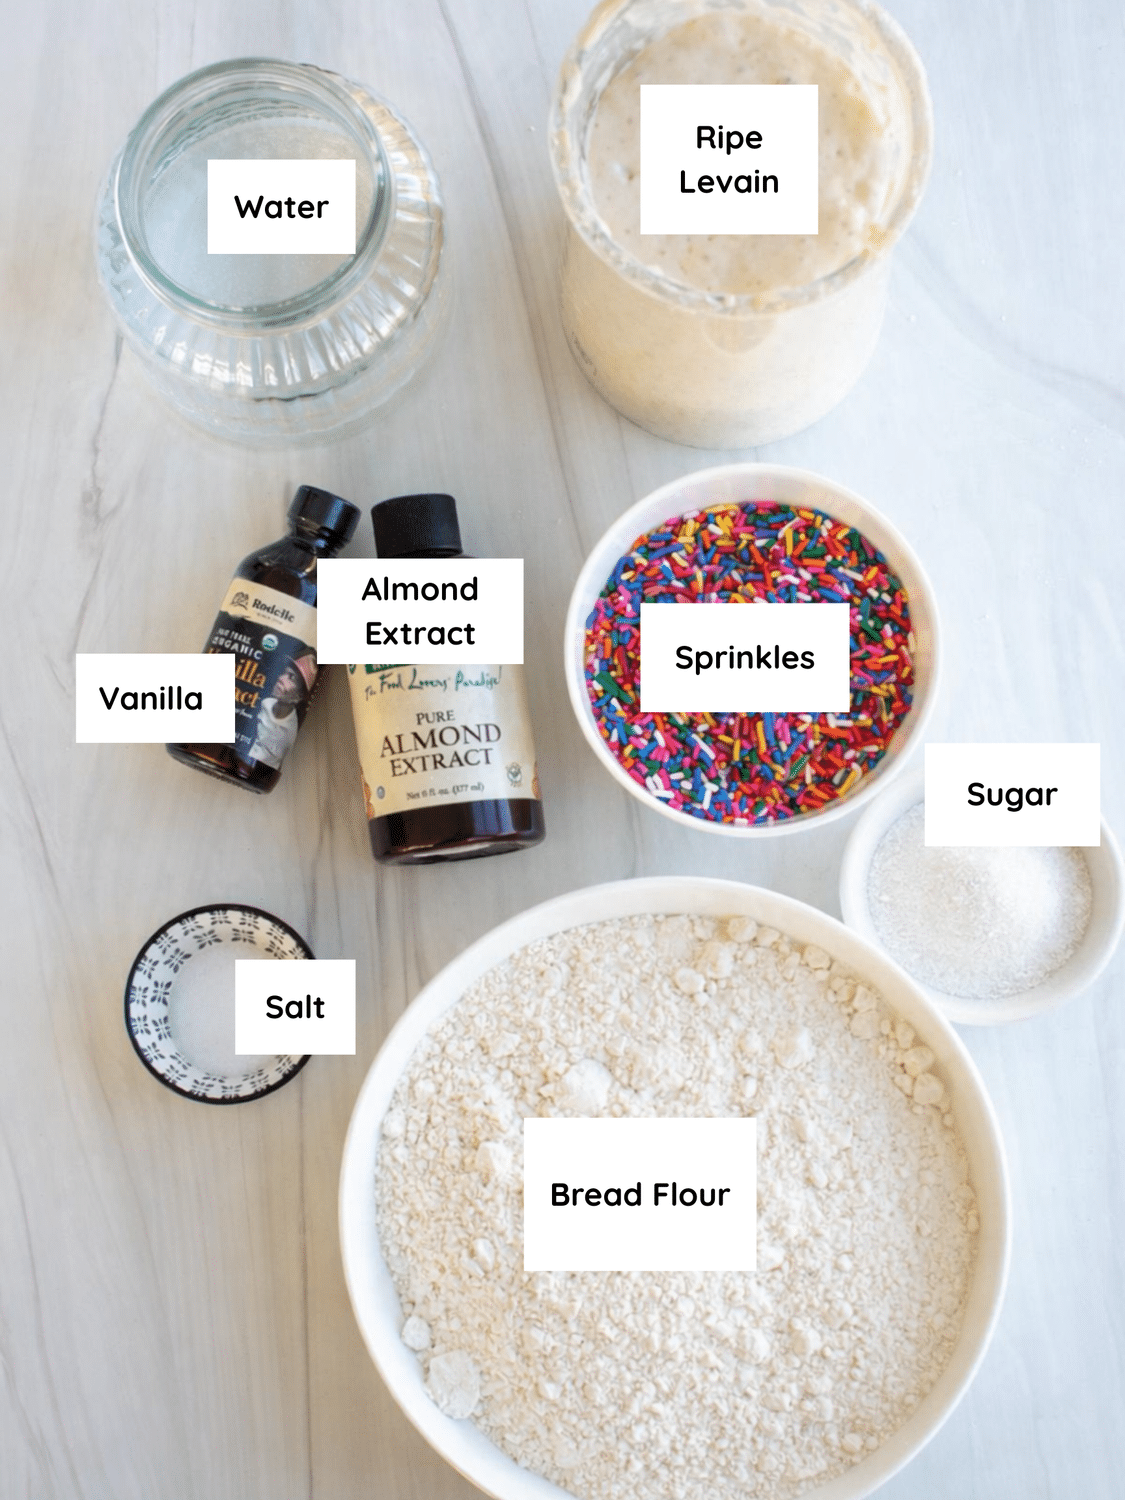
- Levain – This recipe uses the French style of sourdough (levain) that acts as a power feed for your sourdough starter. It’s not hard – just an extra feeding step to give you the best bread. If you don’t have a sourdough starter, first make your own sourdough starter, get some from a friend, or purchase one.
- Bread Flour – Use good quality bread flour with 12-12.5% protein content.
- Sprinkles – Use the large rod shaped jimmy sprinkles for this loaf (NOT nonpareils) you can use any color combination but rainbow is fun for birthdays and the traditional funfetti look.
- Sugar – This loaf is lightly sweet, so a small amount of sugar is added to enhance the flavor without making it taste too sweet.
- Almond & Vanilla Extract – The inclusion of vanilla and almond extracts give this loaf the classic funfetti flavor. You can leave them out, but won’t get the same “birthday cake” flavor you do with both of these extracts.
See the recipe card for full information on ingredients and quantities
Substitutions
- All-Purpose Flour: I like the chewy, fluffy crumb bread flour produces, but all-purpose flour can work well too. I have not tried using whole wheat flour in this recipe, but I think you could add some with good results.
- Sourdough Starter: Skip the levain and substitute ripe, active sourdough starter that is 100% hydration (starter that has been fed equal weights of flour and water).
- Sprinkles: No matter what color of sprinkles you use, I would use the long rod style sprinkles (jimmies) for best results. You can leave the sprinkles out entirely or swap rainbow for your favorite color combination. I’ve tested this loaf with dye-free natural sprinkles, and unfortunately the color tends to bleed. Naturally colored sprinkles often create more streaks in the dough rather than those defined pops of color. If you find a brand that holds up well, let me know in the comments!
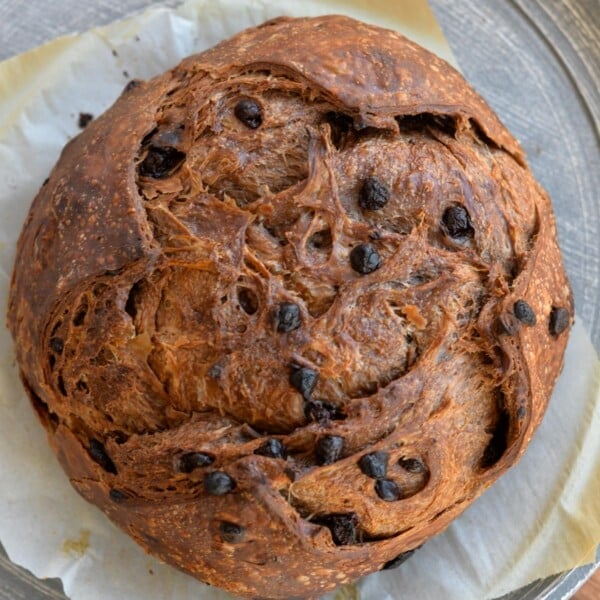
- White Chocolate: For a sweeter loaf, you can add 100 grams of white chocolate chips to the dough at the same time you add the sprinkles.
Sourdough Baker’s Timeline
A sample baking schedule helps me when baking with sourdough. Sourdough takes much longer to rise than commercial yeast bread. This schedule helps me plan my bake.
A few notes: This schedule assumes the dough temperature is 78°F throughout the process. If you’d like to make the bread all on the same day, skip the cold fermentation and let the dough rise for a few hours in a banneton or bowl before baking.
| Day 1 | Levain/Mixing/Bulk Fermentation/Shaping/Cold Fermentation |
| 8:00 AM – 12:00 PM | Mix Levain. Let sit at 78°F for about 3-4 hours until doubled/bubbly and ripe. |
| 12:00 PM | Mix the Dough |
| 12:30 PM | Stretch and Fold #1 |
| 1:00 PM | Stretch and Fold #2 Add Sprinkles |
| 1:30 PM | Stretch and Fold #3 |
| 2:00 PM | Stretch and Fold #4 |
| 2:00 PM – 4:30 PM | Bulk Fermentation Continued |
| 4:30 PM | Pre-Shape the Dough |
| 5:00 PM | Shape and begin cold fermentation (refrigerated rest) |
| Day 2 | Bake |
| 9:00 AM | Preheat Dutch oven |
| 9:15 AM | Score and Bake |
How to Make Funfetti Sourdough Bread
Mix the Levain
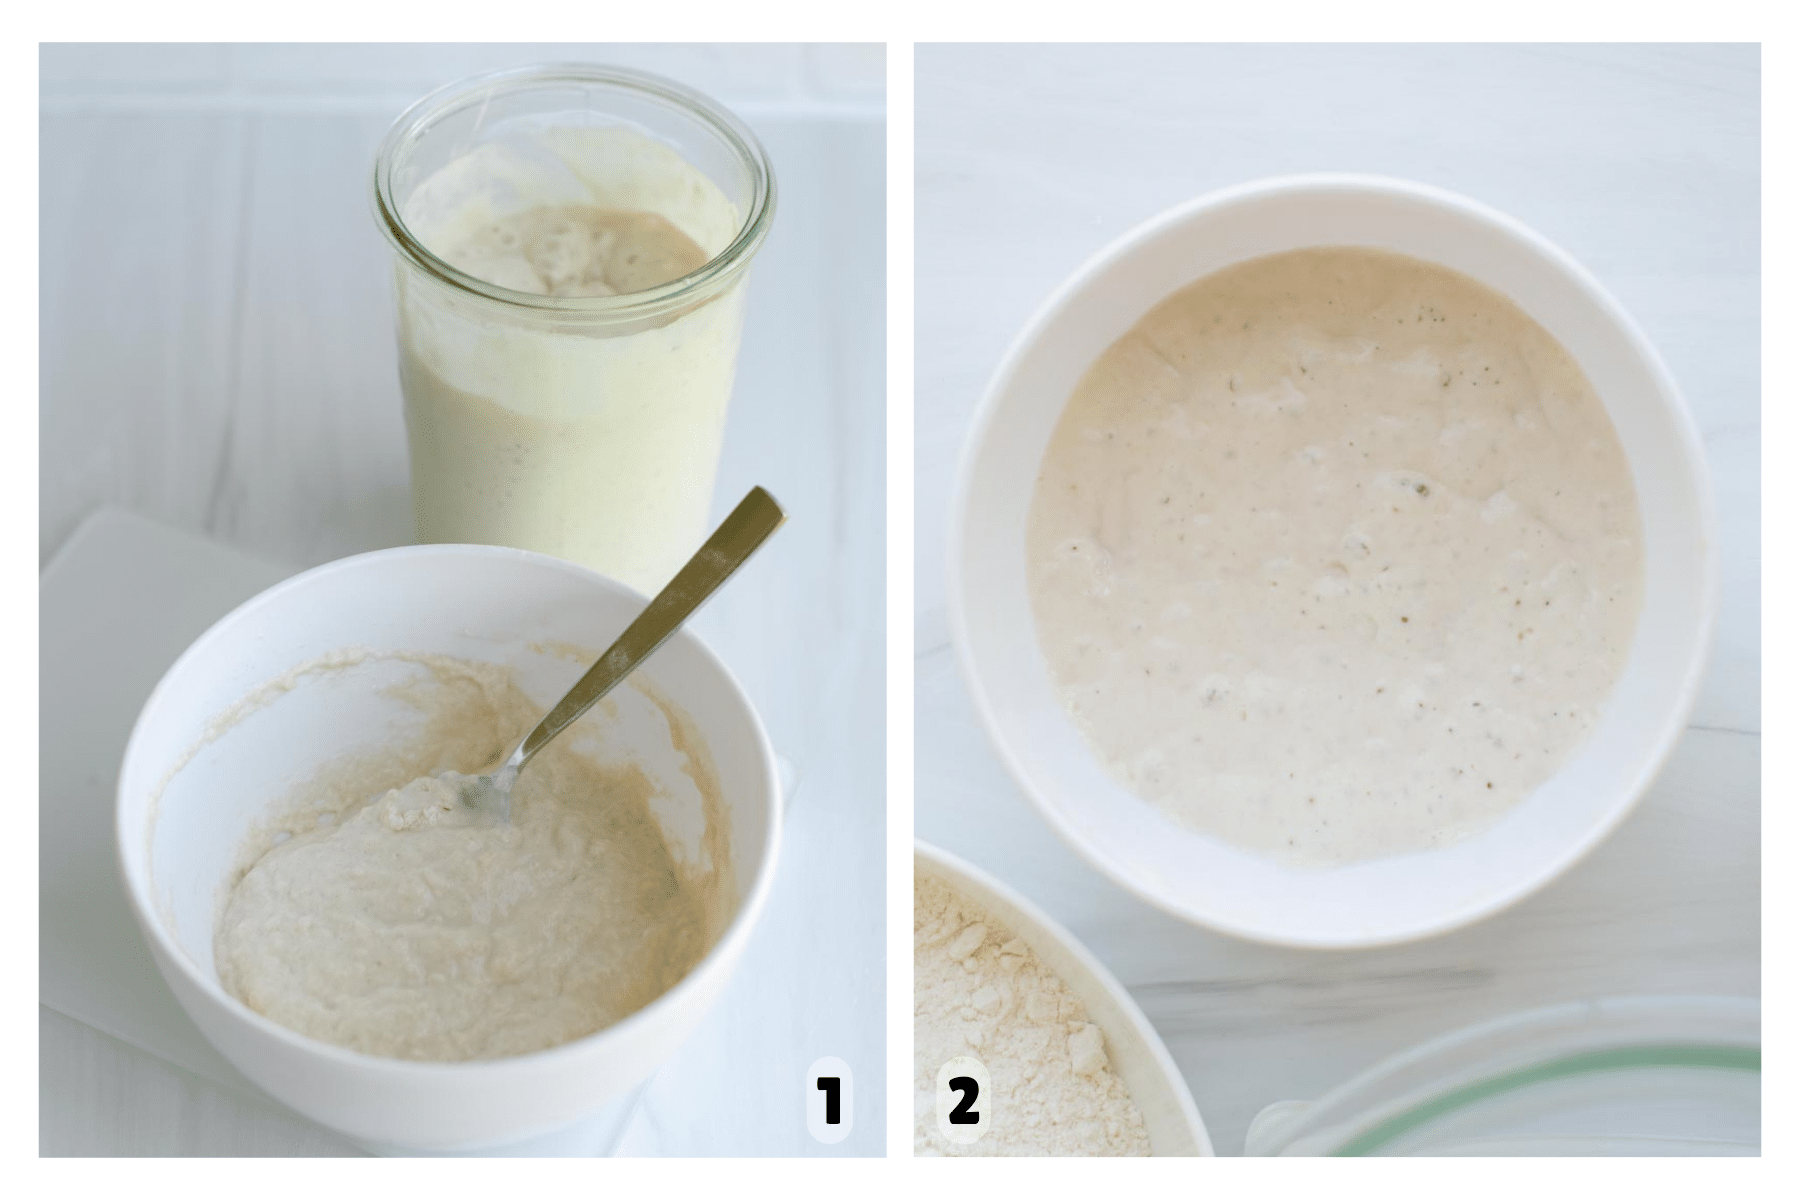
Step 1: Mix the Levain. Take 45 grams ripe, active sourdough starter. Feed it 45 grams flour and 45 grams water (Image 1). Cover and let sit in a warm (78ºF) place for 3-4 hours until bubbly, doubled in size, smells milky sweet and is just about to fall back down (Image 2). Do not use the levain or your sourdough starter if it has not shown these signs. Starter is best to used in its peaked and active state.
Do you have to use a levain in this recipe? No. I prefer it, but if you have a well-maintained and frequently refreshed sourdough starter, you can substitute it in place of the levain in the recipe. A levain is an offshoot of your sourdough starter. It acts as a power feed for your starter and using one will give you a better loaf.
Mixing the Dough

Step 2: Mix Dough. Add the ripe levain, water, sugar, vanilla extract, almond extract, salt, and bread flour to a large bowl (Image 3). I like to set my bowl on a kitchen scale and add everything straight in—fewer dishes is always a win. Give it a good mix with a dough whisk or spoon until everything is combined and you have a sticky dough (Image 4). Cover the bowl with plastic wrap, a bowl cover (my favorite hack is to use a shower cap) and let the dough rest for about 30 minutes.
Bulk Fermentation
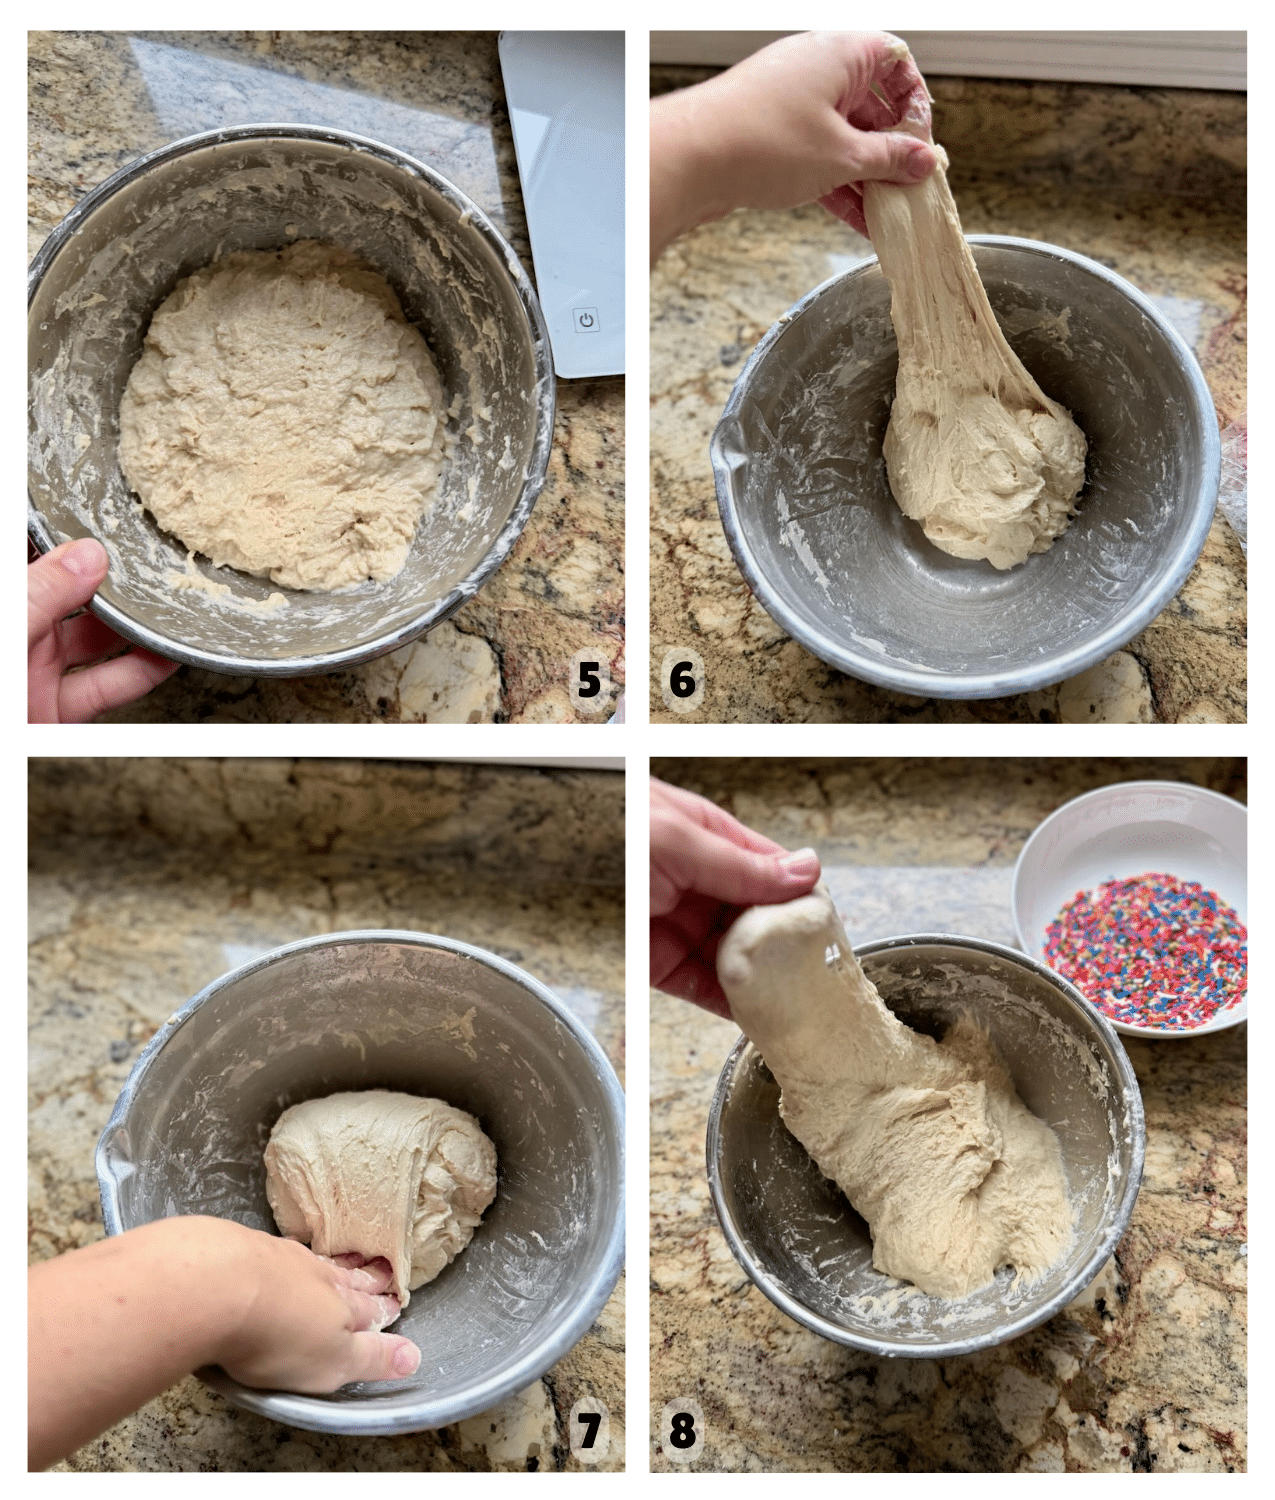
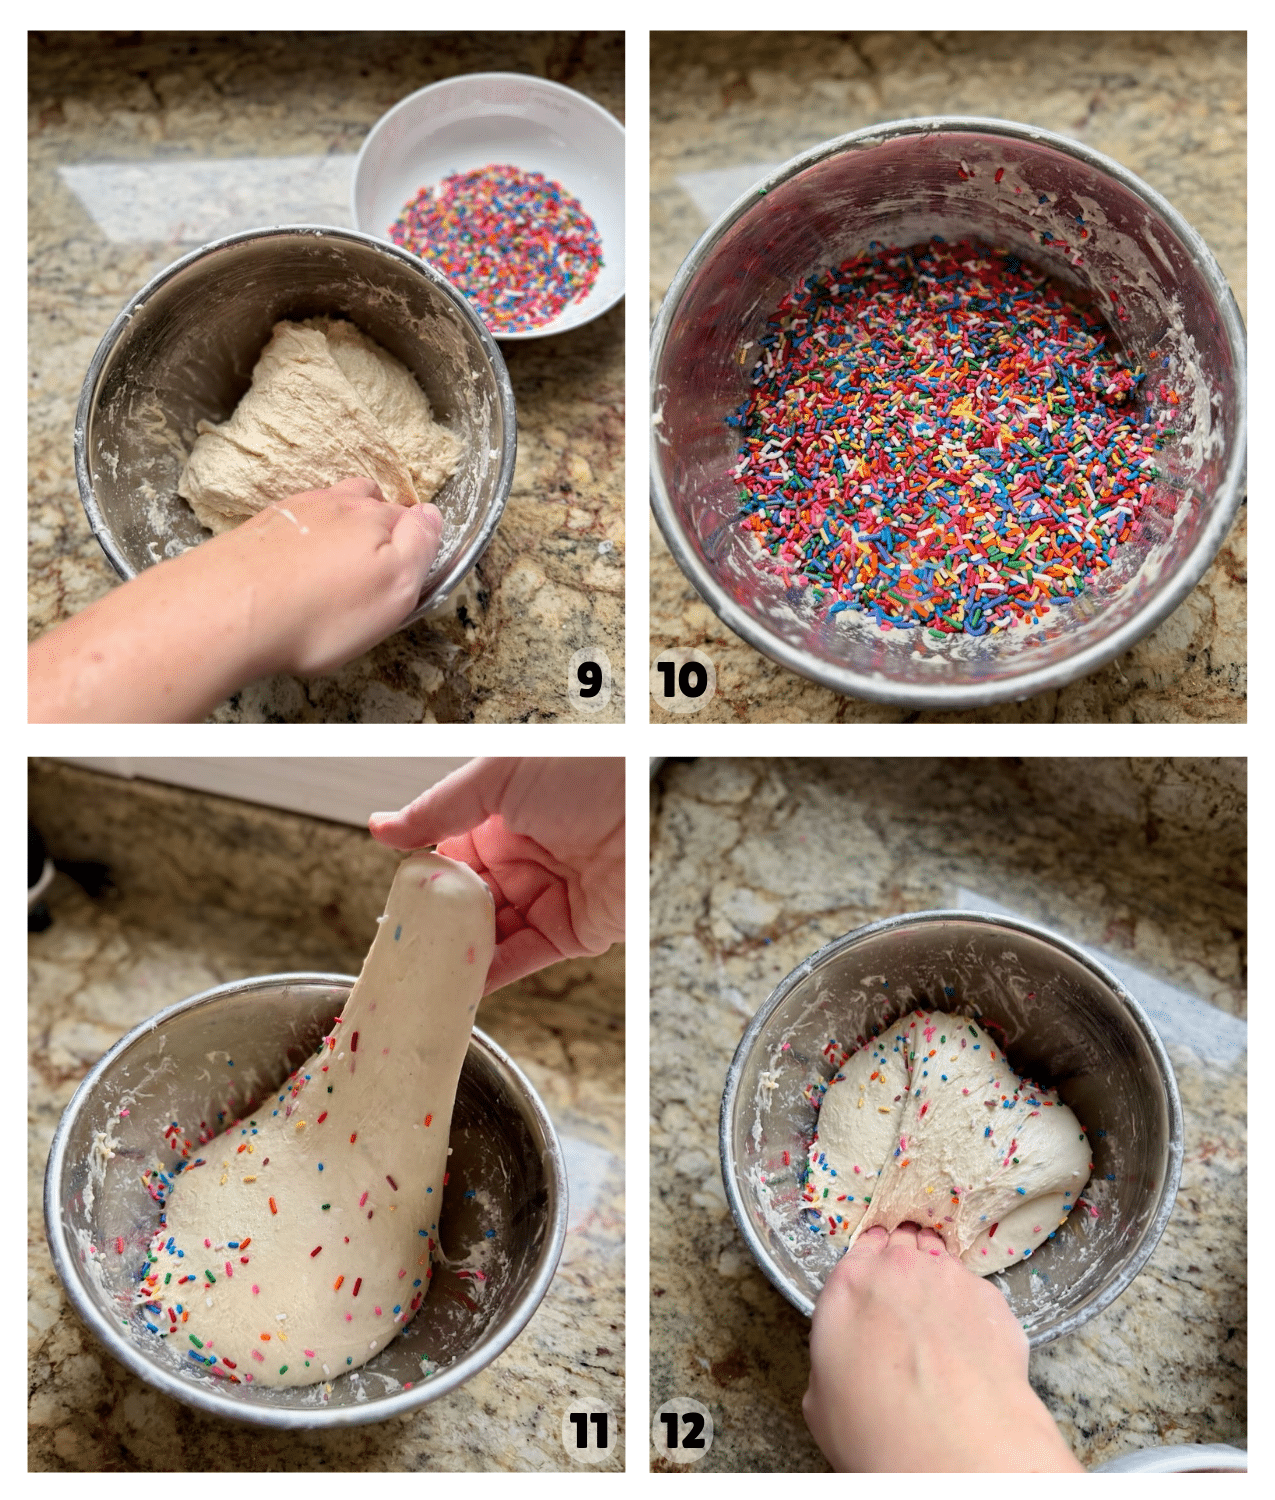
Step 3: Stretch and Folds. After 30 minutes of resting (Image 5) you will perform a series of stretch and folds to gently strengthen the dough. To “stretch and fold,” wet your hand (so it doesn’t stick to the dough). Reach down to the bottom of the bowl of dough and pull the dough up and over the top of the dough (Images 6 & 7).
Turn the bowl 1/4 turn and repeat the stretch and fold (Images 8 & 9). Turn another quarter turn and repeat. Perform one more 1/4 turn with stretching and folding the dough. The more you stretch and fold, the more the dough will resist and tighten up. Once it does that, it’s your sign to stop stretching and folding. Cover the dough and set it aside.
Add Sprinkles: After 30 minutes and prior to beginning your second set of stretch and folds, add the jimmy sprinkles to the top of the dough (Image 10). As you perform the second set of stretch and folds, the sprinkles will begin to incorporate into the dough. Let the dough rest for another 30 minutes and then perform your third set of stretch and folds. You will repeat this one more time for a total of four sets of stretch and folds over approximately 2 hours. As you perform the third and fourth sets of stretch and folds, your dough will begin to feel smoother and more cohesive and your sprinkles will fully incorporate into your dough until they are evenly dispersed (Images 11 & 12).
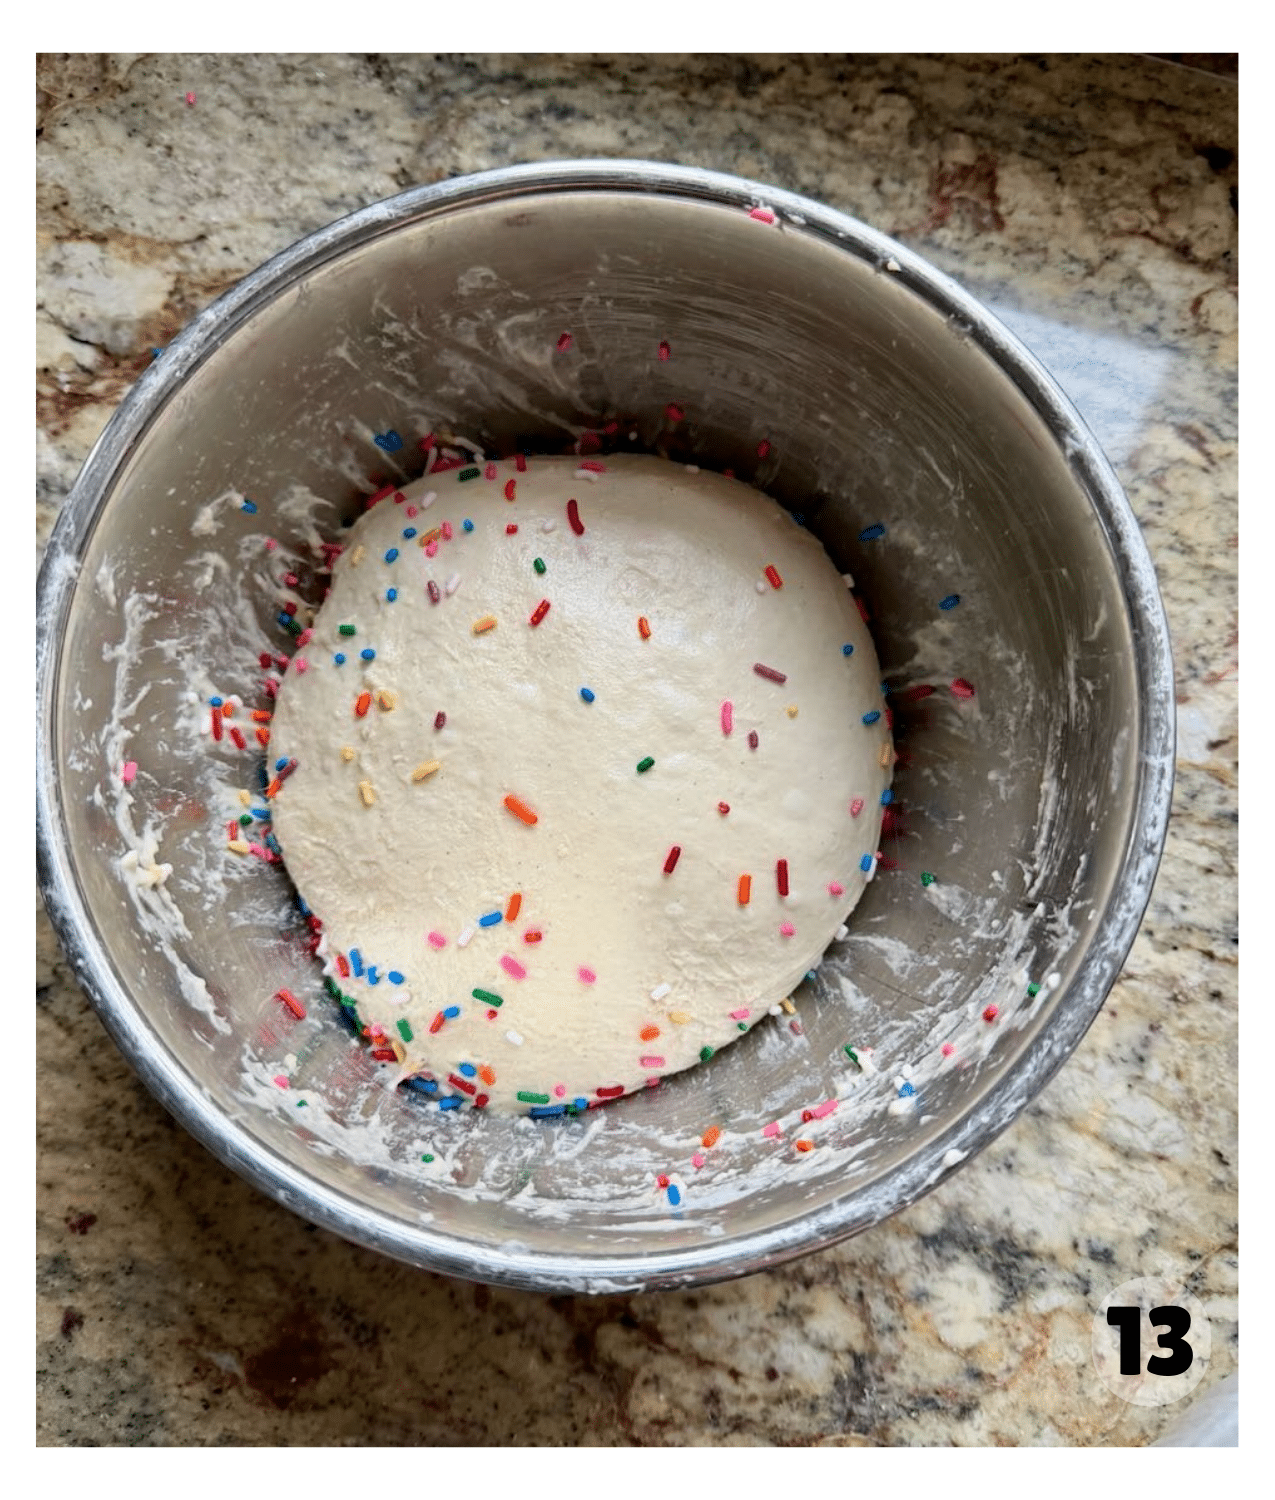
Step 4: Rest. After completing your stretch and folds, cover the dough and let it rest for the remainder of the bulk fermentation phase 2-3 hours at 78°F. You are looking for a volume increase of about 40% the dough should be domed at the edges, puffed, and “jiggly” when you shake the bowl (Image 13).
Amy’s Expert Tip: The amount of time it takes for your dough to rise will depend on the temperature of the dough. You can use a dough mat or proofing box to help control the dough temperature if your kitchen runs cold. This helps maintain a consistent rate of fermentation and avoids an under-proofed loaf and gummy crumb.
Shaping the Dough
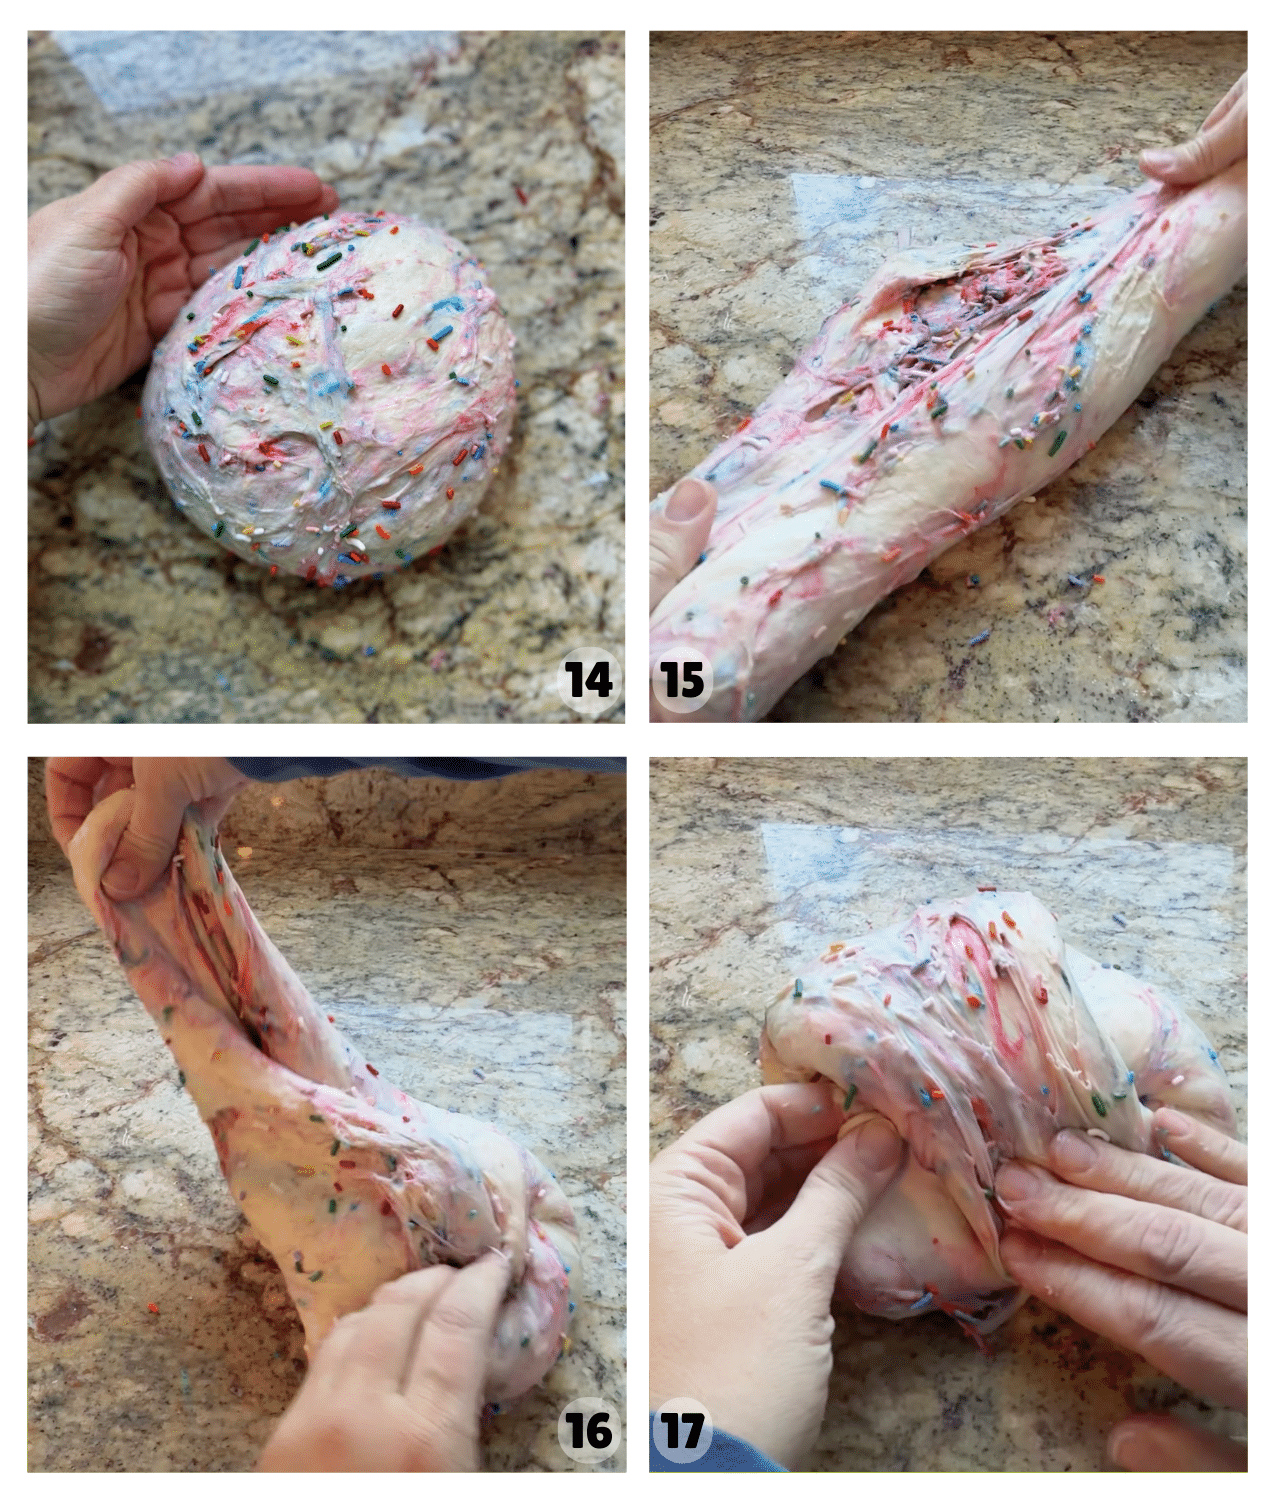
Step 5: Pre-Shape and Bench Rest. Wet your hands and the bench knife with just a little water. Push the bench knife under the dough while using your free hand to tuck the dough under itself. Repeat this process going around in a circle until you have a tight ball of dough. Repeat with the second loaf and let the dough rest on the counter (Image 14). The dough will flatten- like a pancake, over the half hour it rests.
Step 6: Shape the Dough. Prepare a banneton or bowl for the dough to sit in by lining with a hair net or kitchen towel. Lightly flour the bowl if needed. Going around in a circle, pull the dough sideways towards you and then fold up to the top of the round (Image 15). Move 90 degrees and repeat the same process pulling the dough sideways and then folding up to the top (Images 16 & 17). As you continue this process around the dough, increase the tension as you pull. Gather the bread into a circle and use a bench knife to lift the bread and place into your lined bowl, seam-side down.
Why does the dough feel sticky? You might notice the dough feels wetter in the hours after adding the sprinkles. The technical name for this is osmosis, which simply means the sugar in the sprinkles pulls moisture toward itself. That extra moisture comes from the dough and can make the dough feel softer and a bit more slack at first. Don’t worry though — it’s completely normal, and the loaf will still bake up just fine.
Cold Fermentation & Proofing
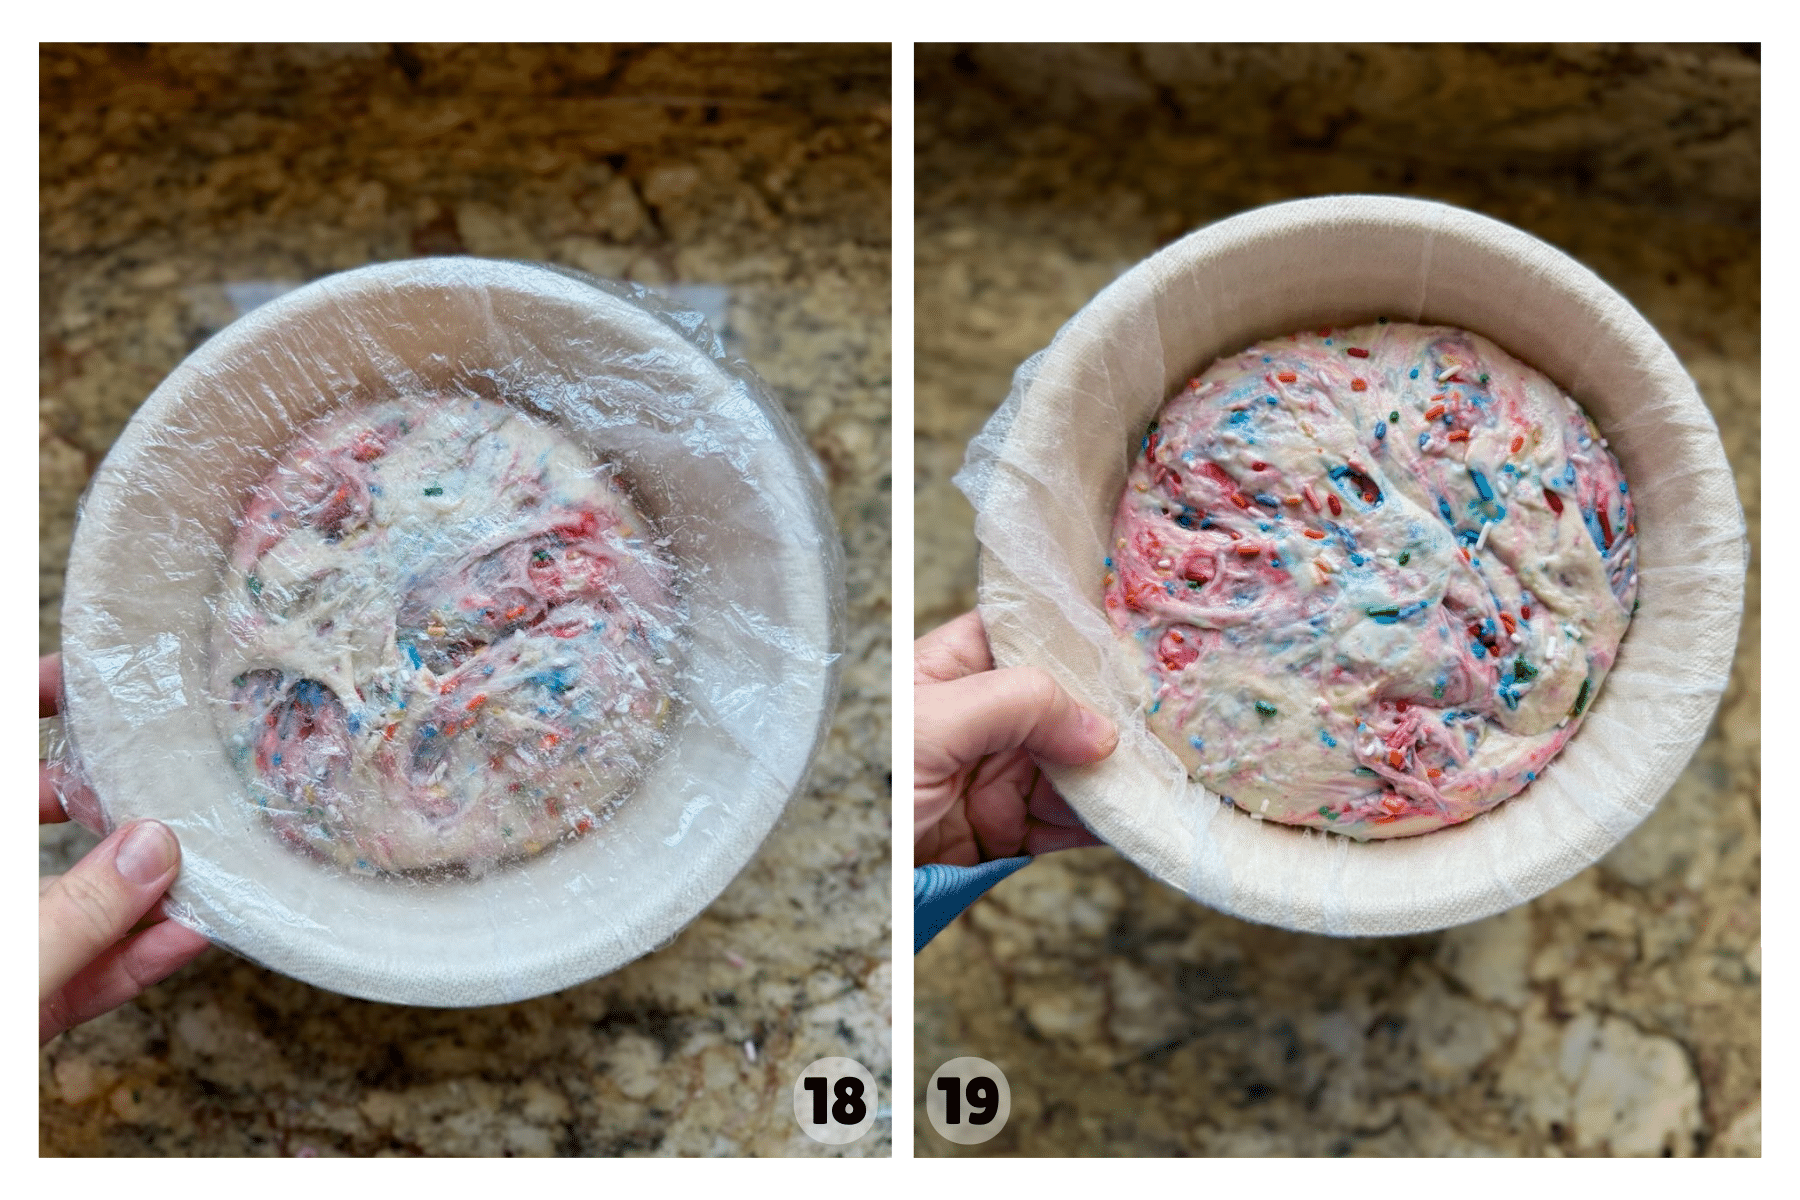
Step 7: Cold Fermentation (Refrigerated Rest). Cover the dough and stick the dough in the refrigerator for 12-24 hours. During this time it will puff up just a little bit as it finishes its rise. (Images 18 & 19).
Amy’s Tip: If you want to bake the loaf the same day, you can skip the refrigerator. Let the dough rise for about 2-3 hours until puffed up and risen 70%. Then bake according to recipe directions.
Baking The Funfetti Sourdough
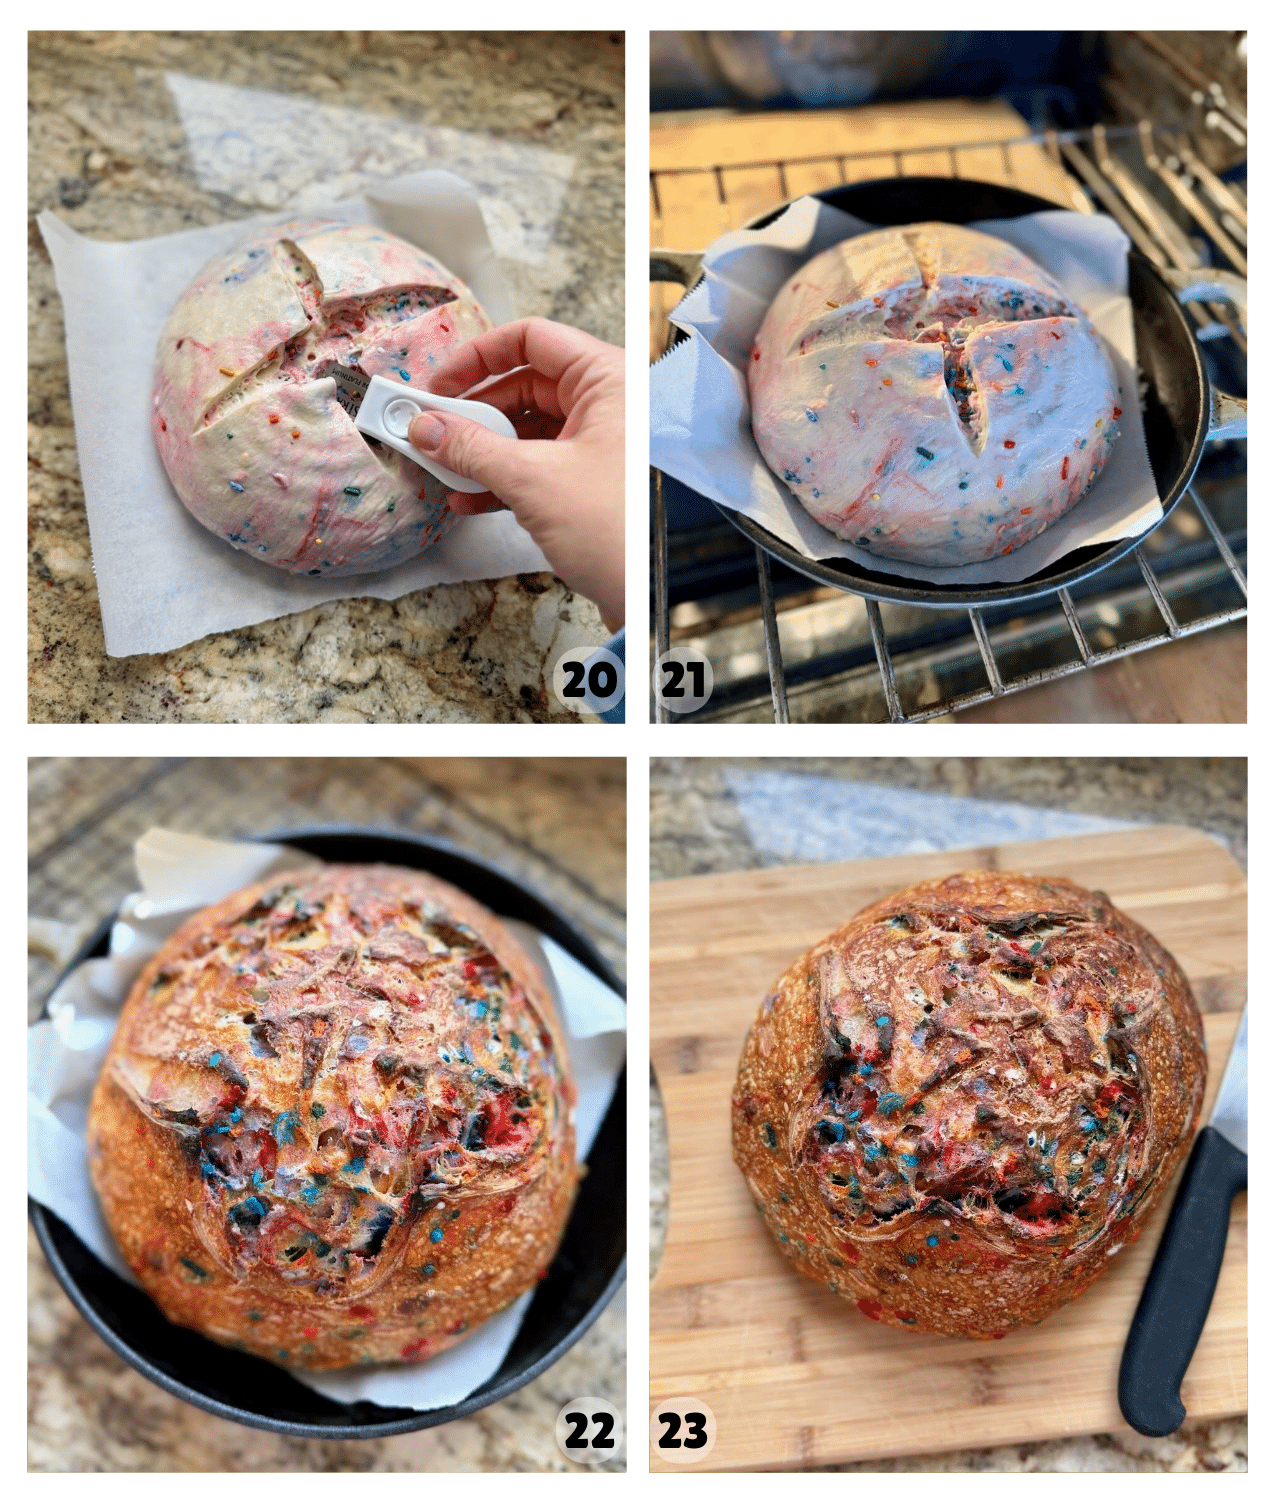
Step 8: Score and Bake. Place a Dutch oven in the oven, lid and all and preheat to 450ºF for 30 minutes. After the Dutch oven has fully preheated, dump the dough out onto a piece of parchment paper. Use a very sharp knife or bread lame to score the dough at a shallow angle (Image 20). This controlled “cut” directs the oven spring, allowing the bread to expand upward rather than bursting at the sides.
Carefully remove the Dutch oven from the 450ºF oven with hot pads. Take the top off and place your bread into the dutch oven (including parchment paper–this helps with the transfer). Put the whole dutch oven back into your oven (Image 21). Lower the temperature to 425ºF and bake for 30 minutes.
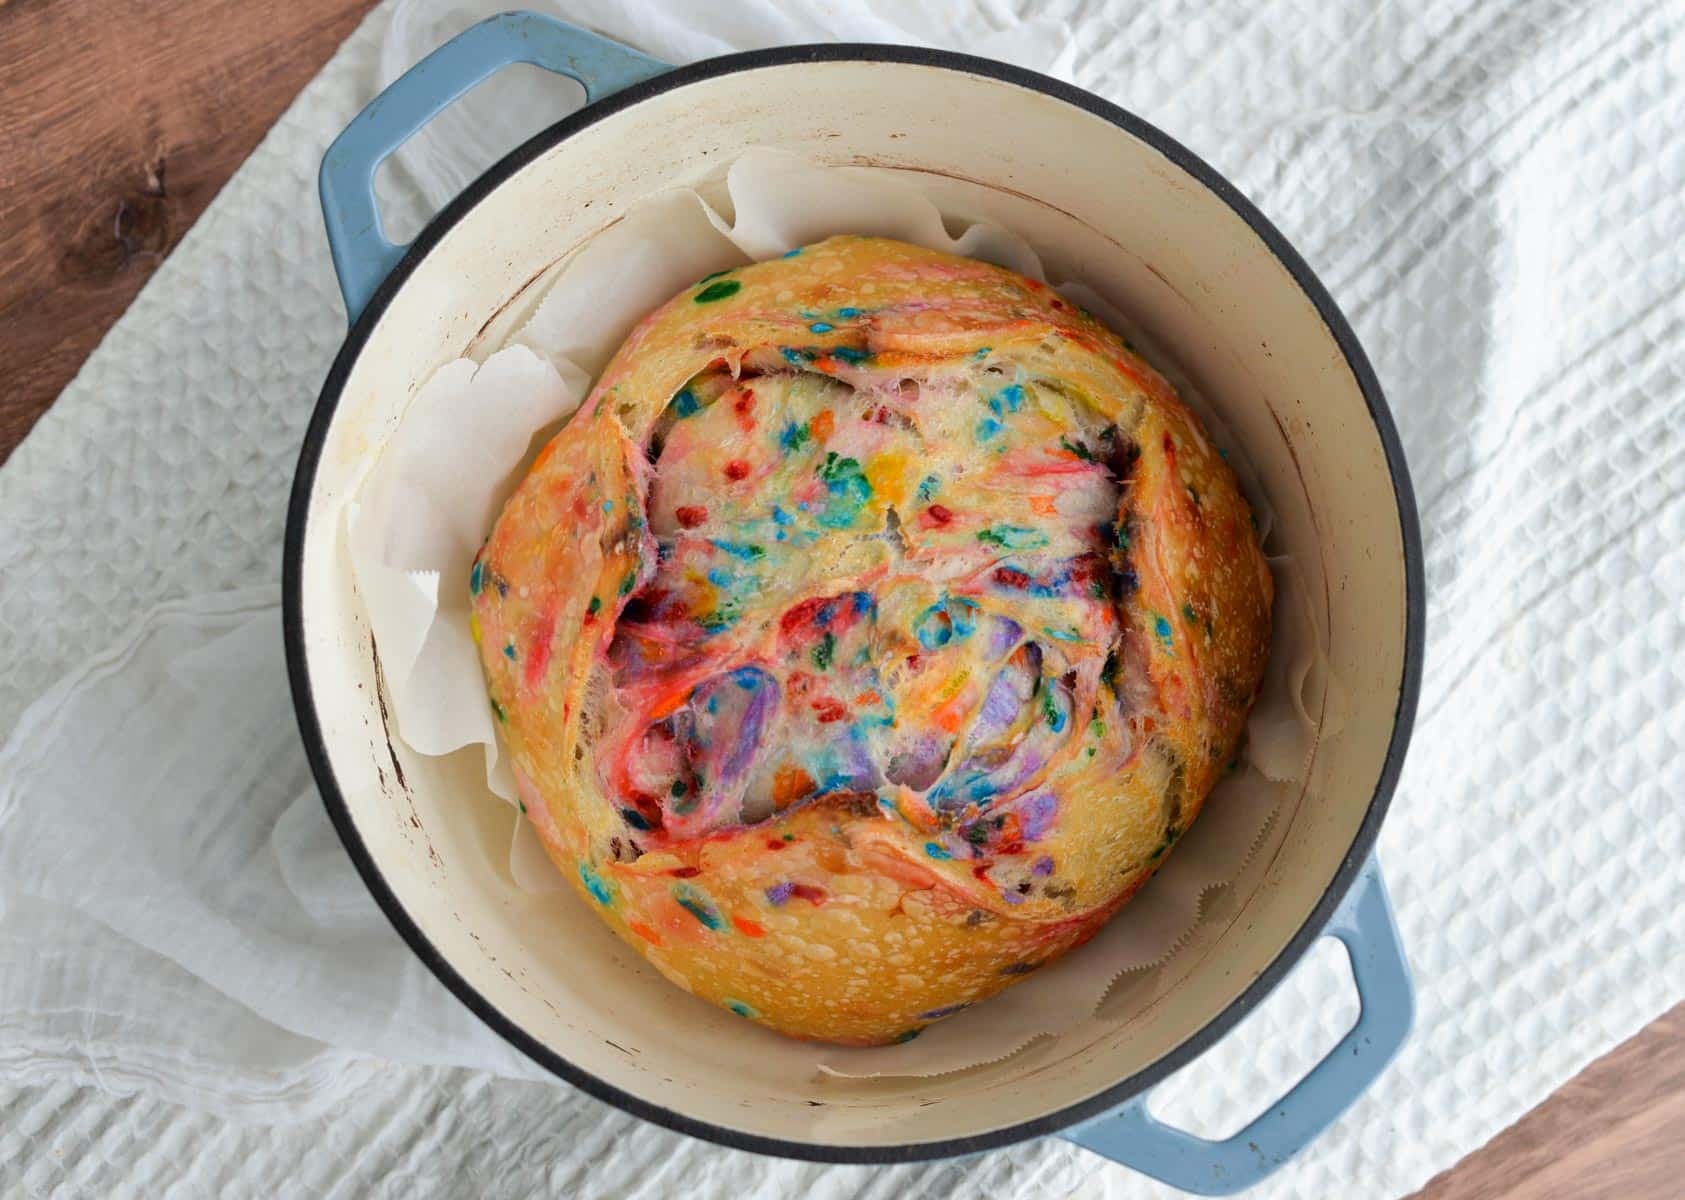
Once 30 minutes are up, take the top off the dutch oven and continue baking for 15-20 minutes until the bread is baked through with an internal temperature between 205-210℉ (Image 22). Remove to a wire rack and let cool completely before slicing (Image 23).
We love serving slices for birthday toast, making them into french toast or just eating warm with salted butter or a sweet cream cheese. Yum!
How to Store Leftovers
After the bread has completely cooled, I like to slice it and store any leftovers in an airtight container or bread bag at room temperature for up to 24 hours. After that, I freeze the whole loaf or individual slices for best results (you can place a piece of parchment between slices if you’d like). The bread will keep in the freezer for a couple of months. I usually toast slices straight from frozen and spread them with a little butter before enjoying.
Amy’s Recipe Tip
Let’s talk sprinkles: I’ve made this loaf a few different times, and the sprinkles you use really do matter. Sprinkles contain sugar, and that sugar pulls moisture from the dough, which can make it feel softer or stickier. This is completely normal. The type of sprinkle makes a big difference, too. Traditional waxy “jimmy” sprinkles hold up best during mixing and folding, giving you bright pops of color with minimal streaking. Sprinkles made with natural colors tend to bleed more into the dough, creating more streaks and fewer defined bursts of color. If you’re after that classic funfetti look, waxy jimmies are the way to go.
Frequently Asked Questions
This loaf contains added sugar, which means it can brown or burn more quickly in the oven. Oven temperatures can vary quite a bit, so if your oven tends to run hot, try reducing the baking temperature by about 25°F.
I also recommend placing a baking stone on the bottom rack to help distribute heat more evenly. Another trick I use is adding a thin layer of uncooked rice to the bottom of my Dutch oven, then setting the parchment with the dough on top of the rice before baking. It creates a buffer from the direct heat and helps prevent the bottom from over-browning.
Typically gummy dough comes from one of two things:
1. Sourdough Starter is not Active Enough – If your starter is still young, it may not be quite ready to raise a loaf of bread. Feed your starter a few more times and use it when it’s very bubbly, doubled in size and just about to fall back down after peaking.
2. An under-proofed loaf – I typically see this with under-proved loaves. Double check your temperature. Make sure your dough has risen before you shape it and stick it in the refrigerator. Under-proved loaves are not fully developed and can turn out gummy – tasting. It can happen with an over-proofed loaf as well, but it is not as common.
No, I don’t recommend using nonpareil sprinkles. They can bleed and make the dough look muddy and not bright colors throughout.
Popular Sweet Sourdough Bread Recipes


If you tried this Funfetti Sourdough Loaf or any other recipe on my website leave a 🌟 star rating and let me know how it went in the comments below. Happy Baking!
Funfetti Sourdough Bread
Save this for later!
Ingredients
Levain (1:1:1, 3-4 hours until doubled if kept at 78ºF)
- 45 grams sourdough starter, ripe, bubbly, active, about 3 Tablespoons
- 45 grams water, about 3 Tablespoons
- 45 grams all-purpose or bread flour, about 1/3 cup
Funfetti Sourdough Bread
- 120 grams levain, about 1/2 cup
- 340 grams water, about 1 1/3 cup plus 2 Tablespoons
- 50 grams granulated sugar, about 1/4 cup
- 4 grams vanilla extract , or vanilla bean paste, about 1 teaspoon
- 2 grams almond extract, about 1/2 teaspoon
- 10 grams salt, about 1.5 teaspoons
- 500 grams bread flour, about 3 3/4 cups
- 70 grams jimmy sprinkles, reserved for stretch and folds, about 1/3 cup
Instructions
Levain (1:1:1 ratio, 3-4 hours peak at 78-80ºF)
- Mix together ripe/active sourdough starter with all-purpose or bread flour and water. Cover loosely and let sit 3-4 hours at 78-80°F until doubled, bubbly & peaked.Note: If you have a ripe, bubbly, active sourdough starter that is fed equal parts flour and water – you can substitute 120 grams of it for the levain in this recipe.
Funfetti Sourdough Bread (78-80ºF dough temperature throughout the bulk fermentation)
- Mix Dough: In a large bowl, combine the ripe levain, water, sugar, vanilla extract, almond extract, salt and bread flour. I like to place my bowl on a kitchen scale and add each ingredient directly to the bowl. Use a dough whisk or spoon to mix until fully combined and a sticky dough forms. Cover with plastic wrap, bowl cover or shower cap and let the dough rest for 30 minutes.
- Stretch and Folds: After the dough has rested, you will perform a series of “stretch and folds” over the next 1 ½ hours. The goal is to strengthen the dough through a gentle kneading process. You will also add the sprinkles during these folds.To “stretch and fold,” wet your hand (so it doesn’t stick to the dough). Reach around the dough down to the bottom of the bowl, pull the dough up and over and place it on top of the dough. Turn the bowl a quarter turn and repeat the stretch and fold. Turn another quarter turn and repeat. Perform one more quarter turn, stretching and folding the dough. Cover and set aside. Take note of how the dough feels through this process. It will go from feeling a little shaggy to smooth and elastic. Cover the bowl and wait about 30 minutes between stretch and folds.
- Stretch and fold #1: 30 minutes into bulk fermentationStretch and fold #2: 30 minutes later, the dough will spread out. Add the jimmy sprinkles on top of the dough. Stretch and fold the dough again, pulling up, folding over, rotating the bowl until the dough doesn't want to stretch anymore and comes together in the center of the bowl. Cover and set aside.Stretch and fold #3: 30 minutes later, repeat the stretch and folds. Cover and set aside.Stretch and fold #4: 30 minutes later, stretch and fold again. You should notice the dough feeling more cohesive and strong during this stretch and fold and not needing very much folding to come together. If your dough still feels loose, add in another couple stretch and folds to help strengthen and tighten the gluten strands. Note: The sprinkles you use matter. If you want defined pops of color in your dough, use traditional waxy "jimmy" sprinkles. Natural colors tend to streak more throughout the dough and you won't get defined pops of color.
- Rest: Cover the dough and let rise for 2-2.5 more hours at 78ºF. You’ll know the dough is ready to shape when it is puffed up about 40%, jiggles when you shake the bowl, and has scattered bubbles visible on the sides and top.If your dough is cooler, this will take longer and you will want to look for a larger percentage rise before shaping the dough.
- Pre-shape: Tip the bowl upside down, allowing the dough to fall onto a clean counter surface. Be gentle to avoid degassing the dough as much as possible. Wet your hands and the bench knife if needed and push the bench knife under the dough on one side and your free hand on the other side to tuck the dough under itself. The goal is to introduce some tension into the dough. Repeat this process, going around in a circle until you have a ball of dough.
- Bench Rest: Let the dough rest uncovered for about 30 minutes at room temperature. The dough will flatten a little as it sits. This allows the gluten in the dough to relax and prepares the dough to be shaped.
- Shaping: Prepare a bowl or banneton. Place a kitchen towel or hair net in the bowl and liberally flour as needed. Sprinkle a little flour on top of the dough. Using a bench knife, lift the dough up off the counter and place it on top of the countertop – floured side down. This ensures that the flour is staying mainly on the outside of the dough. Going around in a circle, pull the dough sideways towards you and then fold up to the top of the round. Move 90 degrees and repeat the same process pulling the dough sideways and then folding up to the top. As you continue this process around the dough, increase the tension as you pull. Gather the bread into a circle and place into a lined bowl. The dough may feel a little wet if the jimmy sprinkles have broken down a bit and the colors start spreading. This is okay. Work quickly and get the dough into the banneton.Note: It is possible to shape the dough without any extra flour (this is my preference). The dough can stick to a kitchen towel but doesn't stick to the hair nets if cold proofed.
- Cold Fermentation: Cover the dough with the tea towel/shower cap/plastic wrap and refrigerate overnight or up to 14-20 hours. If you want to bake the same day, you can let the dough rise for about 3-4 hours until puffed up and risen. Then bake according to recipe directions.
- Preheat the oven: Put a Dutch oven (top and all) into the oven and preheat to 450°F for 30 minutes. You are working with high temperatures, so make sure you have some good hot pads. Once preheated for 30 minutes, pull the loaf out of the refrigerator. Remove the covering. Place a piece of parchment paper on top of the dough. Flip the dough over so it is now sitting on the parchment paper. Take off the bowl/banneton and the kitchen towel.
- Scoring: Use a very sharp knife or bread lame to score the dough. Take the bread lame and make a shallow cross on the top of the dough, about 1/2 inch deep. Score straight from the refrigerator on the cold dough for best results.
- Baking: Carefully remove the Dutch oven from the 450°F oven. Take the lid off and place your bread into the Dutch oven (including parchment paper – this helps with the transfer). Put the lid on and put back in the oven. Lower the temperature to 425°F and bake for 30 minutes. After 30 minutes, take the lid off the Dutch oven, reduce the temperature to 400ºF and continue baking for 15-20 minutes until the bread is baked through and registers 205-210ºF. Remove the Dutch oven and let the bread cool completely before slicing. Enjoy!Note: If your oven runs hot or you are using a dark cast-iron pot, there's a tendency for the bottom of the loaf to burn due to the extra sugar in this loaf. Make sure to put a sheet pan on the rack underneath the pot to deflect the heat or even a thin layer of rice underneath the parchment paper if you are having difficulty with your dutch oven.
Notes
Nutrition
Nutrition information is automatically calculated, so should only be used as an approximation.


I have to say I was not expecting this bread to taste so good. I think the almond with the vanilla does make a difference and changing the flavor profile of making again! What this bread. And yes, natural Jimmy’s melt. They still tasted good.
I’m glad it turned out great! I agree that it is a delightful flavor. Enjoy!