Affiliate disclosure: This post may contain affiliate links. Please see our disclosure policy.
Crispy on the outside, soft in the middle, and made with just five simple ingredients. This is what bread should be. It’s the kind of bread you want to eat every day and share with family and friends. It’s the sourdough recipe I’ve been making for years, and no matter how many loaves I bake, I always come back to this Classic Sourdough Bread.
This classic artisan sourdough is everything that good bread should be. Made with a sourdough starter, it develops deep flavor, a perfect crust, and a soft interior that toasts beautifully for sandwiches. Once you experience this bread, you’ll never want to be without it. And the best part? I’m here to guide you through every step, so let’s get baking!

Save this for later!
This is a little more advanced sourdough recipe. If you are just starting out with sourdough, I recommend starting with my Beginner Sourdough Bread or my Easy Sourdough Bread Recipe (for busy people).
Table of Contents
Why You’ll Love Classic Sourdough Bread
- Taste and Texture: You won’t find a loaf like this at the grocery store. The crispy crust and soft, airy interior make it truly special. For an easier version, try my Beginner Sourdough Bread or make this sourdough bread in a stand mixer instead.
- Bakery-Quality at Home: This recipe gives you that artisan sourdough experience straight from your own oven. You’re going to feel like a pro when you lift the lid and see that beautiful loaf there!
- Versatile: Once you master this classic sourdough loaf, you’ll want to try a few of my favorite variations, like this sourdough croissant loaf or sourdough bagel bread. Both start with a classic sourdough base and turn it into something extra special.
- Mix It Up: This is the perfect base for adding inclusions. Try my top 10 favorite mix-ins or learn how to customize your sourdough with any addition you love!
- Make it Mini: For smaller, giftable loaves, use my recipe for mini sourdough loaves.
New to Sourdough? If you are new to sourdough, learn how to make a sourdough starter from scratch and check out my Free Sourdough Beginner Guide. Using naturally fermented sourdough will take much longer, but you will love the fermentation benefits and the flavor!
Important Ingredients

- Levain – This recipe uses the French style of sourdough (levain) that acts as a power feed for your sourdough starter. It’s not hard – just an extra feeding step to give you the best bread. If you don’t have a sourdough starter, first make your own, get some from a friend, or purchase one.
- Bread Flour – Use good quality bread flour with 12-12.5% protein content.
- Whole Wheat Flour – Whole wheat flour gives a boost to the fermentation of the dough and adds good flavor to this bread. I like to freshly mill my whole wheat, but aged whole wheat flour from the grocery store works well too.
- Water – Use warm water to warm up your dough or cool water to cool it down so it can stay in the 76-78ºF temperature range.
- Salt – I use table salt.
See the recipe card for full information on ingredients and quantities
Substitutions
There’s not much in the way of substitutions when you are working with only a few ingredients!
- Sourdough Starter: Skip the levain and substitute ripe, active sourdough starter that is 100% hydration (starter that has been fed equal weights of flour and water).
- Whole Wheat Flour: You can substitute bread flour for the whole wheat flour in this recipe. Note that the dough will take a little bit longer to rise and ferment if you don’t use whole wheat flour.
- All-Purpose Flour: I like the chewy, fluffy crumb bread flour produces, but all-purpose flour can work as well. Decrease the water by about 50 grams if you are going to use all-purpose flour or the dough can be more difficult to work with.
- Mix-Ins: This loaf is delicious with fresh herbs or everything bagel seasoning sprinkled in during the stretch and folds. Or try my cranberry pecan sourdough bread based off this recipe – it’s a family favorite. This is the perfect base recipe for any sourdough inclusions!
Sourdough Tools You’ll Need
I am a big believer in using what you already have in your kitchen. Sourdough can work for anyone and I’ve spent years making it with limited tools. To really get started I have a list of recommended essential sourdough tools including:
- Sourdough Starter: Make a sourdough starter from scratch, purchase one or get one from a friend.
- Kitchen Scale: I know, I know you want to use cups and volume measurements because it’s familiar, but working with high-hydration dough – I don’t recommend it until you really know the feel of your dough (and even then I still love using a kitchen scale). You’re going to love how easy artisan sourdough recipes are to scale up and down when using metric measurements. Give it a try – promise!
- Dutch Oven: The easiest way for a home baker to get a great loaf of sourdough is with a Dutch oven. There are lots of other options, but I still use a Dutch oven most of the time for consistently good results.
- Mixing Bowl: Any large mixing bowl will work. I do like it to be clear so I can judge how much my dough has risen.
Sourdough Baker’s Timeline
Because sourdough takes time to rise, I include sourdough sample schedules in my sourdough recipes. These schedules are not meant to be followed exactly but rather give you an idea of a timeline – which is very dependent on the temperature of your dough/starter and the activity of your starter.
Note: The schedule assumes a dough temperature of 76-80ºF. I hope it’s helpful to you.
| Day 1 | Mix Levain |
| 9:00 PM – 9:00 AM | Mix Levain Let Rise Overnight at 78ºF Note: Ripe, bubbly, active sourdough starter can be substituted for levain |
| Day 2 | Mix Dough/Bulk Fermentation/Folds/Shape/Cold Fermentation |
| 9:00 AM – 9:30 AM | Fermentolyse (mix flour, water, levain) |
| 9:30 AM – 10:00 AM | Add Salt and Reserved Water Mix Dough and Rest |
| 10:00 AM | Stretch and Fold #1 |
| 10:30 AM | Stretch and Fold #2 |
| 11:00 AM | Stretch and Fold #3 |
| 11:30 AM | Stretch and Fold #4 (if needed) |
| 11:30 AM – 1:00 PM | Rest and complete bulk fermentation at 78ºF |
| 1:00 PM | Pre-shape and Rest |
| 1:30 PM | Shape and begin Cold Fermentation |
| Day 3 | Bake |
| 8:30 AM | Preheat Dutch |
| 9:00 AM | Bake |
Keep in Mind: If your dough and levain are colder than these temperatures, the dough will take longer to rise. If they are warmer, the dough will ferment/rise faster.
How to Maintain Sourdough Temperature: If you are having issues keeping your dough or starter warm enough for it to activate, try a bread-proofing mat, bread proofer or use some of the ideas in my guide on how temperature affects sourdough. You can also increase the amount of starter in your dough to help with colder temperatures. For warmer ambient temperatures, use cold water, your refrigerator and less starter in your dough.
How to Make Classic Sourdough Bread
Mix the Levain

Step 1: Mix the Levain. Take 10 grams ripe, active sourdough starter. Feed it 100 grams flour and 100 grams water (Image 1). Cover and let sit in a warm (78ºF) place for 10-12 hours until bubbly, doubled in size, smells milky sweet and is just about to fall back down (Image 2). Do not use the levain or your sourdough starter if it has not shown these signs. Starter is best to used in its peaked and active state.
Do you have to use a levain in this recipe? No. I prefer it, but if you have a well-maintained and frequently refreshed sourdough starter, you can substitute it in place of the levain in the recipe. A levain is an offshoot of your sourdough starter. It acts as a power feed for your starter and using one will give you a better loaf.
Also Note: The ratios of flour, water, and starter can be adjusted so that your levain will double in the timeframe that works for you. If you want to mix your levain in the morning, mix together 70 grams of ripe/over-ripe starter with 70 grams of flour and 70 of grams water. IF kept at a warm 78ºF temperature, the levain will be doubled in 3-4 hours. If your temperature is colder, the process will take longer.
Fermentolyse (Mix Flour, Water, Levain)

Step 2: Fermentolyse. Mix together water and ripe levain (Image 3). Add bread flour and whole wheat flour and mix together until a shaggy dough forms (Image 4 & 5). Cover the bowl and set in a warm place for about 30 minutes. I like to keep the reserved water and salt next to the bowl so I don’t forget to add it (Image 6).
Note: If you prefer to skip the fermentolyse, you can simply mix all the ingredients together at once. Alternatively, you can opt for an autolyse by mixing only the flour and water, then letting it rest for an hour or up to a few hours. After that, incorporate the levain, salt, and reserved water. This method helps build extra strength in the dough.
Mix the Dough

Step 3: Add Reserved Water and Salt. After a 30-minute rest, add the reserved salt and water (Images 7 & 8). Pinch together the dough with your fingers, incorporating the salt and water into the dough as you go. (Image 9).
Salt slows down and tempers fermentation by causing the gluten strands to contract, which is necessary for dough development. A fermentolyse allows the dough to develop more elasticity and strength before the salt is added.
Step 4: Mix the Dough. Take the dough and continue working with it by slapping it against the side of the bowl and quickly pulling it back (Image 10, 11, 12, 13 & 14). This vigorous mixing helps strengthen the gluten strands quickly in the dough and will result in a stronger loaf with more oven spring. After about 3-5 minutes of mixing, the dough will feel more cohesive and strong. Place the dough back in the bowl or transfer to a clear plastic container or a glass bowl if desired. Cover and set aside for 30 minutes.

I adapted this recipe from the Tartine method that I read about years and years ago in the book, Tartine Bread. That recipe doesn’t call for any vigorous mixing. Over the years I’ve incorporated my own methods to produce a loaf with more strength and oven spring.
Stretch and Folds

Step 5: Stretch and Folds. After 30 minutes of resting (Image 15) you will perform a series of stretch and folds to gently strengthen the dough. To “stretch and fold,” wet your hand (so it doesn’t stick to the dough). Reach down to the bottom of the bowl (Image 16) of dough and pull the dough up and over the top of the dough (Image 17).
Turn the bowl 1/4 turn and repeat the stretch and fold. Turn another quarter turn and repeat. Perform one more 1/4 turn with stretching and folding the dough (Image 18). The more you stretch and fold, the more the dough will resist and tighten up. Once it does that, it’s your sign to stop stretching and folding. Cover the dough and set it aside.

Repeat the series of folds over the course of 1.5-2 hours, (Images 19, 20, 21, 22) stretching and folding the dough every 30 minutes until cohesive and strong. If you forget a set of stretch and folds – don’t worry! Just add it back in when you remember.
What about Coil Folds? You can use coil folds and even lamination with this sourdough bread recipe. I tend to use coil folds for higher-hydration doughs like my sourdough focaccia bread or big batches of this recipe where a coil fold is easier to perform than a stretch and fold.
Rest and Finish Bulk Fermentation

Step 6: Rest and Finish Bulk Fermentation. After the dough is sufficiently strengthened through folds, cover the dough and let it rest and rise at a warm 78-80ºF temperature until it has risen about 30-40%, is doming toward the center and has some scattered bubbles around the edges (Image 23). Those are the signs that the dough is ready for pre-shaping.
Keep in Mind: If your dough is colder, you will want to see a larger percentage rise in the dough before pre-shaping. Dough that is 70ºF throughout the bulk fermentation will need to rise at least 70% in the bowl before it is ready for pre-shaping.
Divide and Pre-Shape the Dough

Step 7: Divide Dough. Dump the dough out onto the counter top and divide into two equal sections of dough with a bench scraper.
Step 8: Pre-Shape the Dough and Bench Rest. Wet your hands and the bench knife with just a little water. Push the bench knife under the dough while using your free hand to tuck the dough under itself (Image 24). Repeat this process going around in a circle until you have a tight ball of dough. Repeat with the second loaf and let the dough rest on the counter. The dough will flatten- like a pancake, over the half hour it rests (Image 26).
If dough is fermenting too quickly – skip the pre-shaping and shape the dough right away. In warmer climates, dough often ferments faster based on the temperature. Watch your dough. If you notice it getting overly sticky, rising too quickly or it is at a high temperature, you may want to skip the pre-shaping and move straight to shaping to get the dough in the refrigerator and cooled down.
Shape the Dough

Step 9: Prepare Bannetons or Bowls. Prepare two bannetons or bowls for the dough to sit in by lining with a hair net or kitchen towel. Lightly flour the bowls. I like to use about 9-inch circular banneetons or 10 inch oval bannetons for this recipe (Images 26).
Step 10: Shape the Dough. Sprinkle some flour over the top of the dough (Image 27). Flip the dough over so the floured side is down on the counter (Image 28 & 29). Going around in a circle, pull the dough sideways towards you (Image 30) and then fold up to the top of the round (Image 31). Move 90 degrees and repeat the same process pulling the dough sideways and then folding up to the top (Image 32 & 33). As you continue this process around the dough, increase the tension as you pull. Gather the bread into a circle and use a bench knife (Image 36) to lift the bread and place into your lined bowl (Image 37). The oval loaf is similar in shaping (Image 34 & 35). Watch the process here.


If you would prefer to bake your sourdough bread in a loaf pan, follow the same shaping method and place the dough in a loaf pan instead.
Stitch and Cold Ferment

Step 11: Stitch the Dough. Let the dough rest for about 5 minutes, and allow the gluten to relax and the dough to spread out just a bit. Stitch the dough up by going around in a circle, pulling pieces of dough from the outer edge to the middle, and then pinching closed (Image 38). This step is completely optional but does give a last little bit of tension to the dough.
Step 12: Cold Fermentation. Cover the dough and stick the dough in the refrigerator for 12-24 hours (Image 39).
Same Day Baking: If you want to bake this recipe the same day and skip the cold fermentation, let the dough rise in the bannetons or bowls on the counter. Do your best to keep the dough warm, in the 78-80ºF range, and allow it to rise for 2-3 more hours. Once the dough has risen another 30-40%, pre-heat the Dutch oven and bake the loaves according to recipe directions.
Preheat Oven and Score Dough


Step 13: Preheat Oven. Place a dutch oven in the oven, lid and all and preheat to 500ºF for 30 minutes.
Step 14: Score the Dough. Dump the dough out onto a piece of parchment paper (Images 40 & 44). Smooth flour over the top of the dough if desired (add a little extra for more contrast if desired) (Images 41 & 45). Use a very sharp knife or bread lame to score the dough. I use my bread lame to make any small decorative scores that are just 1/4-inch deep. Then make one or two larger/longer slashes that go across the dough about 1-inch deep (Images 42, 43, 46 & 47). Watch the process here.
Why Score? Scoring your bread gives you control over where the dough expands as it bakes, allowing it to rise to its full potential. It also enhances the loaf’s appearance, adding character and definition. Without scoring, the dough may not rise as well and could burst unpredictably.
Bake the Bread

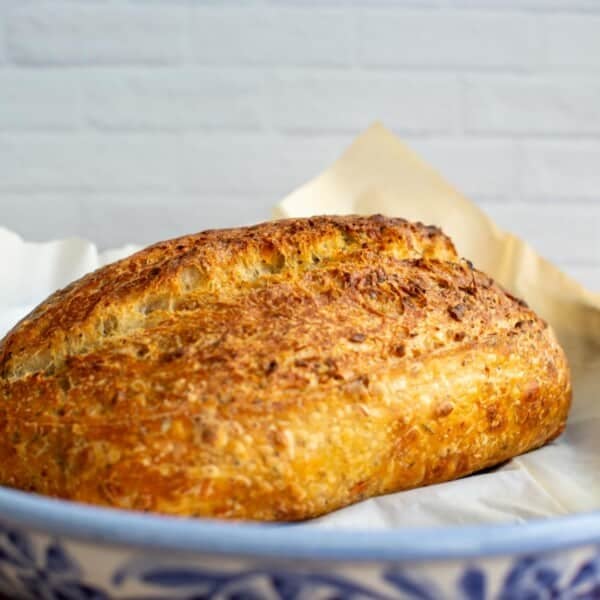
Step 15: Bake the Bread. Carefully remove the dutch oven from the 500ºF oven with hot pads. Take the top off and place your bread into the dutch oven (including parchment paper–this helps with the transfer). Put the whole dutch oven back into your oven. Lower the temperature to 450ºF and bake for 25 minutes. Once 25 minutes are up, take the top off the dutch oven (Image 48) and continue baking for 20 minutes until the bread is a crackly deep brown (Image 49). The loaf should register between 205-210℉ when it’s finished baking.
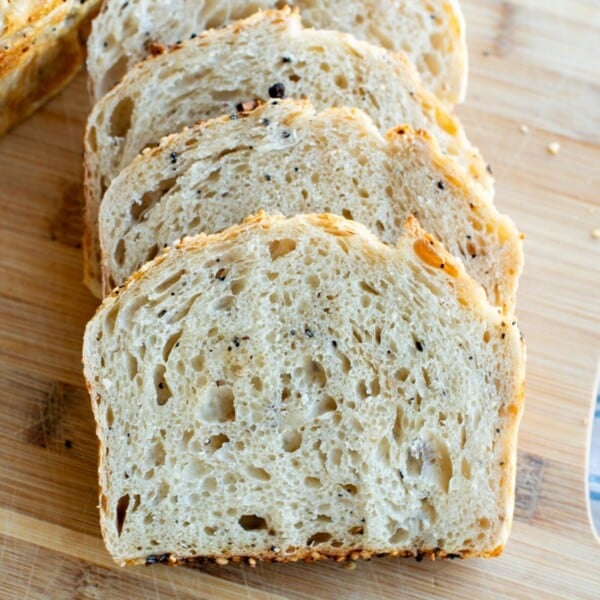
Let the bread cool and then slice and enjoy!
If you don’t want to use a Dutch oven, read about other options for baking sourdough including open-baking, baking a sourdough loaf on your grill and baking in a loaf pan.

How to Store Leftovers
Store leftover sourdough bread in an airtight container or bread bag at room temperature for a day or two. After that freeze the loaf or bread slices (put a piece of parchment in between each slice if desired) for best results. Bread can stay frozen for up to a couple of months.
Amy’s Recipe Tips
How You Maintain Your Starter Matters: Good sourdough starts with a good sourdough starter. A well-maintained sourdough starter that is frequently refreshed will give you the best loaf of bread – or use the levain method as outlined in this recipe that acts as a power feed.
Use Active Levain: Levain or starter that has doubled in size, peaked and is just starting to fall back down is going to have the most wild yeast and least amount of acid carryover into your bread – which will result in the best loaf of sourdough.
Temperature Matters: The temperature of your dough (and starter) will affect how quickly your dough will rise. It’s okay to stick a thermometer in your dough so you know exactly what your temperature is – it may surprise you! Colder dough will need a larger percentage rise than warmer dough.
Proofing Matters: Over and underproofing dough is something that is so tricky for new and experienced sourdough bakers! It can be hard to find that perfectly proofed loaf line because it varies so much every bake. Watch for signs of your dough’s readiness and check your temperatures. At the end of the day, I would prefer my loaf to be over-proofed than under-proofed.
Use a Kitchen Scale: I know, I know. You don’t want to use a scale to measure your flour, water and salt. I get it! I grew up using cup measurements too. BUT, sourdough has taught me how inaccurate cup measurements really are.
Everyone measures a cup of flour differently and when you are working with a higher hydration (more water) dough, it can be difficult to go by “feel” until you have quite a few loaves under your belt. I do include cup measurements in this recipe if you don’t have your scale yet, but I highly recommend using a scale for best results.
Frequently Asked Questions
I love using the levain method because it ensures your sourdough starter is at its peak—ripe, bubbly, and active—before mixing your dough. A well-maintained starter is the foundation of every great sourdough loaf, and a levain acts as a built-in insurance policy, giving you confidence that your bread will rise properly.
That said, if you already follow a solid starter maintenance routine, a levain isn’t strictly necessary. In most recipes, you can substitute ripe, active sourdough starter for the levain and still achieve great results. But if you’re ever unsure, using a levain is an easy way to double-check that your starter is ready to perform.
Typically gummy dough comes from one of two things:
1. Sourdough Starter is not Active Enough – If your starter is still young, it may not be quite ready to raise a loaf of bread. Feed your starter a few more times and use it when it’s very bubbly, doubled in size and just about to fall back down after peaking.
2. An under-proofed loaf – I typically see this with under-proved loaves. Double check your temperature. Make sure your dough has risen before you shape it and stick it in the refrigerator. Under-proved loaves are not fully developed and can turn out gummy – tasting. It can happen with an over-proofed loaf as well, but it is not as common.
Yes! That process is detailed in my new sourdough cookbook, “The Beginner’s Guide to Sourdough,” or cut this recipe in half and just make one loaf.
You don’t have to use whole wheat flour in this recipe. Whole wheat makes the fermentation move a little faster and adds great flavor to the dough, but you can leave it out and substitute bread flour for the whole wheat flour. And if you like the flavor of whole wheat, you may also want to try my whole wheat sourdough bread.
I believe that sourdough can fit into almost anyone’s schedule. Once you understand the simple science behind sourdough, you can make it work for you. Feed your starter or levain different ratios so your starter is ready when you are. Use the refrigerator to slow down the timeline when you aren’t going to be around. Warm the dough up to make it move faster or decrease the amount of starter/levain in your dough to make it move slower. When you learn to manipulate your sourdough then you can make it work for any schedule.
I like to add them in with the second set of stretch and folds or sometimes I will laminate inclusions in the dough after rising. Choose one of my top 10 sourdough add-ins to try in your next loaf and learn how to add inclusions to any sourdough recipe!

Sourdough Artisan Bread Guide
Use this FREE Sourdough Artisan Bread Guide to help you make the best high-hydration loaf of sourdough bread. These articles will help you troubleshoot the entire process of baking a loaf of sourdough bread from start to finish in this free guide.
Sourdough Artisan Bread Guide
 Classic Sourdough Bread
 Essential Tools for Baking with Sourdough
 How to Autolyse and Fermentolyse: Sourdough Artisan Bread
 Bulk Fermentation in Sourdough Artisan Bread
 How to Knead Sourdough Artisan Bread
 Adding Inclusions to Sourdough Artisan Bread
 How to Shape Sourdough Artisan Bread
 How to Score Sourdough Artisan Bread
 How to Bake Sourdough Bread
 How to Bake Sourdough in A Loaf Pan
 Sourdough Artisan Bread Videos
 Sourdough Beginner Guide
More Sourdough Recipes You’ll Love


If you tried this Classic Sourdough Bread or any other recipe on my website leave a 🌟 star rating and let me know how it went in the comments below. Happy Baking!

Classic Sourdough Bread
Save this for later!
Ingredients
Levain (1:10:10, overnight 10-12 hours at 78ºF)
- 10 grams sourdough starter, ripe and active, see recipe notes for other options, about 2 teaspoons
- 100 grams bread flour, scant 3/4 cup
- 100 grams water, about 7 Tablespoons
Classic Sourdough Bread
- 200 grams levain, ripe and active, about 3/4 cup
- 750 grams water, 50 grams reserved for AFTER the fermentolyse, about 3 cups plus 2 Tablespoons water (plus 3 Tablespoons reserved for after fermentolyse)
- 900 grams bread flour, about 6.5 cups
- 100 grams whole wheat flour, about 3/4 cup
- 20 grams salt, about 1 Tablespoon
Instructions
Day 1: Evening, Mix Levain (1:10:10, overnight 10-12 hours at 78ºF)
- Mix together ripe sourdough starter, bread flour and water. Set aside to ripen for 10-12 hours.Note: Ripe, bubbly, active sourdough starter can be substituted for levain in this recipe if desired.
Day 2: Mix Dough/Bulk Fermentation/Shape/Cold Bulk Fermentation (78ºF)
- Fermentolyse: Once the levain is peaked and active (bubbly, doubled in size, milky sweet smell), mix 200 grams levain with 700 grams of water in a large bowl. Warm the water if the ingredients are too cold and cool the water if ingredients are too warm. Add 900 grams bread flour and 100 grams whole wheat flour to the bowl and mix until incorporated and a shaggy dough forms. Cover and let rest for 30 minutes.
- Mixing: After 30 minutes, add the reserved salt and 50 grams of water. Combine using your hands by squeezing the dough between your fingers, pinching chunks of dough and reincorporating together. The dough will break apart and then reform in the bowl through this process. Pick up one side of the dough and fold it over on itself. The dough will be sticky. Wet your hands as needed and continue to work with the dough until all the salt and water has been incorporated. Take the dough and continue working with it by slapping it against the side of the bowl and quickly pulling it back. This vigorous mixing helps strengthen the gluten strands quickly in the dough and will result in a stronger loaf with more oven spring. After about 3-5 minutes of mixing, the dough will feel more cohesive and strong. Place the dough back in the bowl or transfer to a clear plastic container or a glass bowl if desired. Cover and set aside for 30 minutes.
- Bulk Fermentation: Perform 3-4 sets of "stretch and folds."To “stretch and fold,” wet your hand (so it doesn’t stick to the dough). Reach down to the bottom of the bowl of dough and pull the dough up and over the top of the dough. Turn the bowl 1/4 turn and repeat the stretch and fold. Turn another quarter turn and repeat. Perform one more 1/4 turn with stretching and folding the dough. Cover and set aside.Repeat the series of stretch and folds every 30 minutes over the course of two hours. Watch the process here.
- Finish Bulk Fermentation: Let the dough rest in a warm place, for the rest of bulk fermentation, about 1 1/2 – 2 hours at 78ºF. During this time the dough will puff up about 30-40%, become more aerated, start to pull away from the edges of the bowl, and have a few scattered bubbles around the edges/top of the dough. If your dough is not showing these signs, make sure it's warm enough and give it another half an hour or so until it is showing those signs that it's ready to shape.
- Divide: Tip the bowl upside down, allowing the dough to fall onto a clean counter surface. Be gentle to avoid cutting and degassing the dough as much as possible. Use a bench knife to cut the dough into two equal portions.
- Pre-Shape: Wet your hands and the bench knife. Push the bench knife under the dough while using your free hand to tuck the dough under itself. Repeat this process going around in a circle until you have a tight ball of dough. Repeat with the second loaf.
- Bench Rest: Let the dough rest uncovered for about 30 minutes at room temperature. The dough will flatten a bit during this period of time.
- Shaping: After the dough has rested for about 30 minutes it is time to shape the bread into a round. Sprinkle flour on top of the dough. Using the bench knife, lift the dough up off the counter and place it on top of the countertop–floured side down. This ensures that the flour is staying mainly on the outside of the dough. Going around in a circle, pull the dough sideways towards you and then fold up to the top of the round. Move 90 degrees and repeat the same process pulling the dough sideways and then folding up to the top. As you continue this process around the dough, increase the tension as you pull. Gather the bread into a circle and use a bench knife to lift the bread and place into your lined bowl. Watch the process here.
- Stitch the Dough: Let the dough rest and the gluten relax for about 5 minutes before stitching up the dough if desired. This adds a last little bit of tension, but is completely optional.
- Cold Fermentation: Cover the dough with a shower cap, plastic wrap or a reusable cover and store the dough in the refrigerator overnight or for up to 12-24 hours. Alternatively you can let your dough rise outside the fridge for another 2-3 hours, keeping the dough at that 78º F temperature, and then bake your loaves the same day.
Day 3: Score and Bake
- Pre-heat the Oven: Put a dutch oven (top and all) into the oven and preheat to 500ºF for 30 minutes.
- Prepare Dough: Once preheated, pull your first loaf out of the refrigerator. Remove the cover (this is easy to do straight out of the refrigerator if the dough is chilled–not easy if the dough warms up) and place a piece of parchment paper on top of the bread dough. Flip the dough over so that the dough is now sitting on the parchment paper. Take off the bowl/banneton and kitchen towel.
- Scoring: Smooth the flour over the top of the dough (add a little extra for more contrast if desired). Use a very sharp knife or bread lame to score the dough. I use my bread lame to make any small decorative scores first that are just 1/4-inch deep. Then make one or two larger/longer slashes that go across the dough about 1-inch deep. Watch the process here.
- Bake: Carefully remove the dutch oven from the 500ºF oven with hot pads. Take the top off and place your bread into the dutch oven (including parchment paper–this helps with the transfer). Be very careful not to touch the sides of the dutch oven. Put your hot pads back on before you pick up the lid of the dutch oven and place it on top of the bread. Put the whole dutch oven back into your oven. Lower the temperature to 450ºF and bake for 25 minutes. Once 25 minutes are up, take the top off the dutch oven and continue baking for 20 minutes until the bread is a crackly deep brown. The loaf should register between 205-210℉ when it's finished baking.
- Remove the baked loaf from the Dutch oven and pre-heat the dutch oven again for 15-20 minutes. Score the second loaf and bake according to the same directions. Let cool and enjoy!
Video
Notes
Nutrition
Nutrition information is automatically calculated, so should only be used as an approximation.


I am new to sourdough baking but I have never had a fail with a recipe/video done by Amy! She is certainly my GO TO resource, thank
Thanks for your support! We’re glad you love the recipes!
Im having trouble with this coming together like my first one. Either the whole wheat is to soft i dont know. Can I use more whole wheat then all-purpose? And how much. What do think
This recipe is written to be mostly bread flour with just 100 grams of whole wheat flour. You can find a whole wheat sourdough recipe here or a half whole wheat recipe here. Changing the ratios of whole wheat flour on this recipe without adjusting for that in the bulk fermentation time risks an overproofed loaf. Hope that helps!