Affiliate disclosure: This post may contain affiliate links. Please see our disclosure policy.
Around here, we’re big fans of any meal that lets everyone build their own—and pita night is always a win. This sourdough discard pita bread is soft, fluffy, and bakes up with the most satisfying little pockets for all your favorite fillings. It’s become a staple at our house, and no surprise—it’s delicious, easy, and doesn’t get any complaints at the dinner table.
The best part? It uses up sourdough discard and comes together quickly, with that light, airy texture we all love – similar to our favorite sourdough fry bread. We stuff them with everything from grilled chicken to roasted veggies, or just tear and dip with hummus. If you’re looking for a go-to sourdough discard pita recipe that delivers every time, this one’s a keeper.

Save this for later!
Table of Contents
- Steps to the Perfect Sourdough Discard Pita Bread
- Top Tips for a Perfect Pita Bread Pocket
- Sourdough Discard in Pita Bread
- Mixing Sourdough Discard Pita Dough
- Shaping and Rolling Pita Bread
- Baking Pita in a Home Oven
- Baking Pita in an Ooni Pizza Oven
- Fill and Enjoy your Sourdough Discard Pita Bread
- Frequently Asked Questions
- Sourdough Discard Pita Bread Recipe
Steps to the Perfect Sourdough Discard Pita Bread
One of the things that separates pita from naan bread (both the discard version and instant yeast version), soft wrap breads, or even this sourdough discard pide bread is the pocket that is created when pita is baked. That signature pocket is created thanks to a very hot oven, which produces steam as the dough bakes.
The steam causes the dough to puff up quickly, separating the top and bottom layers and forming the pocket. Once the pita cools, the bread will flatten – but the pocket remains, ready to be filled.
That said, pita pockets can be a little finicky and rely on near-perfect conditions to form properly during baking. If you keep the following tips in mind when making homemade sourdough discard pita bread, you’ll get beautiful pockets about 80–100% of the time.


Top Tips for a Perfect Pita Bread Pocket
- HOT, HOT oven: Preheat a pizza stone for 30-40 minutes BEFORE baking the pita (550 degrees if you can, 500 degrees will work too). Baking in an Ooni Pizza Oven is even better for the pocket to form if you have one.
- Tacky Dough: If your pita dough is too dry, it will not form a perfect pocket. Add flour a little bit at a time until it is slightly tacky.
- Double Rise: Let the dough rise once for an hour or longer. Then shape and rise again for about 30 minutes before rolling.
- Roll it THIN: Roll the pita bread as thin as you can without tearing the dough. ¼ inch or thinner works best.
- Create Steam: When baking the pita bread, create steam in your oven by placing a pan with some ice cubes on the bottom rack of your oven OR spritzing the top of the dough with water before putting in oven. If you use an Ooni Pizza oven you don’t need to worry about this step.
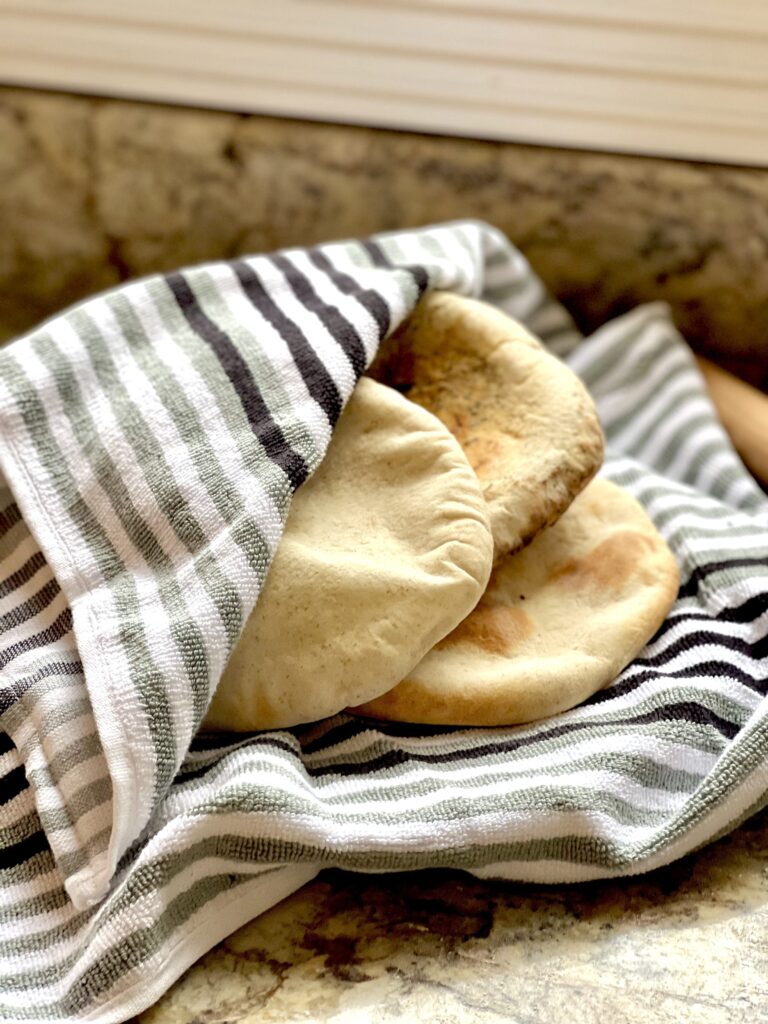
- Wrap Up Warm Pita: To preserve the pocket created in the oven, as soon as the pita is finished baking, remove it from the oven and fold it up in a kitchen towel. Repeat this process with all of the pita bread. This keeps the pita warm and locks in moisture.
Even with all of these tips, it’s still possible your pita will not rise and form a pocket. Don’t despair! The pita bread will still taste very good and hopefully your next pita will form a pocket when baked.


Sourdough Discard in Pita Bread
If you know me, you know I’m always looking for ways to use up some sourdough discard. I love the fermentation benefits (all that “good” bacteria that help maintain a stable, healthy digestive system) and less food waste. Both of these things contribute to me adding sourdough discard to a lot of my baked goods. Waffles, biscuits, chocolate chip cookies, banana bread, you name it – I will try it!
This sourdough discard pita bread is no different. I love that this recipe calls for a whole cup of sourdough discard. If you don’t have discard on hand you can also use sourdough starter instead. Because this recipe uses a lot of discard, it’s important to use discard that is 100% hydration (meaning it’s been fed equal weights water and flour). If you use discard with a higher hydration, you’ll want to add a little more flour to the pita bread. Conversely, if you use a lower hydration discard you’ll want a little less flour. Make sure you are feeling the dough throughout and know when to stop adding flour. Over-flouring the dough leads to a flat and no-pocket pita.


Mixing Sourdough Discard Pita Dough
Pita dough can be mixed using a stand mixer or by hand. When making small batches of dough, like this recipe, I like use a KitchenAid mixer or knead by hand. If I was doubling the recipe and making a larger batch, I would use a Bosch mixer. Using a mixer means you can dump all the ingredients into the mixer fitted with a dough hook, turn it on and let it knead for about 5 minutes. If you choose to mix by hand, whisk together the ingredients (I love this Danish dough whisk) and then knead for 2 minutes by hand. Let the dough rest and gluten relax for about 5 minutes and then knead again for another two minutes. Once the dough has been kneaded, place it in a container, cover it and let the dough rise for about an hour until doubled in size.
Shaping and Rolling Pita Bread
Pita bread dough is initially pre-shaped into small balls before being rolled thin. At this point, you will want to begin pre-heating your oven or pizza oven. Dump the dough out onto a countertop and separate into 8 pieces. Taking a piece at a time, pull up the sides of the dough into the middle while rotating the dough in your hand. Then roll the ball on the countertop to seal the seam and place on the counter. Cover the dough balls and let them rise again for about 30 minutes. Once the balls have risen, use a rolling pin to roll one of the balls out very thin, a little less than 1/4 inch without tearing the dough. Lightly flour a board and place the rolled out dough on the board. It is now ready to be baked in an oven.


Baking Pita in a Home Oven
To get a traditional pocket in pita bread using a conventional oven, you will want to use a baking stone (my favorite one) or pizza stone. The baking stone helps keep the oven hot and is the perfect place to bake the pita bread once it’s pre-heated. Place the baking stone in the oven. Pre-heat the oven to 550 degrees (or the highest temperature your oven will set) for about 30-40 minutes. The extra pre-heating time is important because the stone will take longer to reach the oven temperature and you want your oven to be super hot before baking the pita. Once your oven is pre-heated and ready, it’s time to add some extra steam to encourage the pita to rise. I like to do this by tossing a handful of ice cubes to pan and placing the pan on the bottom rack of the oven, right before I slide the dough onto the pizza stone. You can also spritz the top of the pita with a light mist of water before placing it in the oven. Slide the pita dough into the oven and close the oven. Bake for about 3 minutes until puffed up and lightly brown. Remove immediately from the oven and wrap warm pita in a kitchen towel. Repeat with the remaining pita bread.
Baking Pita in an Ooni Pizza Oven
My favorite way to bake this pita bread is in an Ooni Pizza Oven. I have waxed poetic about my love for the Ooni before and have a few great Ooni specific recipes for Naan bread and Pizza that I love. This sourdough discard pita bread is right up there with those recipes in deliciousness. Pre-heat your pizza oven on the highest setting for about 30 minutes. After 30 minutes turn the temperature down just a bit. Launch the rolled pita dough into the Ooni by quickly thrusting the dough off the board and into the oven. Bake for about 40 seconds to 1 minute until puffed up. Immediately after the pita puffs up all the way, pull it out of the oven, rotate it and place it back in the Ooni, very close to the front opening of the oven. This will allow the pita to continue baking but will keep it from catching on fire (as it has a tendency to do the further toward the back of the oven you put it). After about 20 seconds, remove from the oven and wrap warm pita in a kitchen towel. Repeat with the remaining pita bread.


Fill and Enjoy your Sourdough Discard Pita Bread
Once all the sourdough discard pita bread is baked and resting in a kitchen towel, prepare the fillings. Our family favorite is salad greens, tomatoes, cucumbers, chicken and some tzatziki sauce but the options are endless. Leftover pita can be stored at room temperature in a ziplock bag for 24 hours. Anything more than that can be stuck in the freezer for up to 3 months. Enjoy!


Frequently Asked Questions
It could be a number of reasons. Make sure the oven you are using has pre-heated to the highest setting. Use a baking stone and add steam to your oven or the pita before baking. If none of those work, make sure your dough isn’t too dry and and that you roll the pita bread about 1/4 inch thin with no holes in the dough.
Sourdough discard can be used for 2-3 weeks straight from the refrigerator. Pour off the “hooch,” stir it up and use it in a recipe. Anything older than about 3 weeks can be re-fed and used as a sourdough starter but I wouldn’t use it in my baked goods.
We love eating pita bread with chicken, lamb gyro meat, vegetables, as sandwiches and to dip into curries and soups.
Naan bread is typically larger, softer and does not typically have a pocket in the middle. Pita bread is made from simpler ingredients (flour, water, yeast, oil, salt) is a little drier and has a large pocket in the middle for fillings.
Initially pita bread should be wrapped in a kitchen towel right after its baked. Leftover pita can be stored in an airtight container for about 24 hours. After 24 hours, pita bread can be frozen for up to 3 months. When you’re ready to use it, pull it out of the freezer and thaw or warm up a bit before using.
This can often happen when the Ooni is too hot or the pita bread is stuck too far back in the pizza oven. Turn the temperature down a little if this keeps happening. As soon as the pita bread puffs up, move the pita a little closer to the opening of the pizza oven to finish baking. This should help keep the pita from catching on fire.


Sourdough Discard Pita Bread
Save this for later!
Ingredients
- 225 grams water, about 1 cup, room temperature
- 200 grams sourdough discard, about 1 cup, see recipe note
- 25 grams olive oil, about 2 Tablespoons
- 10 grams granulated sugar, 2 teaspoons
- 8 grams instant yeast, 2 teaspoons
- 12 grams salt, 2 teaspoons
- 35 grams whole wheat flour, about 1/4 cup, see recipe notes
- 410 grams all purpose flour, about 2.5-3 cups
Instructions
Pita Dough
- Kneading by Mixer: To the bowl of a stand mixer, add the warm water, sourdough discard, olive oil, granuated sugar, instant yeast and salt. Stir to combine. With the dough hook running, add the flour and knead for about 5 minutes, adding a Tablespoon or more flour as needed until soft, tacky and smooth.
- Kneading by Hand: Mix together all the ingredients. Spread a little dusting of flour on the counter. Knead for 2 minutes until the dough comes together, adding small amounts of flour as needed. Let rest for 5 minutes, then knead again for another 2 minutes until smooth.
- Cover dough and let rise for about an hour until doubled in size.
- Seperate the dough into 8 equal pieces and roll into balls. Pull up the sides of the dough into the middle while rotating the dough in your hand. Then roll the ball on the countertop to seal the seam and place on the counter. Cover and let rise again, about 30 minutes to an hour.
- Take one risen ball of dough and roll out into a thin circle. The thinner you can roll the pita, the better. Be careful not to "break" any holes in the pita or else it willl not rise with a pocket in the oven.
Baking Pita Bread
- Oven Method: Place a baking stone in the oven. Pre-heat oven to 550ºF. Once the oven is pre-heated for 30 minutes, roll a piece of dough out into a circle. Place the rolled out pita on a lightly floured board. Take a couple ice cubes and toss them in the oven before sliding the pita on the pizza stone. Quickly close the oven door and bake for 2-3 minutes until puffed up and lightly brown. Immediately remove to a plate and cover with a dishtowel. Repeat with remaining dough balls.
- Pizza Oven Method: Pre-heat your pizza oven on high heat for about 30 minutes. Place the rolled out pita on a lightly floured board. Launch the pita into the oven and let it bake for about 1 minute until puffed up. Once puffed up, quickly pull the pita out of the pizza oven and rotate, putting the pita back in the pizza oven very close to the opening (this helps prevent the pita from over-baking and catching on fire). Let bake for about 20 more seconds. Remove to a plate and cover with a dishtowel. Repeat with remaining dough balls.
- Let the pita cool before slicing in half and filling with toppings. Enjoy!
Notes
- Oven is not hot enough. Make sure it’s pre-heated and hot.
- Use a baking stone or turn a baking sheet upside down in the oven.
- Pita needs more added steam
- Pita dough is dry. Keep it covered so it stays moist.
- Dough has holes in it.
Nutrition
Nutrition information is automatically calculated, so should only be used as an approximation.


This absolutely didn’t work for me.
I’m sorry you had trouble with this pita bread. Was there anything specific I can help you troubleshoot?
I like most of your recipes. The questions I have with the pocket bread are: 1) are the ice cubes tossed onto the baking stone? and 2)Not sure of the nutritional information. Most breads have 7-9 grams of protein, while this recipe lists protein at 49grams.
Sorry about the confusion. The ice cubes would not go directly onto your baking stone. You create steam in your oven by placing a pan with some ice cubes on the bottom rack of your oven. Alternatively, you can spritz the top of the dough with water before putting in oven if you don’t want to use the ice cubes. The nutritional information is 7 grams of protein and 49 grams of carbohydrates. Hope that helps!
They came out so perfect!!!!
Thanks for the review!
I’ve made hybrid sourdough pita recipes quite a few times and half of them would puff up and the other half would be just flat breads. Tasty, but not what I was looking for.
This recipe was very easy. The dough came together very nicely and rose perfectly within one hour in my 68° kitchen. I rolled my pitas to 6mm, which were a bit thicker than I normally would have, but I wanted them moew like a naan bread, but without the yogurt (vegan friends).
Each pita took about 2.5 minutes as expected, but the kicker was the ice in the bottom of the oven – it really made a huge difference! 8 puffy, soft, and yummy pita breads!
At 9:00am, I wish I didn’t have Lebanese garlic dip in the fridge. A stinky breakfast to be sure, but a very yummy one! Once again, thanks for the great recipe!
Yum! Thanks for your detailed notes and review.
My wife and I have made this recipe several times now and it’s much superior to the previous all-yeast recipe we were following before starting our sourdough adventure.
We make a double or triple batch every few weeks and freeze them to make falafel rolls with hummus and tabbouleh or Greek lamb or chicken wraps with tzatziki, lettuce and tomatoes in the ensuing weeks.
The only change we make to the recipe is cutting out the sugar completely and reducing the salt by half. They still puff up superbly and taste more to our liking. The frozen pitas even puff up again in the microwave after about 40 seconds!
We also make them larger, using around 120 grams of dough per pita, which is the standard size of most pitas here in Australian stores and restaurants.
We had friends over for a Lebanese feast recently who said they had never tasted pitas so good. Thanks Amy!!!
I’m glad you’ve adjusted the recipe to your liking – thanks for the feedback and review!
I tidied this recipe and it’s perfect. Bit i wanted to ask can i remove the yeast and sugar ?
Because this is a discard recipe, it requires the yeast to rise. The sugar is important for balancing the flavor in this bread (it might taste a bit bland without it.
This was my first try at making pitas and overall I’d say they were a success! I made the dough the night before with a little higher ratio of whole wheat flour than the recipe calls for, left it over night in the fridge, pulled it out the next morning, and baked around 12:30. The sourdough flavor really comes through. My oven only heats to 525° and that may be why they didn’t brown at all?? They did puff up. I baked several on my tortilla griddle high heat and they browned nicely and puffed but not as thoroughly. My main issue is they were kind of big to handle (I don’t have a peel) so next time I’ll make 10 or 12 smaller ones.
Thanks for the feedback and review!
This dough was so easy to work with, and the pitas turned out amazing! Thanks for the great recipe
So glad you loved them! Thanks for sharing.
worked great..they all puffed up…used the oven method….best pita ever
I’m so glad you loved this recipe! Thanks for sharing your review.