Affiliate disclosure: This post may contain affiliate links. Please see our disclosure policy.
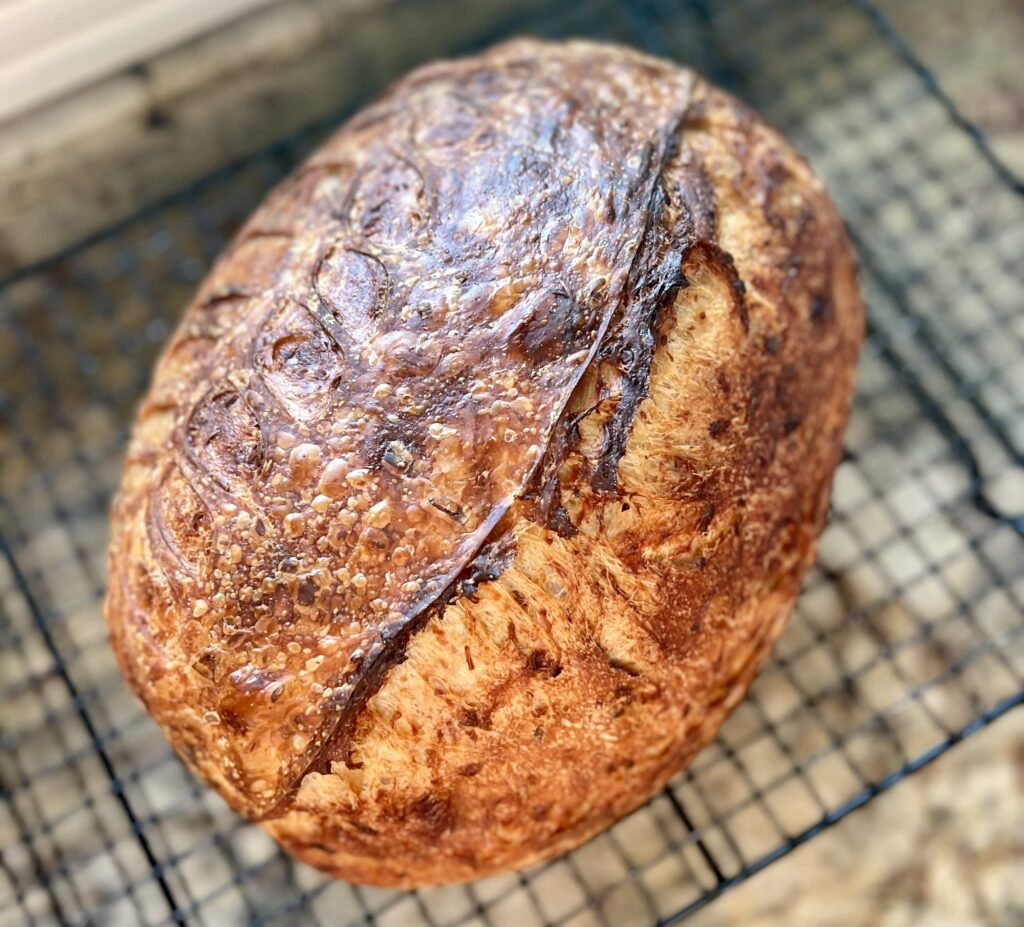
I created this incredibly delicious bread on a whim, over Thanksgiving break with extended family, and it has become a repeat staple at our house. Need something to take to a party? Need a showstopper bread that people can’t stop munching on? Looking for a new take on your traditional sourdough artisan loaf? Make this caramelized onion sourdough bread! The caramelized onion jam pairs so beautifully with the Asiago cheese. It’s a flavor burst in every bite. I can’t wait for you to try it!

Save this for later!
Ingredients in Caramelized Onion Sourdough Bread
- Sourdough Starter: Use an active/ripe sourdough starter (doubled in size/bubbly/mild sour aroma) to mix the levain.
- Bread Flour: I almost always use a 12.5% protein bread flour for any bread that I am kneading. The higher protein content and properly activating the gluten result in a lighter, springy baked good.
- Whole Wheat Flour: I add whole wheat flour to this recipe for a little extra depth of flavor and to encourage fermentation. You can use freshly milled whole wheat flour or whole wheat flour from the grocery store.
- Caramelized Onion Jam: This bread is incredible with Divina Caramelized Onion Jam. I’ve found it in my local grocery store cheaper than you can purchase it online, so look there. You can also make your own caramelized onion jam and substitute it if desired.
- Asiago Cheese: I love the flavor of Asiago Cheese in this bread, or try it in my Sourdough Asiago Bagel Loaf, but any semi-hard cheese will work or even a combination of cheeses. I always prefer shredding cheese myself if I can, but a pre-shredded Asiago should work in this case.
- Salt: Salt enhances the flavor, don’t leave it out!

Sample Sourdough Schedule for Caramelized Onion Sourdough Bread
A sample baking schedule helps me when baking with sourdough. Sourdough takes much longer to rise than commercial yeast bread. This schedule helps me plan my bake.
A few notes: This schedule assumes the dough temperature is 78°F throughout the process. If you’d like to make the bread all on the same day, skip the cold fermentation and let the dough rise for a few hours in a banneton before baking.
| Day 1 | Levain/Mixing/Bulk Fermentation/Shaping/Cold Fermentation |
| 8:00 AM –11:30 AM | Mix Levain. Let sit at 78°F for about 3-4 hours until doubled/bubbly and ripe. |
| 11:30 AM | Fermentolyse: Mix bread flour, whole wheat flour, water and ripe/active/bubbly levain. Let sit for 30 minutes before adding in the salt and reserved water. |
| 12:00 PM | Mix dough with salt and reserved water |
| 12:30 PM 1:00 PM 1:30 PM 2:00 PM | Stretch and Fold #1 Stretch and Fold #2 Add caramelized onion jam and shredded Asiago Stretch and Fold #3 Stretch and Fold #4 if desired |
| 3:30 PM | Bench Rest |
| 4:00 PM | Shape dough Begin cold fermentation |
| Day 2 | |
| 9:00 AM | Preheat Dutch Oven |
| 9:30 AM | Score and Bake |
How to Make Caramelized Onion Sourdough
Mix Levain
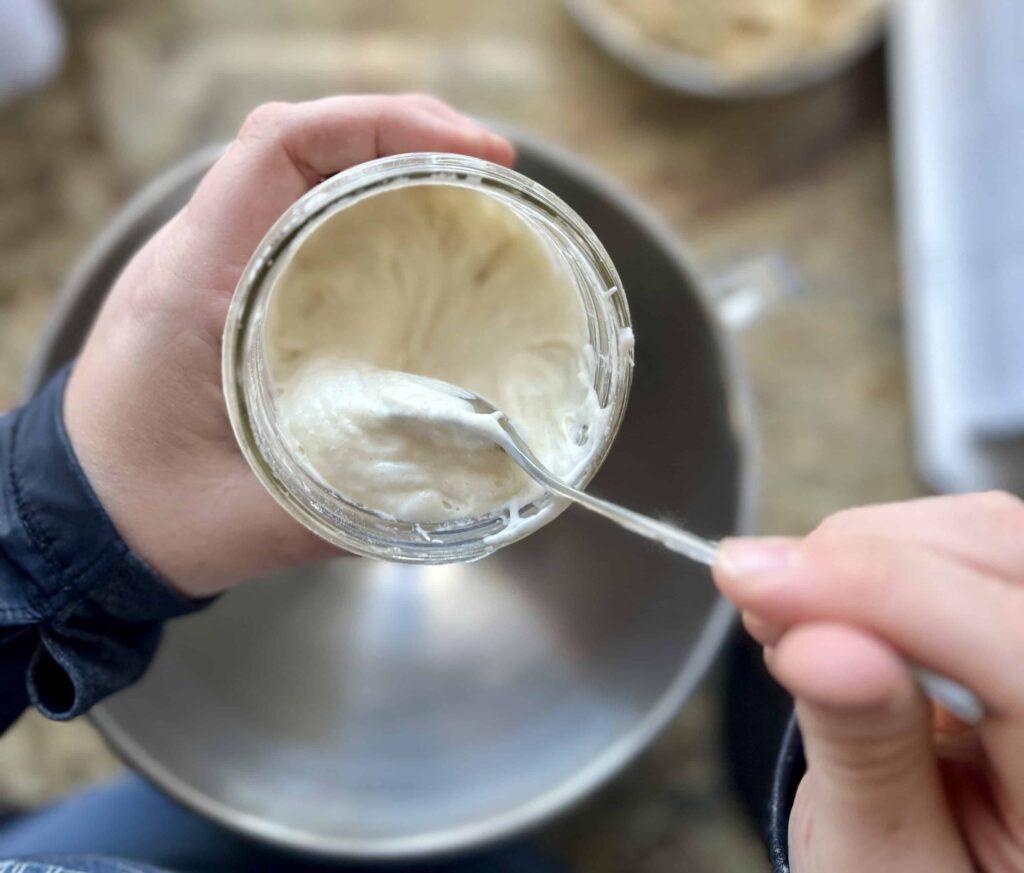
1:1:1 Levain (ready in 3-4 hours/same day): This recipe calls for a levain mixed the same day you mix the dough. It should take 3-4 hours until it’s ready to be mixed with the dough, if you keep the levain temperature at 78-80°F. Levain is ready when it has doubled in size, has lots of bubbles, a slightly sour aroma and is just about to start going down from its peak height. Mix together:
- 35 grams of ripe/mature starter
- 35 grams of warm water
- 35 grams of bread flour
If you prefer to mix the levain the night before, you can mix a 1:10:10 levain that is ready in 10-12 hours or overnight. Mix together:
- 5 grams of ripe/mature sourdough starter
- 55 grams water
- 55 grams bread flour
Begin Bulk Fermentation: Fermentolyse
As soon as the levain is ready (bubbly, doubled in size, peaked), mix together the ripe levain, bread flour, whole wheat flour and water. This method helps strengthen the gluten strands in the dough and gives a better overall texture and crumb to this bread. Cover the dough, set it in a warm (78°F) place and let it rest for 30 minutes.
After 30 minutes, add the salt and 25 grams of reserved water. Pinch chunks of dough and reincorporate them together gently. Pick up one side of the dough and fold it over on itself. Wet your hands as needed and continue to work with the dough, gently kneading until all the ingredients are incorporated and the dough is smooth. This will probably take 3-5 minutes. Transfer the dough to a plastic container or a glass bowl if desired.


Bulk Fermentation: Stretch and Folds
In artisan style bread we don’t use traditional kneading methods, instead we use a series of gentle folds to help strengthen the gluten strands in the dough. This dough usually gets about 3-4 sets of stretch and folds over a 2 hour period, if the dough is kept right around 78°F.
Stretch and Fold: To “stretch and fold,” wet your hand (so it doesn’t stick to the dough). Reach down to the bottom of the bowl of dough and pull the dough up and over the top of the dough. Turn the bowl a quarter turn and repeat the stretch and fold. Turn another quarter turn and repeat. Perform one more quarter turn with stretching and folding the dough. Cover and set aside for 30 minutes. Repeat every 30 minutes for a total of 3-4 times.

Adding Inclusions to Caramelized Onion Sourdough Bread
Adding in Caramelized Onion Jam and Asiago: Right before your second set of stretch and folds, add the caramelized onion jam and grated Asiago to the top of the dough. As you stretch and fold the dough, the inclusions will incorporate. Alternatively, you can use coil folds to add the inclusions if you prefer. Repeat another set or two of stretch and folds until the caramelized onion jam and Asiago is spread evenly throughout the dough.
You can also try laminating in the onion jam and Asiago in place of a stretch and fold, or at the end of bulk fermentation right before shaping. Read more about adding inclusions here.


Bulk Fermentation: Resting and Pre-Shaping the Dough
Rest: After the 2-hour period of stretch and folds, let the dough rest in a warm 78-80°F place until puffed up and jiggly with a few scattered bubbles around the top. This usually takes 1.5-2 hours. If the dough doesn’t look like this, give it another half hour and check again.
Pre-Shaping: Once the dough has rested and is showing signs of readiness, dump the dough out on the counter. Wet your hands (and the bench knife if needed) and push the bench knife under the dough on one side, with your free hand on the other side to tuck the dough under itself. Turn the dough tightly on the counter until it forms a smooth round ball. If any of the inclusions pop out, simply remove it from the top of the dough and push it into the underside of the dough. Let the dough sit for about 30 minutes, uncovered. It will flatten out a little bit during this time and will be ready for shaping.


Shaping the Dough
Prepare a banneton or small bowl. Place a kitchen towel or hair net in the bowl and liberally flour. If you use the hair net, you should not need to use much if any flour if using a cold ferment. Using the bench knife, lift the dough up off the counter and place it on top of the countertop, floured side down. Pull the dough down toward you and then fold up to the middle of the dough. Take the right edge and pull out and then into the middle of the dough. Take the left side of the dough and stretch out and then back to the middle. Repeat with the top of the dough, forming a little “package” of dough. If any caramelized onions pop out, remove them from the top of the dough and place them inside the bottom of the dough. This keeps them from burning on the top. Gather the bread into a circle or oval and lift the bread, placing it in your lined bowl.

Cold Fermentation
I almost always use a cold fermentation for my sourdough artisan bread, and the same goes for this caramelized onion sourdough bread. Cover the dough and place in the refrigerator for 12-20 hours. If it goes a little longer than that, it should be okay – up to as much as 48 hours depending on the temperature of your refrigerator.
Want to bake this the same day you mix the dough? Leave the dough to continue rising in a warm place for a few hours until puffy, jiggly and risen. Pre-heat oven and bake.

Baking Caramelized Onion Sourdough Bread
Pre-heat the Oven: Put a Dutch oven (top and all) into the oven and preheat to 500°F. Allow the Dutch oven to heat for about 30 minutes to an hour at 500°F. This builds up steam, which is necessary to achieve the beautiful oven spring and perfect crust that artisan bread is known for.
Scoring the Dough: Once the oven is preheated for 30 minutes, pull the loaf out of the refrigerator. Remove the plastic wrap (this is easy to do straight out of the refrigerator if the dough is chilled – not easy if the dough warms up) and place a piece of parchment paper on top of the bread dough. Flip the dough over so that it is now sitting on the parchment paper. Take off the bowl/banneton and kitchen towel. Smooth the flour over the top of the dough and use a bread lame or very sharp knife to score the dough. I find a simple score is best when working with this dough.
Baking the Bread: Carefully remove the Dutch oven from the 500°F oven with hot pads. Take the top off and place your bread into the Dutch oven (including parchment paper – this helps with the transfer). Be very careful not to touch the sides of the hot Dutch oven. Put your hot pads back on before you pick up the lid of the Dutch oven and place it on top of the bread. Put the whole Dutch oven back into your oven. Lower the temperature to 450°F and bake for 20 minutes. Once 20 minutes are up, take the top off the Dutch oven and continue baking for 20 minutes until the bread is fully baked.


If you liked this recipe, you’ll love…
- Jalapeño Cheddar Sourdough Bread
- Chocolate Sourdough Bread
- Cranberry Pecan Sourdough Bread
- Sourdough Artisan Bread
Frequently Asked Questions
I like to let my loaf cool completely. Then slice, stick in an airtight bag and freeze. You can also freeze the whole loaf and then let it thaw or warm back up in the oven for a few minutes before enjoying.
Yes. You can make your own onion jam. I’ve made it before and it is delicious when added to the bread. Choose a recipe you like and make sure it cools before adding it. You can also dice onions, caramelize them and add them in place of the onion jam if desired.
Yes. Choose whatever cheese you like. I think Asiago pairs well with this recipe, but you could also substitute any semi-hard cheese or a combination of cheeses. If you don’t want to use any cheese in this recipe, you can leave it out.


Caramelized Onion Sourdough Bread
Save this for later!
Ingredients
Levain (1:1:1, 3-4 hours before)
- 35 grams ripe sourdough starter, about 2 Tablespoons
- 35 grams bread flour, about 1/4 cup
- 35 grams water, about 2 Tablespoons
Caramelized Onion and Asiago Sourdough
- 100 grams ripe/bubbly/peaked levain, scant 1/2 cup
- 375 grams water, 25 grams reserved for after fermentolyse, about 1 1/2 cups water (plus 1 Tablespoon reserved for after fermentolyse)
- 450 grams bread flour, 12.5% protein content, about 3 1/4 cup
- 50 grams whole wheat flour, about 1/3 cup
- 10 grams salt, about 1.5 teaspoons
- 100 grams caramelized onion jam, see recipe notes, about 1/2 jar
- 100 grams shredded Asiago cheese, see recipe notes, about 1 cup
Instructions
Levain (1:1:1, 3-4 hours before, 78 degrees F)
- Mix Levain: Mix together ripe/active sourdough starter with bread flour and water. Cover loosely and let sit 3-4 hours at 78°F until doubled, bubbly & peaked.
Caramelized Onion Asiago Sourdough
- Note: Maintain the dough temperature at 78-80°F during the bulk fermentation for best results.
- Fermentolyse: Once the levain is ready (bubbly, doubled in size, milky sweet smell), mix together 100 grams levain, 350 grams water (warm the water if the ingredients are too cold and cool water if the ingredients are too warm), 450 grams bread flour and 50 grams whole wheat flour. Let rest for 30 minutes.
- Mixing: After 30 minutes, add the reserved 10 grams salt and 25 grams of water. Combine using your hands by squeezing the dough between your fingers, pinching chunks of dough and reincorporating together. The dough will break apart and then reform in the bowl through this process. Pick up one side of the dough and fold it over on itself. The dough will be sticky. Wet your hands as needed and continue to work with the dough until all the salt and water has been incorporated. Transfer the dough to a plastic container or a glass bowl and cover.
- Stretch and Folds: Perform a series of “stretch and folds” throughout the next 2 hours. The goal is to strengthen the dough. To “stretch and fold,” wet your hand (so it doesn’t stick to the dough). Reach around the dough down to the bottom of the bowl, pull the dough up and over and place it on top of the dough. Turn the bowl a quarter turn and repeat the stretch and fold. Turn another quarter turn and repeat. Perform one more quarter turn, stretching and folding the dough. Cover and set aside. Take note of how the dough feels through this process. It will go from feeling a little shaggy to smooth and elastic. Cover the bowl and wait about 30 minutes in between stretch and folds
- Stretch and fold #1: 30 minutes into bulk fermentationStretch and fold #2: 30 minutes later, During this stretch and fold, spread the onion jam and asiago on top of the dough. Perform stretch and fold #2, adding the inclusions in as you fold.Stretch and fold #3: 30 minutes later Stretch and fold #4: Optional, if you want to disperse the inclusions more or you think your dough needs a little more strength.
- Rest: Cover the dough and let rise for 1.5-2 more hours. You’ll know the dough is ready to shape when the dough is puffed up, jiggles when you shake the bowl, has scattered bubbles visible on the sides and top.
- Pre-shape: Tip the bowl upside down, allowing the dough to fall onto a clean counter surface. Be gentle to avoid degassing the dough as much as possible. Wet your hands and the bench knife if needed and push the bench knife under the dough on one side and your free hand on the other side to tuck the dough under itself. The goal is to introduce some tension into the dough. Repeat this process, going around in a circle until you have a ball of dough.
- Bench Rest: Let the dough rest uncovered for about 30 minutes at room temperature. The dough will flatten (like a pancake) during this period of time. This allows the gluten in the dough to relax and prepares the dough to be shaped.
- Shaping: Prepare a bowl or banneton. Place a kitchen towel or hair net in the bowl and liberally flour as needed. Sprinkle a little flour on top of the dough. Using a bench knife, lift the dough up off the counter and place it on top of the countertop – floured side down. This ensures that the flour is staying mainly on the outside of the dough. Going around in a circle, pull the dough sideways towards you and then fold up to the top of the round. Move 90 degrees and repeat the same process pulling the dough sideways and then folding up to the top. As you continue this process around the dough, increase the tension as you pull. Gather the bread into a circle and place into a lined bowl. Remove any caramelized onions that have popped out on the surface of the dough to prevent burning in the oven.
- Cold Fermentation: Cover the dough with the tea towel/shower cap/plastic wrap and refrigerate overnight or up to 12-20 hours. If you want to bake the same day, you can let the dough rise for about 3-4 hours until puffed up and risen. Then bake according to recipe directions.
- Preheat: Put a Dutch oven (top and all) into the oven and preheat to 500°F for 30 minutes. You are working with very high temperatures, so make sure you have some good hot pads. Once preheated for 30 minutes, pull the loaf out of the refrigerator. Remove the covering. Place a piece of parchment paper on top of the dough. Flip the dough over so it is now sitting on the parchment paper. Take off the bowl/banneton and the kitchen towel.
- Scoring: Use a very sharp knife or bread lame to score the dough. Take the bread lame and score on one side of the dough, at a shallow angle, about 1 inch deep. Remove any inclusions that pop out. Score straight from the refrigerator for best results.
- Baking: Carefully remove the Dutch oven from the 500°F oven. Take the lid off and place your bread into the Dutch oven (including parchment paper – this helps with the transfer). Put the lid on and put back in the oven. Lower the temperature to 450°F and bake for 25 minutes. After 25 minutes, take the lid off the Dutch oven and continue baking for 20 minutes until the bread is a crackly deep brown. Remove the Dutch oven and let bread cool. Enjoy!
Notes
Nutrition
Nutrition information is automatically calculated, so should only be used as an approximation.


My dough was extremely wet and didn’t rise in the oven. The bulk fermentation was on point and it cold proofed for 12 hours
I’m sorry your loaf didn’t get a good oven rise. That’s always frustrating, especially when everything seems to be going right. If the dough felt extremely wet, it may have just been a little too hydrated or the structure wasn’t quite strong enough to hold its shape in the oven. Hopefully the next loaf behaves better!
This recipe is absolutely phenomenal! Holy wow! I just made another loaf of it today and added maple bacon to it 🫣
Maple bacon sounds like an amazing inclusion. Yum!
I do this with a roasted garlic and onion jam, with asiago, and it’s definitely a fan favorite!
Yum! That sounds delicious.
Do you think this would work as a croissant loaf?
I haven’t tried it, but I think it would turn out delicious!
This is a seriously delicious, flavorful loaf of bread! Ive never even seen jarred caramelized onions- what a great shortcut! I was nervous when the dough was wetter than my usual loaf- quite a slippery stretch and fold process. Im glad I didnt make adjustments because this recipe, as followed, resulted in a wonderfully tender and moist loaf. Im excited to bake it again!
It’s one of my favorite recipes too! I’m glad you trusted the process and got a great loaf.
I am a newbie, but am obsessed and over the last 3 months have baked close to 2 dozen loaves, most of which I give away. I was so excited to try this, and followed the recipe exactly. But mine came out much darker and the bottom is black. Have not tried it yet but am hopeful that it will taste fine. Any thoughts on how to salvage a burnt bottom would be appreciated.
Do you have a baking stone or pizza stone to put in the bottom of your oven? That can help draw some heat to allow for a more even bake. Some ovens bake hotter too, so you could reduce your oven temperature by 20 degrees or so to compensate if this continues to be an issue. Hope that helps!
Soo good! I didn’t know onion jam was a thing, but wow! This loaf is so good and takes your turkey sandwich to a whole new level. Watch the loaf closely during the final uncovered baking as the onion jam can burn quickly. There are a whole host of savory jams out there you can use. I’m having fun with this one. Thanks Amy
I’m glad you love it – it’s a favorite for me too! Thanks for the review.
Amy, this sounds delicious! I am very new to sourdough baking. I just made my fourth loaf yesterday. All 4 have turned out wonderfully. I have been using 500 g flour, 150 g active starter, 300 g water, and 10 g sea salt. I feed my starter twice the day before I bake at 1:1:1 and then 1:1.5:1.5. When I’m making my dough, I don’t do it in stages, I just mix it all together at once, wait 30 minutes, and start my stretch and folds. Since I like my bread and have been successful, why would I want to do more work or take a risk at changing the process?
My real question for you is, do you think I can just make the recipe I have been making and just add in the onions and cheese during my first set of stretch and folds? I would probably just use caramelized onions, not jam as other people have commented that the jam makes the dough very wet, and I try to avoid added sugar as much as possible. Thank you for any advice you give.
You can do whatever works for you. This recipe calls for a fermentolyse, which helps form the gluten structure on these higher hydration doughs. You can try just adding caramelized onion (and cheese) and see if you like how it turns out!
I usually love all her recipes but this one just wasn’t my favorite. First off I followed the recipe to a T and it turned was so wet I couldn’t even shape it or preform coil folds. I still followed through and baked it. The bake came out okay but the flavor just wasn’t what I wanted. I honestly think the onion jam was just too much and too wet. Would not make again.
I’m sorry it wasn’t your favorite loaf. The onion jam definitely has a distinctive flavor that people either seem to love or hate. Better luck with your next loaf!
I have made this several times, and I need help.
when adding the cheese and jam, the dough is very very wet. almost too wet to stretch and fold. it is slippery. I do the best I can. But it did bulk ferment fine.
is it me? as I have made this several times and the same thing happens.
your photos make it look almost dry, but the jam is Definity adding liquid to the dough. help please
The onion jam definitely does add some extra moisture. What brand of onion jam are you using? When you add the inclusions during the second stretch and fold they won’t be entirely incorporated yet. They should become more incorporated with the next two sets of stretch and folds so that the dough is more cohesive by the end of the bulk fermentation. Hope that helps!
The Davina. It is so.liquidity that the dough doesn’t come together. It is very slippery.. using the same as the recipe
Hmm… I’ve made this recipe with that same brand multiple times. My dough also comes out pretty slippery when the onion jam is added, but after several rounds of stretch and folds it is incorporated and cohesive. You could try adding a bit more flour next time? Or give it an extra set of stretch and folds prior to adding the inclusions?