Affiliate disclosure: This post may contain affiliate links. Please see our disclosure policy.
Get ready to fall in love with this Half Whole Wheat Sourdough Artisan Bread recipe! It’s the ideal recipe to start adding more whole grains into your sourdough. With a perfect balance of half whole wheat flour and half bread flour, this recipe not only amps up the nutrition but also delivers on flavor – just like my Sourdough Spelt Bread and Einkorn Sourdough Bread if you are looking for loaves made with Ancient Grains.
Or try my favorite Oatmeal Sourdough Loaf – another great whole grain option. Whether you opt for your favorite freshly ground whole wheat flour or a store-bought option, this recipe is a keeper. Give it a try – I hope you love it!

Save this for later!
Table of Contents
- Ingredients in Half Whole Wheat Sourdough Bread
- Sample Sourdough Schedule for Half Whole Wheat Sourdough Artisan Bread
- Some Tips for Using Whole Wheat Flour in the Dough
- Mixing A Levain
- Bulk Fermentation: Fermentolyse
- Bulk Fermentation: Mixing the Dough
- Bulk Fermentation: Stretch and Folds & Rest
- Pre-Shaping and Shaping the Dough
- Cold Fermentation
- Baking Half Whole Wheat Sourdough Artisan Bread
- Frequently Asked Questions
- Half Whole Wheat Sourdough Artisan Bread Recipe
Ingredients in Half Whole Wheat Sourdough Bread
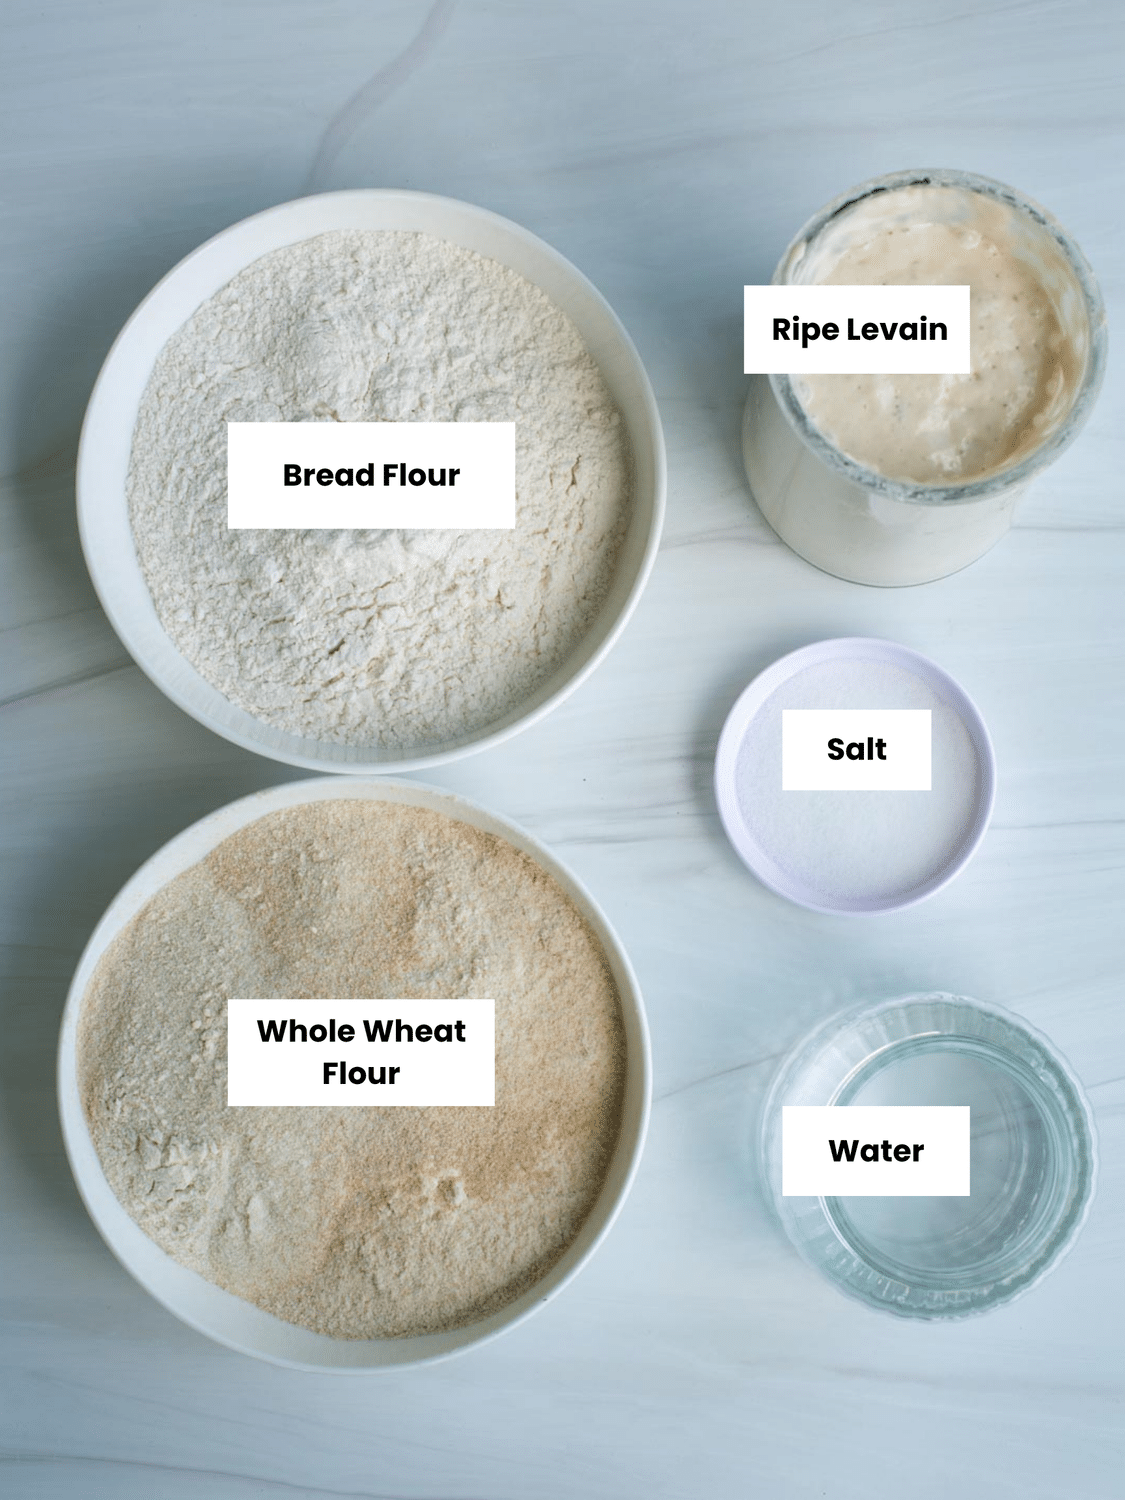
- Whole Wheat Flour: In this recipe I use a freshly milled hard whole wheat flour. I like a combination of white hard wheat and red hard wheat, or you can choose to use just one of them. Both are high in protein (13-14%) and are milled using a grain mill (I have the Harvest Grain Mill). You can also use aged whole wheat flour from the grocery store. Make sure to choose a wheat that has a flavor you enjoy.
- Bread Flour: I almost always use a 12.5% protein bread flour for any bread that I am kneading. The higher protein content and properly activating the gluten results in a lighter and springy baked good.
- Sourdough Starter: Use an active/ripe sourdough starter (doubled in size/bubbly/mild sour aroma) to mix the levain. I use my regular sourdough starter to mix this levain. If you maintain a whole wheat starter, you can use that too.
- Water: Depending on the temperature of the other ingredients and the temperature inside your kitchen, you’ll want to use either cool, warm or room temperature water. This strongly influences how well your dough will rise (especially in the winter).
- Salt: Salt enhances the flavor and helps temper the yeast. I delay adding the salt to help give the dough more elasticity in the first 30 minutes. Then I add the salt with a little extra water. Don’t leave out the salt!
Sample Sourdough Schedule for Half Whole Wheat Sourdough Artisan Bread
A sample baking schedule helps me when baking with sourdough. Sourdough takes much longer to rise than commercial yeast bread. This schedule helps me plan my bake.
A few notes: This schedule assumes the dough temperature is 78°F during bulk fermentation and 78-80°F during proofing. Whole wheat flour tends to move more quickly through the fermentation process and freshly milled whole wheat moves even more quickly. Watch your dough closely so it doesn’t overproof. If you want to slow down the process a little, keep the dough at a lower temperature.
| Day 1 | |
| 8:00 AM – 11:30 AM | Mix levain. Cover and let ferment at 78°F for about 3 -4 hours until peaked, bubbly and active. |
| 11:30 AM – 12:00 PM | Fermentolyse Dough |
| 12:00 PM | Mix Dough |
| 12:30 PM | Stretch and Fold #1 |
| 1:00 PM | Stretch and Fold #2 |
| 1:30 PM | Stretch and Fold #3 |
| 2:00 PM | Stretch and Fold #4 |
| 2:00 PM – 3:30 PM | Bulk Ferment 1.5 to 2 hours |
| 4:00 PM | Pre-shape |
| 4:30 PM | Shape and begin cold fermentation |
| Day 2 | |
| 8:00 AM | Score and Bake |

Some Tips for Using Whole Wheat Flour in the Dough
Baking with whole wheat flour presents some challenges, but also a whole lot of flavor and nutrition. You can read more about baking with whole wheat flour here. These are a few tips to keep in mind when using whole wheat flour:
- Fermentation will go faster: This recipe combines bread flour and whole wheat flour to get a loaf with a lot of flavor and good oven spring. Using a large percentage of whole wheat flour in the dough is going to speed up the fermentation compared to a normal loaf of sourdough artisan bread.
- Use freshly milled flour if possible: I much prefer freshly milled flour over an aged whole wheat flour. It tastes better and has more nutrients than a flour that has sat around for some time. But, if you have a favorite whole wheat flour you purchase (instead of milling your own), it will work for this recipe too. Learn more about the different types of whole wheat flour I recommend here.
- Whole wheat flour absorbs more water: The bran in whole wheat flour readily absorbs water, so you may need to add a little extra water when mixing the dough if it’s feeling too stiff and tight.


Mixing A Levain
Because this bread uses a combination of whole wheat and bread flour, I make a levain using my bread flour. However, you can make a levain with a combination of flours, alternatively you can make a whole wheat levain. If you choose to add whole wheat to your levain, the levain will be ready earlier than if you are using bread flour to mix it.
1:1:1 Levain (ready in 3-4 hours at 78°F): This recipe calls for a levain made in the morning before you mix up your dough. Keep the levain at 78-80°F for consistent results. Levain is ready when it has just about doubled in size, has lots of bubbles, a slightly sour aroma and is just about to start going down from its peak height. Mix together:
- 40 grams of ripe/mature starter
- 40 grams of warm water
- 40 grams of bread flour
If you prefer to mix a levain the night before you mix your dough, you can use a 1:10:10 ratio and mix together 6 grams ripe starter with 60 grams water and 60 grams bread flour. Keep it at 78-80°F and it will be ready in about 10-12 hours.

Bulk Fermentation: Fermentolyse
When your levain is ripe, bubbly, doubled in size and active, it’s time to mix your dough. This recipe calls for a “fermentolyse”, which is a short 30 minute mixing and resting of the flour, water and levain. Hold back 20 grams of water and all of the salt to mix in after the resting period. Mix together the ripe levain with the bread flour, whole wheat flour and water until it forms a shaggy dough. Cover and let sit for 30 minutes. Note that fermentation time begins when the levain is added. The total bulk fermentation time for this recipe (INCLUDING stretch and folds) is 4-5 hours. Read more about the autolyse/fermentolyse process here.

Bulk Fermentation: Mixing the Dough
After a 30 minute fermentolyse, it’s time to mix your dough. Add the salt and reserved water on top of the fermentolysed dough. Pinch chunks of dough and reincorporate them together gently. Pick up one side of the dough and fold it over on itself. The dough will be sticky. Wet your hands as needed and continue to work with the dough, gently kneading until all the ingredients are incorporated and the dough is smooth. This will probably take 3-5 minutes. If you feel the dough needs a little more water, add it in during this mixing time. Transfer the dough to a plastic container or a glass bowl if desired.

Bulk Fermentation: Stretch and Folds & Rest
In artisan bread we don’t use traditional kneading methods, instead we use a series of gentle folds to help strengthen the gluten strands in the dough. This dough usually gets about 3-4 sets of stretch and folds over a 2 hour period, if the dough is kept right around 78°F.
Stretch and Fold: To “stretch and fold,” wet your hand (so it doesn’t stick to the dough). Reach down to the bottom of the bowl of dough and pull the dough up and over the top of the dough. Turn the bowl a quarter turn and repeat the stretch and fold. Turn another quarter turn and repeat. Perform one more quarter turn with stretching and folding the dough. Cover and set aside for 30 minutes. Repeat every 30 minutes a total of 3-4 times.
Rest: After the 2-hour period of stretch and folds, finish the bulk fermentation with the dough resting in a warm 78-80°F place until puffed up and risen about 30-40%. The dough will be jiggly with a few scattered bubbles around the top. This usually takes about 1.5 – 2 hours at 78°F. Because this recipes uses 50% whole wheat flour, the dough typically moves quickly through this fermentation process. Check on the dough frequently.


Pre-Shaping and Shaping the Dough
Pre-Shaping: Dump the dough out on the countertop. Wet your hands and the bench knife if needed and push the bench knife under the dough on one side and your free hand on the other side to tuck the dough under itself. The goal is to introduce some tension into the dough. Repeat this process going around in a circle until you have a ball of dough. Let rest on the counter for 30 minutes uncovered.
Shaping: Prepare a banneton or small bowl. Place a kitchen towel or hair net in the bowl and liberally flour. If you use the hair net, you should not need to use much flour. Using the bench knife, lift the dough up off the counter and place it on top of the countertop – floured side down. Pull the dough down toward you and then fold up to the middle of the dough. Take the right edge and pull out and then into the middle of the dough. Take the left side of the dough and stretch out and then back to the middle. Repeat with the top of the dough, forming a little “package” of dough. Gather the bread into a circle and use a bench knife to lift the bread and place into your lined bowl.


Cold Fermentation
I almost always use a cold fermentation for all my sourdough artisan bread recipes. This recipe is no different, EXCEPT, the fermentation time is moving more quickly due to the higher percentage of whole wheat flour in the dough. Half whole wheat sourdough artisan bread dough cannot sit in the refrigerator much longer than 18 hours (assuming you followed the temperature recommendations) or else it will over-proof. Cover the dough in the banneton and place in the refrigerator for 14-18 hours. If it goes a little longer than that, it may be a little over-proofed. I would not exceed 24 hours with this loaf.

Baking Half Whole Wheat Sourdough Artisan Bread
Pre-heat the Oven: Put a Dutch oven (top and all) into the oven and preheat to 500°F. Allow the Dutch oven to heat for about 30 minutes at 500°F. This builds up steam, which is necessary to achieve the beautiful oven spring and perfect crust that artisan bread is known for.
Scoring the Dough: Once the oven is preheated for 30 minutes, pull the loaf out of the refrigerator. Remove the plastic wrap or bowl covering (this is easy to do straight out of the refrigerator if the dough is chilled – not easy if the dough warms up) and place a piece of parchment paper on top of the bread dough. Flip the dough over so that it is now sitting on the parchment paper. Take off the bowl/banneton and kitchen towel. Smooth some flour over the top of the dough (add a little extra for more contrast if desired) or leave the flour off completely for no contrast. Use a bread lame or very sharp knife to score the dough.
Bread made with 50% whole wheat flour may not have quite the same crumb you are used to as bread made with bread flour. It may be a little more closed, but it will have delicious flavor from the whole grain.
Baking the Bread: Carefully remove the Dutch oven from the 500°F oven with hot pads. Take the top off and place your bread into the Dutch oven (including parchment paper – this helps with the transfer). Be very careful not to touch the sides of the hot Dutch oven. Put your hot pads back on before you pick up the lid of the Dutch oven and place it on top of the bread. Put the whole Dutch oven back into your oven. Lower the temperature to 450°F and bake for 25 minutes. Once 20 minutes are up, take the top off the Dutch oven and continue baking for 20 minutes until the bread is fully baked. If you check the the temperature of the bread, it should register between 205-210°F when fully baked. Let cool completely and enjoy!


Frequently Asked Questions
After the loaf has cooled completely, slice it and freeze the slices for up to a month or two. When you want a piece of bread, toast it or let it thaw before eating.
This loaf is not very sour, but has more sour notes than its (mostly) bread flour counterpart. Whole wheat flour ferments more quickly than bread flour because the wild yeast and bacteria feed on the extra nutrients found in the whole wheat. To keep it from being too sour, manage your fermentation times and keep the dough in the suggested temperature range (78°F).
Most likely, your loaf was over-proofed. This can happen easily when using whole wheat. You will need to watch closely during fermentation, looking for it to be ready to be shaped and refrigerated for a cold proof. Even in the refrigerator, the dough will ferment faster than a bread flour dough. I wouldn’t let it cold ferment for more than 24 hours.
Yes. I have a great recipe for 100% whole wheat sourdough artisan bread here.


Half Whole Wheat Sourdough Artisan Bread
Save this for later!
Ingredients
Levain (takes 3-4 hours until peaked, bubbly and active at 78°F)
- 40 grams bubbly, active, ripe sourdough starter, scant 3 Tablespoons
- 40 grams flour (all purpose/whole wheat or a combination of the two), scant 1/3 cup
- 40 grams water, scant 3 Tablespoons
Half Whole Wheat Sourdough Artisan Bread
- 100 grams ripe, active levain, scant 1/2 cup
- 390 grams water, reserve 20 grams reserved for AFTER the fermentolyse, about 1 2/3 cup
- 250 grams bread flour, about 2 cups
- 250 grams whole wheat flour , see recipe notes, about 2 cups
- 10 grams salt, about 1.5 teaspoons
Instructions
Day 1 Mix Levain (takes 3-4 hours until peaked, bubbly and active at 78°F)
- Mix together ripe sourdough starter, bread flour and water. Set aside to ripen for 3-4 hours at 78°F. The levain is ready when it’s doubled in size, peaked, bubbly, active and has a milky sweet aroma.
Half Whole Wheat Sourdough Artisan Bread
- Bulk Fermentation Begins: Fermentolyse Once the levain is peaked and active (bubbly, doubled in size, milky sweet smell), mix 100 grams levain with 370 grams of water in a bowl. Warm the water if the ingredients are too cold and cool the water if ingredients are too warm. Add 250 grams bread flour and 250 grams whole wheat flour to the bowl and mix until incorporated and a shaggy dough forms. Let dough rest for 30 minutes.
- Mixing: After 30 minutes, add the salt and as much of the reserved 20 grams of water as needed. Squeeze the dough between your fingers, pinching chunks of dough and reincorporating together. The dough will break apart and then reform in the bowl through this process. Pick up one side of the dough and fold it over on itself. The dough will be sticky. Wet your hands as needed and continue to work with the dough until all the salt and water has been incorporated. This can take about 3-5 minutes until the dough is cohesive and strong. Transfer the dough to a plastic container or a glass bowl if desired.
- Bulk Fermentation Continued: Stretch and Folds Perform 3-4 sets of stretch and folds To stretch and fold, wet your hand (so it doesn’t stick to the dough). Reach down to the bottom of the bowl of dough and pull the dough up and over the top of the dough. Turn the bowl a quarter turn and repeat the stretch and fold. Turn another quarter turn and repeat. Perform one more quarter turn with stretching and folding the dough. Cover and set aside. Repeat the stretch and folds every 30 minutes for the first two hours, a total of 4 times.
- Bulk Fermentation Continued: Bulk Rise Let the dough rest in a warm place, for the rest of bulk fermentation, about 1 1/2 – 2 hours at 78°F. You should look for another 20-30% rise in the dough after you place it in the banneton, before you bake it. During this time the dough will puff up about 30-40%, become more aerated, start to pull away from the edges of the bowl and have a few scattered bubbles around the edges/top of the dough. If your dough is not showing these signs, make sure it's warm enough and give it another half an hour or so until it is showing those signs that it's ready to shape.
- Bulk Fermentation Ends: Pre-Shape and Bench Rest When your dough is ready, dump it out on the countertop. Wet your hands and the bench knife. Push the bench knife under the dough while using your free hand to tuck the dough under itself. Repeat this process going around in a circle until you have a tight ball of dough. Let the dough rest uncovered for about 30 minutes at room temperature. The dough will flatten a bit during this period of time.
- Shape and Begin Cold Fermentation: Prepare a banneton or small bowl. Place a kitchen towel or hair net in the bowl. Liberally flour. After the dough has rested for about 30 minutes it is time to shape the bread into a round. Sprinkle flour on top of the dough. Using the bench knife, lift the dough up off the counter and place it on top of the countertop, floured side down. This ensures that the flour is staying mainly on the outside of the dough. Going around in a circle, pull the dough sideways towards you and then fold up to the top of the round. Move 90 degrees and repeat the same process, pulling the dough sideways and then folding up to the top. As you continue this process around the dough, increase the tension as you pull. Gather the bread into a circle and use a bench knife to lift the bread and place into a lined bowl or banneton.
- Cold Fermentation: Cover the dough with plastic wrap or a reusable cover and store in the refrigerator overnight or for up to 14-18 hours. During this time, the dough will continue to ferment but at a much slower rate. Alternatively you can let your dough rise outside the fridge for another 3-4 hours, allowing the dough to proof and rise and then bake your loaves the same day.
Day 2: Bake
- Pre-heat Oven: Put a Dutch oven (top and all) into the oven and preheat to 500°F. Allow the Dutch oven to heat for about 30 minutes to an hour at 500°F. Once preheated for 30 minutes, pull your loaf out of the refrigerator. Remove the plastic wrap or covering (this is easy to do straight out of the refrigerator if the dough is chilled – not easy if the dough warms up) and place a piece of parchment paper on top of the bread dough. Flip the dough over so that the dough is now sitting on the parchment paper. Take off the bowl/banneton and kitchen towel.
- Score the Dough: Smooth the flour over the top of the dough (add a little extra for more contrast if desired). Use a very sharp knife or bread lame to score the dough.
- Bake: Carefully remove the Dutch oven from the 500°F oven with hot pads. Take the top off and place your bread into the Dutch oven (including parchment paper – this helps with the transfer). Be very careful not to touch the sides of the Dutch oven. Put your hot pads back on before you pick up the lid of the Dutch oven and place it on top of the bread. Put the whole Dutch oven back into your oven. Lower the temperature to 450°F and bake for 25 minutes. Once 25 minutes are up, take the top off the Dutch oven and continue baking for 20 minutes until the bread is a crackly deep brown. The loaf should register between 205-210°F when it's finished baking. If your loaf is getting too dark on the bottom, place a baking sheet or baking stone on the rack below the Dutch oven to help diffuse the heat.
- Let loaf cool completely and enjoy!
Notes
Nutrition
Nutrition information is automatically calculated, so should only be used as an approximation.


I wounder whet would help if I add more flour? how texture would be.
You want to be careful not to add too much extra flour, as that can lead to a dryer loaf.
It baked well and rise was great but came out a little gummy .. not sure what to change.. flavor was amazing.
I’m glad the flavor was great, but sorry about the gummy texture. Was it fully cooled before slicing? Slicing while warm can lead to a gummy texture. It could also mean the bread needed to bake for another minute or two. Hope that helps!
My bread over fermented a little, it didn’t get more buddels around the edges so I let it go more. it wasn’t supper runny but I couldn’t keep a nice shape ball. so i added flour till I could, put in banneton basket.
Have you baked it yet? How did it turn out? Adding more flour at that stage usually isn’t recommended (unless it is some flour in your banneton to prevent sticking).
very hare crust, underproofed and gummy inside. next time ill try putting in in fridge overnight. if runny short to let proof and bake same day.
I’m sorry it didn’t turn out great this time – I hope the next loaf turns out better!
is it better to put in fridge overnight, dose it help better for the crumb read?
I like the flavor that the longer ferment time provides. I also find it easier to score the bread after a cold ferment. It’s up to you though!
this time I used the overnight ratio, it’s better timing and not getting late in day to do rest of steps. I hold back 25 g water from the 370 grams . and just added 20 grams with salt. dough come together better. So do you warm it up ,take to out of fridge for 30 minutes before baking?
You don’t need to wait to bake after the overnight cold ferment to bake. You can score and bake right out of the fridge. Enjoy!
what is 78 freight in Celsius? I bought a proofing box. or can I put it in fridge and fermented next day?
78 degrees Fahrenheit is 25 degrees Celsius. A proofing box definitely helps keep temperature consistent!
would you have a time line if you made a overnight leavain? is this recipe the same as the classic sourdough bread?
If you do the overnight levain, you would just adjust the times in the timeline provided based on when your levain will be read. For example, if your levain is ready at 8:30am, you would move the timeline up by doing the fermentolyse at 8:30am and the rest of the timeline would move up by 3 hours from the times listed in the schedule on this recipe post. Hope that helps!
so this bread will hold longer, not proof so fast as the %100 whole wheat? it will be ok in fridge all night?
That’s right!
I made this recipe the last two days for the first time. My whole wheat flour was Red Fife. Because I cut my loaves in half and give some to neighbors, I baked two loaves in double loaf pans. I just cut after and all night rest. Wow. What wonderful taste. The percentage of whole wheat is my fav. The Red Fife is such a sweet, nutty flavor. As always, thank you for your recipe and instructions. I have recommended your site and cookbook to others, especially beginners. I do have a question-would this recipe be acceptable for some inclusions-like dried fruit and nuts? Would you add at second S&F, or laminate in when shaping?
Interesting! Thanks for the review. I would probably laminate when shaping because I wouldn’t want the whole wheat dough to get too heavy as it rises. I think you could probably do it either way though. Enjoy!