Whole Wheat Sourdough Artisan Bread
This post may contain affiliate links. Please read our disclosure policy.This is the real-deal 100% whole wheat sourdough artisan bread. Made with whole wheat flour – grind it yourself or grab it from the store. This sourdough bread recipe is all about packing in the flavor and whole grains. If you’ve wanted to venture into the world of 100% whole wheat baking, you’ve got to try this whole wheat sourdough bread recipe. Awesome taste and texture thanks to the autolyse process – this isn’t your a dry-as-sawdust whole wheat bread; it’s the real deal! 100% sourdough, 100% whole wheat, and 100% the best of both worlds! I can’t wait for you to try it.

Ingredients in Whole Wheat Sourdough Artisan Bread
- Whole Wheat Flour: In this recipe I use a freshly milled HARD whole wheat flour. I like a combination of white hard wheat and red hard wheat, or you can choose only one of them. Both are high in protein (13-14%) and are milled using a grain mill (I have the Harvest Grain Mill). You can also use aged, whole wheat flour from the grocery store. Keep in mind that whatever flour you choose, the loaf will have that flavor. so choose a wheat that has a flavor you enjoy.
- Sourdough Starter: Use an active/ripe sourdough starter (doubled in size/bubbly/mild sour aroma) to mix the levain. I use my regular sourdough starter to mix this levain. If you maintain a whole wheat starter, you can use that too.
- Water: Depending on the temperature of the other ingredients and the temperature inside your kitchen, you’ll want to use either cool, warm or room temperature water. This strongly influences how well your dough will rise (especially in the winter).:
- Salt: Salt enhances the flavor and helps temper the fermentation. Don’t leave out the salt!


Sample Sourdough Schedule for Whole Wheat Sourdough Artisan Bread
A sample baking schedule helps me when baking with sourdough. Sourdough takes much longer to rise than commercial yeast bread. This schedule helps me plan my bake.
A few notes: This schedule assumes the dough temperature is 78℉ during bulk fermentation and 78-80℉ during proofing. Whole wheat flour tends to move more quickly through the fermentation process, and freshly milled whole wheat moves even more quickly. Watch your dough closely so it doesn’t overproof. If you keep this dough at a lower temperature, it will take the dough a little bit longer to reach each stage.
| Day 1 | |
| 7:00 AM – 4:00 PM | Mix levain. Cover and let ferment at 78-80℉ for about 8-10 hours until peaked, bubbly and active. |
| 3:00 PM | Autolyse Dough (see recipe notes on type of flour) |
| 4:00 PM | Mix Dough |
| 4:30 PM | Stretch and Fold #1 |
| 5:00 PM | Stretch and Fold #2 |
| 5:30 PM | Stretch and Fold #3 |
| 6:00 PM | Stretch and Fold #4 |
| 6:00 PM – 7:30 PM | Bulk Ferment 1.5 hours at 78℉ |
| 7:30 PM | Pre-shape |
| 8:00 PM | Shape and begin cold fermentation |
| Day 2 | |
| 10:00 AM | Score and Bake |


Some Tips for Using Whole Wheat Flour in the Dough
Using whole wheat flour in baking provides some challenges and a whole lot of flavor and nutrition. You can read more about baking with whole wheat flour here. These are a few tips to keep in mind when using whole wheat flour:
- Fermentation will go faster: This recipe is made with 100% whole wheat flour. Using a large percentage of whole wheat flour in the dough is going to speed up the fermentation, and it will progress faster than a traditional loaf of sourdough artisan bread. If you want to slow down the fermentation, keep it at a cooler temperature or use less starter in your dough.
- Use freshly milled flour if possible: I much prefer freshly milled flour over an aged whole wheat flour. It tastes better and has more nutrients than a flour that has sat around for some time. But, if you have a favorite whole wheat flour you purchase (instead of milling your own), it will work for this recipe too. Learn more about the different types of whole wheat flour I recommend here. You can also try sifting the grain when using freshly milled or running the grain through your mill again for a finer texture.
- Whole wheat flour absorbs more water: Whole wheat absorbs more water because of the bran found in the whole wheat. You may need to add a little bit of extra water as you’re mixing the dough if it’s feeling too stiff and tight.

Mixing the Levain
I like to make a whole wheat levain for this bread to make it almost 100% whole wheat or as close as I can get it without making an entirely separate whole wheat starter. If you have a whole wheat starter, feel free to use that to mix your levain.
1:10:10 Levain (ready in 8-10 hours at 78-80℉): This recipe calls for a levain mixed in the morning before you make your bread in the afternoon. Using whole wheat flour will cause the fermentation process to go more quickly, so your levain will be ready sooner than if you mix a levain with an all-purpose or bread flour. Keep the levain at 78-80°F for consistent results. Levain is ready when it has just about doubled in size, has lots of bubbles, a slightly sour aroma and is just about to start going down from its peak height. Mix together:
- 6 grams of ripe/mature sourdough starter
- 60 grams whole wheat flour
- 60 grams water
If you prefer to mix the levain a few hours before you make the bread, mix a 1:1:1 Levain (ready in 3 – 3.5 hours at 78℉). Mix together:
- 40 grams of ripe/mature starter
- 40 grams of warm water
- 40 grams of whole wheat flour

Autolyse the Dough
In this 100% whole wheat sourdough artisan bread recipe, the flour and water autolyse together for an hour before mixing in the ripe levain. This autolyse period helps soften the bran and germ in the dough and imparts some extra strength to the bread dough. I find that an autolyse works the best for aged whole wheat flour (from a store or local mill). With aged flour you can extend the autolyse to a few hours or even mix the autolyse right when you mix the levain. If you are using freshly milled flour, autolysing for too long can lead to a wet, sticky dough that’s hard to manage, so keep it to about an hour if possible.


Bulk Fermentation: Mixing the Dough
When your levain is ripe, bubbly, doubled in size and active, it’s time to mix your dough. Add the ripe levain, salt and reserved water on top of the autolysed dough. Pinch chunks of dough and reincorporate them together gently. Pick up one side of the dough and fold it over on itself. The dough will be sticky. Wet your hands as needed and continue to work with the dough, gently kneading until all the ingredients are incorporated and the dough is smooth. This will probably take 3-5 minutes. If you feel the dough needs a little more water, add it in during this mixing time. Transfer the dough to a plastic container or a glass bowl if desired


Bulk Fermentation: Stretch and Folds & Rest
For artisan bread we don’t use traditional kneading methods, instead we use a series of gentle folds to help strengthen the gluten strands in the dough. This dough usually gets about 3-4 sets of stretch and folds over a 2-hour period, if the dough is kept right around 78°F.
Stretch and Fold: To “stretch and fold,” wet your hand (so it doesn’t stick to the dough). Reach down to the bottom of the bowl of dough and pull the dough up and over the top of the dough. Turn the bowl a quarter turn and repeat the stretch and fold. Turn another quarter turn and repeat. Perform one more quarter turn with stretching and folding the dough. Cover and set aside for 30 minutes. Repeat every 30 minutes a total of 3-4 times.
Rest: After the 2-hour period of stretch and folds, let the dough rest in a warm 78-80°F place until puffed up and risen about 30-40%. The dough will be jiggly with a few scattered bubbles around the top. This usually takes about 1.5 hours at 78℉. Because this recipes uses 100% whole wheat flour, the dough typically moves quickly through this fermentation process. Check on the dough frequently.


Pre-Shaping and Shaping the Dough
Pre-Shaping: Dump the dough out on the countertop. Wet your hands and the bench knife if needed and push the bench knife under the dough on one side and your free hand on the other side to tuck the dough under itself. The goal is to introduce some tension into the dough. Repeat this process going around in a circle until you have a ball of dough. Let rest on the counter for 30 minutes uncovered.
Shaping: Prepare a banneton or small bowl. Place a kitchen towel or hair net in the bowl and liberally flour. If you use the hair net, you should not need to use much flour. Using the bench knife, lift the dough up off the counter and place it on top of the countertop – floured side down. Pull the dough down toward you and then fold up to the middle of the dough. Take the right edge and pull out and then into the middle of the dough. Take the left side of the dough and stretch out and then back to the middle. Repeat with the top of the dough, forming a little “package” of dough. Gather the bread into a circle and use a bench knife to lift the bread and place into your lined bowl.


Cold Fermentation
I almost always use a cold fermentation for all my sourdough artisan bread recipes. This recipe is no different, EXCEPT the fermentation time is moving much more quickly from the whole wheat flour. The whole wheat sourdough artisan bread dough cannot sit in the refrigerator much longer than 15 hours (assuming you followed the temperature recommendations) or else it will over-proof. Cover the dough in the banneton and place in the refrigerator for 14-15 hours. If it goes a little longer than that, it may be a little over-proofed. I would not exceed 24 hours.

Baking Whole Wheat Sourdough Artisan Bread
Pre-heat the Oven: Put a Dutch oven (top and all) into the oven and preheat to 500°F. Allow the Dutch oven to heat for about 30 minutes at 500°F. This builds up steam, which is necessary to achieve the beautiful oven spring and perfect crust that artisan bread is known for.
Scoring the Dough: Once the oven is preheated for 30 minutes, pull the loaf out of the refrigerator. Remove the plastic wrap or bowl covering (this is easy to do straight out of the refrigerator if the dough is chilled – not easy if the dough warms up) and place a piece of parchment paper on top of the bread dough. Flip the dough over so that it is now sitting on the parchment paper. Take off the bowl/banneton and kitchen towel. Smooth some flour over the top of the dough (add a little extra for more contrast if desired) or leave the flour off completely for no contrast. Use a bread lame or very sharp knife to score the dough.
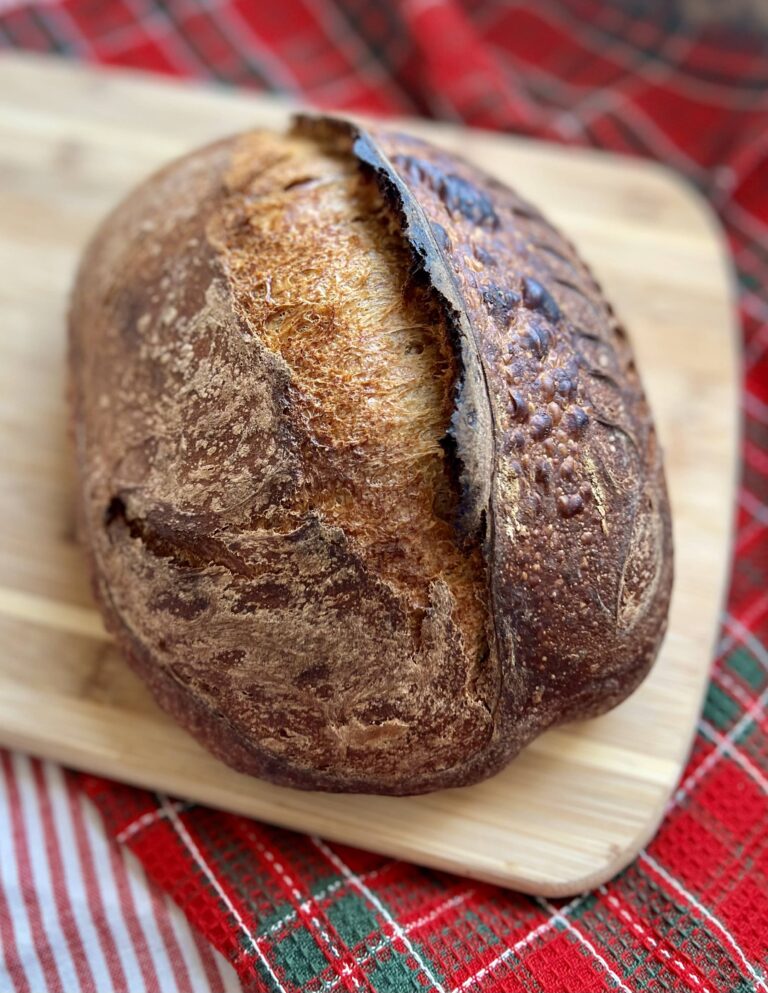
Temper your expectations with whole wheat sourdough artisan bread. Do not expect the same large ear or the same rise you would get out of a loaf made with mostly bread flour. Your bread will look beautiful in its own way and have more flavor than a loaf made with mostly bread flour.
Baking the Bread: Carefully remove the Dutch oven from the 500°F oven with hot pads. Take the top off and place your bread into the Dutch oven (including parchment paper – this helps with the transfer). Be very careful not to touch the sides of the hot Dutch oven. Put your hot pads back on before you pick up the lid of the Dutch oven and place it on top of the bread. Put the whole Dutch oven back into your oven. Lower the temperature to 450°F and bake for 20 minutes. Once 20 minutes are up, take the top off the Dutch oven and continue baking for 20 minutes until the bread is fully baked. If you check the the temperature of the bread, it should register between 205-210℉ when fully baked. Let cool completely and enjoy!


Frequently Asked Questions
After the loaf has cooled completely, slice it and freeze the slices up to a month or two. When you want a piece of bread, toast it or let it thaw and warm up just a bit before eating.
Yes! If you choose you can substitute half of the whole wheat flour for bread flour. You can also check out my recipe for 50/50 whole wheat sourdough artisan bread here (coming soon).
This loaf is not very sour, but has more sour notes than its mainly bread flour counterpart. Whole wheat flour ferments more quickly than bread flour because the wild yeast and bacteria feed on the extra nutrients found in the whole wheat. To keep it from being too sour, manage your fermentation times and keep the dough in the suggested temperature range (78℉).
Most likely, your loaf was over-proofed. This can happen easily when using whole wheat. Watch your fermentation closely, looking for the signs of readiness, then shape and refrigerate the dough for a cold proof. The dough also ferments faster in the refrigerator, so this loaf is not a great candidate for sitting in the fridge for a couple days before baking.
I have not tried that, but if you’re looking for a great 100% whole wheat sandwich bread, try this one.


Check out these Sourdough Favorites

Whole Wheat Sourdough Artisan Bread
Ingredients
Levain (1:10:10, 8-10 hours at 78-80℉)
- 6 grams ripe, active, bubbly sourdough starter
- 60 grams whole wheat flour see recipe notes on flour
- 60 grams water
Autolyse 1 hour before levain is ready
- 500 grams whole wheat flour see recipe notes for vital wheat gluten for softer bread
- 400 grams water
Mix in after autolyse
- 80 grams ripe, active, bubbly levain
- 10 grams salt
- 20 grams water
Instructions
Day 1 Mix Levain (1:10:10, 8-10 hours until ripe at 78-80℉)
- Mix together ripe sourdough starter, whole wheat flour and water. Set aside to ripen for 8-10 hours at 78℉. The levain is ready when it’s doubled in size, peaked, bubbly, active and has a milky sweet aroma.
Whole Wheat Sourdough Artisan Bread
- Autolyse Aged/Store-bought Flour: Mix together 500 grams flour and 400 grams warm water when you mix the levain or 1-2 hours before the levain is ripe and active. Freshly Milled Flour: 1 hour before the levain is ripe and ready, mix together 500 grams of flour and 400 grams of warm water. Cover and let sit for 1 hour until levain is ripe. Note: If you use vital wheat gluten in the recipe, mix it together with the flour before adding the water for the autolyse.
- Bulk Fermentation Begins: Mixing the Dough Once the levain is peaked and active (bubbly, doubled in size, milky sweet smell), add 80 grams levain, 10 grams salt and 20 grams water to the top of the autolysed dough. Warm the water if the ingredients are too cold and cool the water if ingredients are too warm. Combine by hand, squeezing the dough between your fingers, pinching chunks of dough and reincorporating together. The dough will break apart and then reform in the bowl through this process. Pick up one side of the dough and fold it over on itself. The dough will be sticky. Wet your hands as needed and continue to work with the dough until all the salt and water has been incorporated. This can take about 3-5 minutes until the dough is cohesive and strong. If you feel the dough could use a little more water, add a little more in during this mixing time. Transfer the dough to a plastic container or a glass bowl if desired.
- Bulk Fermentation Continued: Stretch and Folds Perform 3-4 sets of stretch and folds. To “stretch and fold,” wet your hand (so it doesn’t stick to the dough). Reach down to the bottom of the bowl of dough and pull the dough up and over the top of the dough. Turn the bowl a quarter turn and repeat the stretch and fold. Turn another quarter turn and repeat. Perform one more quarter turn and stretch and fold the dough. Cover and set aside. Repeat the stretch and folds every 30 minutes for the first two hours, a total of 4 times.
- Bulk Fermentation Continued: Bulk Rise After the stretch and folds are complete, let the dough rest in a warm place, for the rest of bulk fermentation, about 1 1/2 – 2 hours at 78℉. During this time the dough will puff up about 30-40%, become more aerated, start to pull away from the edges of the bowl and have a few scattered bubbles around the edges/top of the dough. If you dough is not showing these signs, make sure it's warm enough and give it another half an hour or so until it is showing those signs that it's ready to shape.
- Bulk Fermentation Ends: Pre-Shape and Bench Rest When your dough is ready to shape, wet your hands and a bench knife. Push the bench knife under the dough while using your free hand to tuck the dough under itself. Repeat this process going around in a circle until you have a tight ball of dough. Let the dough rest uncovered for about 30 minutes at room temperature. The dough will flatten a bit during this period of time.
- Shaping and Begin Cold Fermentation: Prepare a banneton or small bowl. Place a kitchen towel or hair net in the bowl. Liberally flour. After the dough has rested for about 30 minutes it is time to shape the bread into a round. Sprinkle flour on top of the dough. Using the bench knife, lift the dough up off the counter and place it on top of the countertop – floured side down. This ensures that the flour is staying mainly on the outside of the dough. Going around in a circle, pull the dough sideways towards you and then fold up to the top of the round. Move 90 degrees and repeat the same process pulling the dough sideways and then folding up to the top. As you continue this process around the dough, increase the tension as you pull. Gather the bread into a circle and use a bench knife to lift the bread and place into a lined bowl or banneton.
- Cold Fermentation: Cover the dough with plastic wrap or a reusable cover and store in the refrigerator overnight or for up to 14-16 hours. During this time the dough will continue to ferment but at a much slower rate. You should look for another 20-30% rise in the dough after you place it in the banneton, before you bake it. Time your cold fermentation carefully because whole wheat dough is prone to over-proofing. Alternatively you can let your dough rise outside the fridge for another 2-3 hours, allowing the dough to proof and rise and then bake your loaves the same day.
Day 2: Bake
- Pre-heat Oven: Put a Dutch oven (top and all) into the oven and preheat to 500 degrees. Allow the Dutch oven to heat for about 30 minutes to an hour at 500°F. Once preheated for 30 minutes, pull your loaf out of the refrigerator. Remove the plastic wrap or covering (this is easy to do straight out of the refrigerator if the dough is chilled – not easy if the dough warms up) and place a piece of parchment paper on top of the bread dough. Flip the dough over so that the dough is now sitting on the parchment paper. Take off the bowl/banneton and kitchen towel.
- Score the Dough: Smooth the flour over the top of the dough (add a little extra for more contrast if desired). Use a very sharp knife or bread lame to score the dough.
- Bake: Carefully remove the Dutch oven from the 500°F oven with hot pads. Take the top off and place your bread into the Dutch oven (including parchment paper – this helps with the transfer). Be very careful not to touch the sides of the Dutch oven. Put your hot pads back on before you pick up the lid of the Dutch oven and place it on top of the bread. Put the whole Dutch oven back into your oven. Lower the temperature to 450°F and bake for 25 minutes. Once 25 minutes are up, take the top off the Dutch oven and continue baking for 20 minutes until the bread is a crackly deep brown. The loaf should register between 205-210℉ when it's finished baking. If your loaf is getting too dark on the bottom, place a baking sheet or baking stone on the rack below the Dutch oven to help diffuse the heat.
- Let loaf cool completely and enjoy!

This looks like an excellent recipe! Thanks for sharing! 😍👩🏼🍳🍞
Again
Why is the Read More link broken OR is it only with iPhones?!
Where are you seeing a “read more” link? I have an iphone and am not seeing that on my phone or on the website.
I saw the read more then clicked it and it took me to the recipe. The read more was from the email.
Okay thank you! That is an email that is sent out by Wordpress, not specially my email list. I can look into it. Thank you for clarifying!
Ahhhh I think I see the difference
It’s from WordPress.com
You have a partial paragraph then the link Read more of this post
above the comment link
So I think I’ll ignore WordPress and stick with your emails
I don’t even know how WordPress got involved
Thank you for the recipe! How do you learn about milling your own flour and the protein percentages of certain flours? I have some hard red wheat grains and I’d like to mill them but don’t understand which type of flour they are. Thank you for your help!
You can read my guide to whole wheat flour that gives some tips: https://amybakesbread.com/guide-to-baking-with-whole-wheat-flour/
Hard wheat has a higher protein content (usually in the 13% range). They would be good for bread. Soft wheat has the lower protein content – good for pancakes, scones, etc…
Hi! So helpful — will make today and tomorrow and report back! Thank you! Question – I see you sifting the freshly milled flour. Can you speak more to that?
Some people like to sift their freshly milled flour to get a more fine flour. This does remove some of the bran and germ, so if you go this route, I still recommend using the bran and germ – either in other recipes or you can hydrate it with some water and add it in during the stretch and folds. I usually don’t sift my flour, but it is an option for people who want a more finely ground flour – makes for a smoother, less heavy tasting loaf.
Thanks Amy! I tried baking 100% Whole Wheat, which I milled, but without reading any 100% Whole Wheat recipes. I knew about the additional hydration, but I did not know about the longer autolyse. My loaves tasted great, but they lacked the big oven spring and larger air pockets. I milled hard red (400g), hard white (300g) and a little soft red (100g – because it’s local to us), and I added 100g of whole wheat flour (Red Mill). Milling just enough for that batch was satisfying, since there was no waste.
Whole wheat is going to bake up a little bit differently because the bran and germ in the whole wheat actually cut the gluten strands in the dough. This is why an autolyse can help soften the bran and germ and why these loaves don’t often bake up with as much oven spring and air pockets. Still a delicious bread to make, but you have to temper your expectations a little because it is a very different bread than one made with bread flour.
I’ve been making fresh milled flour sourdough for over a year and have tried many recipes as I searched for the perfect one. Yours is the first where everything finally came together perfectly! I got the most beautiful oven spring and ear with your method. I don’t know if it was the one hour autolyse, the vital wheat gluten or a combo of the two but I’m so happy with the results! Thank you!
I’m so happy you got such a great loaf! Thanks for sharing.