Affiliate disclosure: This post may contain affiliate links. Please see our disclosure policy.
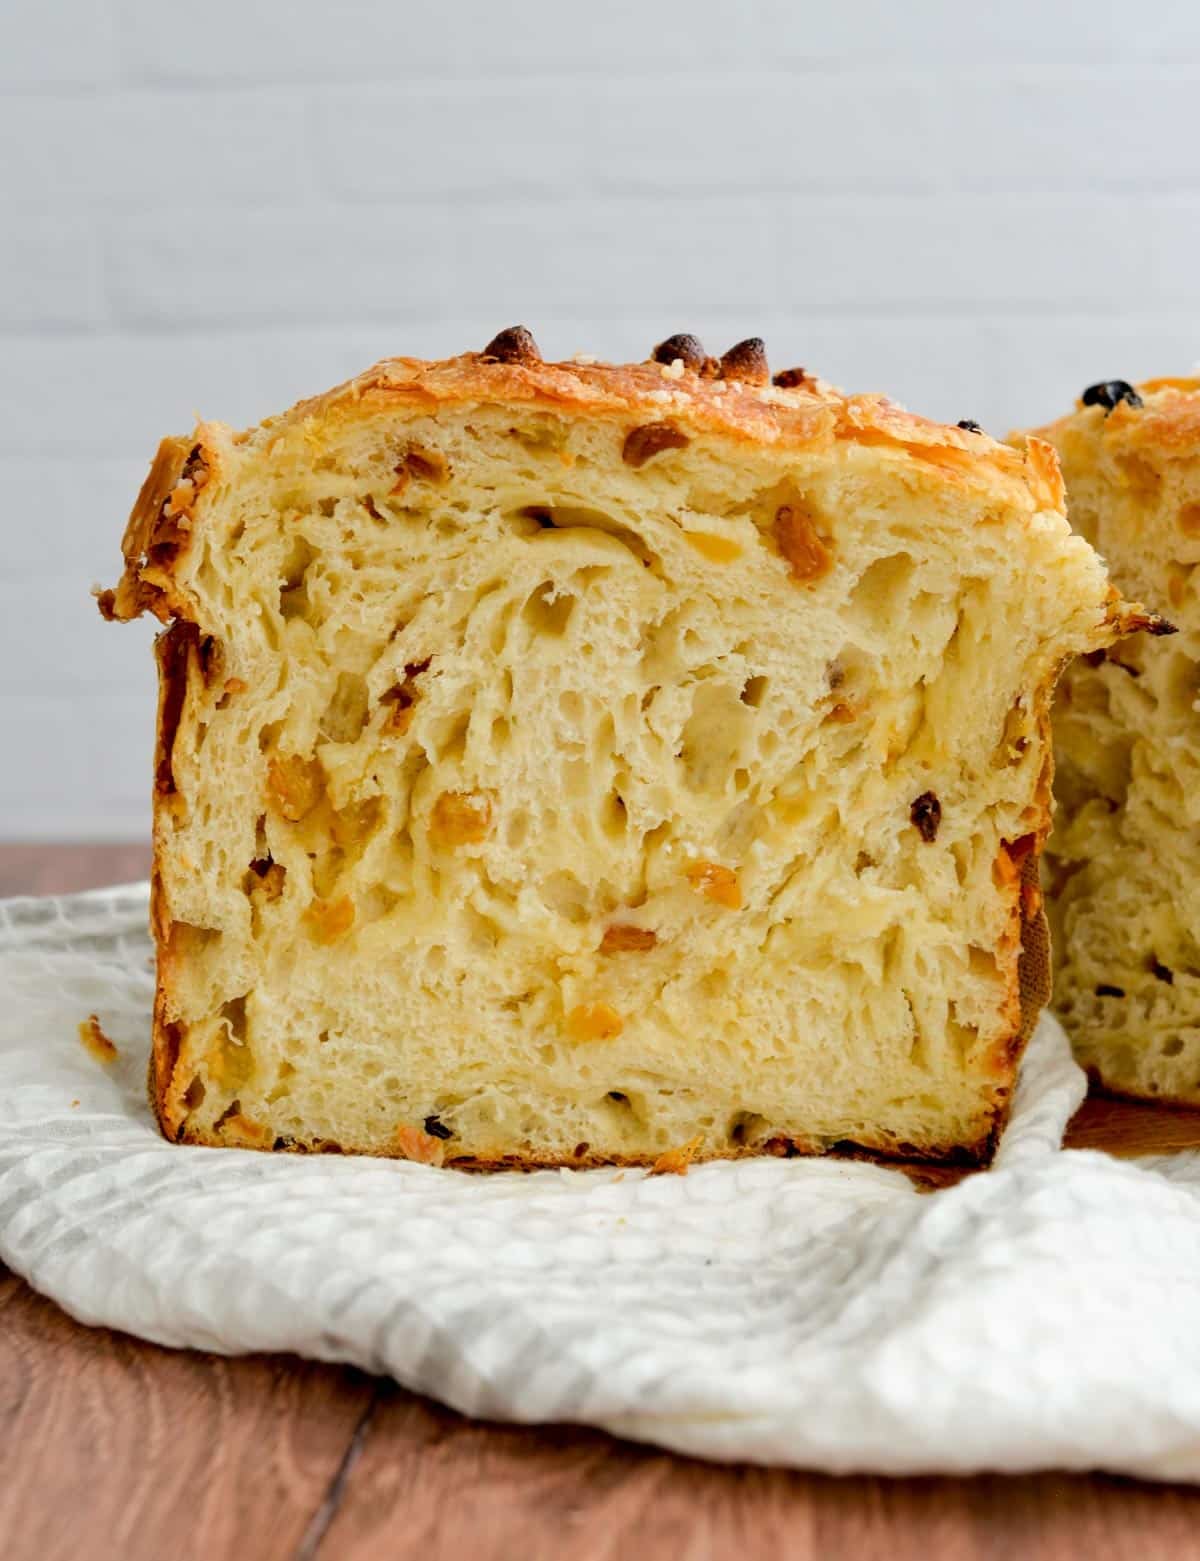
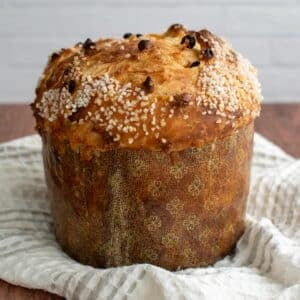
Panettone is famously tricky to master—but this Panettone Sourdough Bread gives you all the flavor of this classic Italian dessert in a much simpler, sourdough-friendly bake. It has the same rich, festive taste you expect from traditional panettone, without the intensive technique.
After spending years trying (and struggling!) to perfect traditional panettone, I finally thought: why not start with my viral buttery Sourdough Croissant Bread, enrich it with an egg yolk and a bit more sugar, and let sourdough do the rest? The result is an incredible holiday treat that’s soft, airy, and richly flavored with a beautiful Italian-inspired sweetness. It pulls apart like a dream and is absolutely delicious. Enjoy during the Christmas and Easter seasons, or any time you want a slice of this sweet, enriched sourdough panettone bread.

Save this for later!
Table of Contents
- What is Sourdough Panettone?
- Traditional Panettone vs. Easier Sourdough Panettone
- Why You’ll Love Panettone Sourdough Bread
- Important Ingredients
- Substitutions
- Tools You’ll Need
- Sourdough Baker’s Timeline
- How to Make Panettone Sourdough Bread
- Add in the Butter
- Shape the Dough
- How to Store Leftovers
- Amy’s Recipe Tips
- Frequently Asked Questions
- Most Popular Unique Sourdough Bakes
- Panettone Sourdough Bread Recipe
What is Sourdough Panettone?
Sourdough panettone is a naturally leavened Italian-style holiday bread made with sweet, enriched dough. Traditional panettone uses a stiff starter (lievito madre) and a multi-day process, while this easier sourdough version delivers the same buttery, citrus-vanilla flavor using a standard sourdough starter.
Traditional Panettone vs. Easier Sourdough Panettone
I didn’t grow up eating panettone, but I’ve been so inspired watching bakers—especially on social media—share the three-day process from start to finish. Traditional sourdough panettone is an art form. It’s made with a lievito madre (or pasta madre), a stiff Italian-style starter that requires frequent feedings before you even begin mixing the dough. Then comes the heavy mixing, the ultra-enriched dough, the second dough, the precise temperature control… all to create that incredibly light, cake-like bread full of eggs, butter, and sugar.
Homemade sourdough panettone is absolutely delicious—but I had a different idea. What if I could make it even easier and get a similar product? I wondered if I could take my enriched sourdough croissant bread and create something with a similar flavor and richness without the intensive process, without a mixer, and without maintaining a special starter. And guess what? It worked.
This recipe is what I’m calling a Sourdough Bread Panettone—rich, flavorful, and absolutely incredible. While it’s not a traditional panettone, it gives you that same luxurious, buttery holiday experience in a way that’s accessible for home bakers. No pasta madre, no hours of mixing… just a naturally leavened, celebration-worthy loaf.
You can bake it in a classic panettone mold for that iconic tall shape or simply bake it as a sourdough loaf in a Dutch oven. Both versions are beautiful and delicious.
Why You’ll Love Panettone Sourdough Bread
- Festive Bake – Panettone is a special treat during the holiday season. This homemade sourdough variety is worth the extra effort and makes the perfect addition to your holiday celebrations. For another sweet holiday bake, try this Sourdough Star Bread too.
- Buttery and Soft – This recipe incorporates cold butter during the stretch and folds, which results in buttery soft layers. If you love this recipe, try another enriched sourdough recipe like my Sourdough Brioche or make my Almond Croissant Sourdough Bread.
- Inclusions – Traditional panettone is made with citrus and raisins. If you love the raisins, you’ll also want to try my Cinnamon Raisin Sourdough Bread!
New to Sourdough? If you are new to sourdough, learn how to make a sourdough starter from scratch and check out my Free Sourdough Beginner Guide. Using naturally fermented sourdough will take much longer, but you will love the fermentation benefits and the flavor!
Important Ingredients
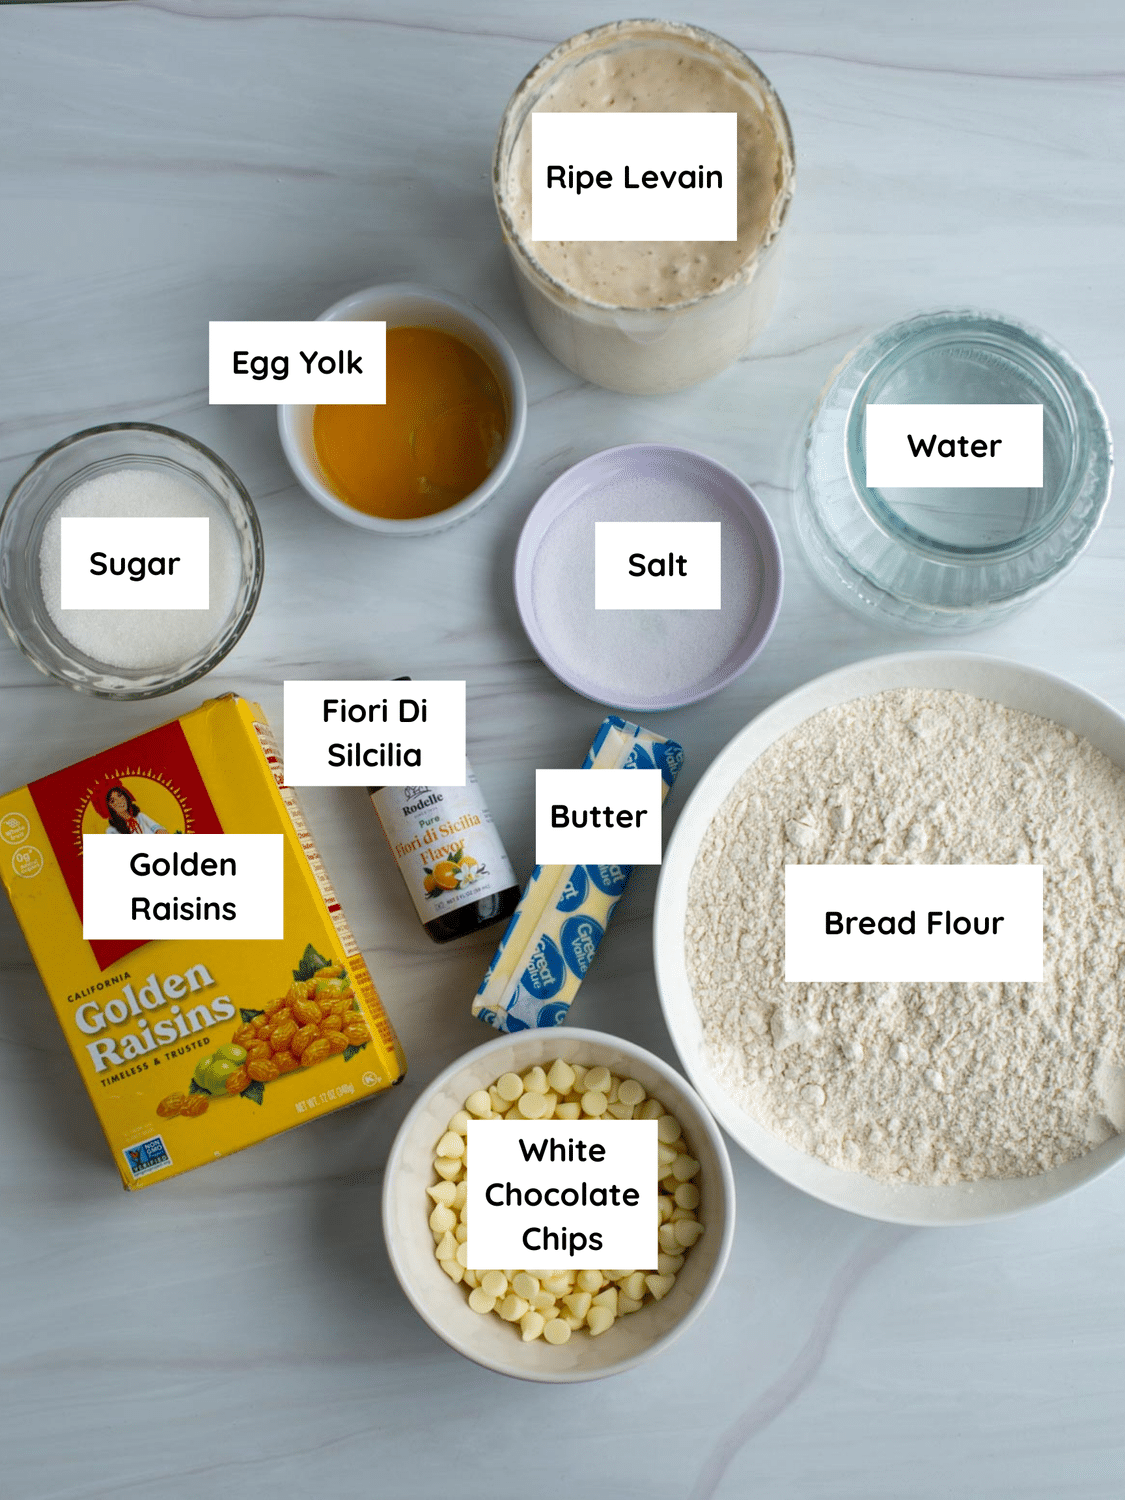
- Levain – This recipe uses a levain that combines ripe and active sourdough starter, flour, and room temperature water, and is left to rise before using.
- Unsalted Butter – The key to the flaky layers that give this loaf its croissant-like texture is unsalted butter. I prefer to bake with unsalted butter, but you can also use salted butter if you prefer. This recipe works for both American-style butter, which has more water content, and European-style butter. The American-style will have more chunks/flakes throughout the dough, but both bake up delicious.
- Egg yolk – Including an egg yolk adds richness to the dough. Panettone is an enriched dough, and the egg helps achieve this.
- Sugar – A little bit of sugar adds sweetness to this loaf, making it the perfect sweet holiday bread.
- Fiori di Sicilia (EXTRACT) – Fiori di Sicilia is a fragrant Italian flavoring blend traditionally used in panettone—it tastes like a mix of citrus and vanilla and gives this bread its signature aroma. After making this loaf 20–30 times to get it just right (yes – it’s been a true labor of love!), I’ve found that extract works best. If you use the essential oil version, use only 2–4 grams, as it’s extremely strong and can even slow your dough’s rise.
- Golden Raisins – Golden raisins are naturally sweeter and fruitier than regular brown raisins, which makes them the perfect addition to this panettone-inspired sourdough bread.
- White Chocolate – Adds the perfect sweetness to this panettone-style bread. Substitute milk, dark, or any preferred chocolate if desired.
- Pearl Sugar – This isn’t pictured, because it’s optional, but I do love adding a sprinkle of pearl sugar on top of the risen dough for a little crunch.
See the recipe card for full information on ingredients and quantities
Substitutions
- Fiori Di Sicilia: No Fiori di Sicilia on hand? Use 10 grams of vanilla extract plus the zest of one orange. It won’t be quite the same, but it will still give your loaf a bright, citrusy flavor.
- Panettone Mold: If you don’t have a panettone mold, you can bake this loaf in a Dutch oven according to the same baking instructions as the Sourdough Croissant Bread.
- Golden Raisins: If you’d prefer a more traditional citrus profile, you can swap the golden raisins for candied orange peel (60 grams) and candied lemon peel (40 grams). Because candied peel contains sugar that can pull moisture from the dough, the best method is to laminate the inclusions in after the dough has risen.
- Chocolate: I really love some chocolate in my panettone, so I often use a combination of white chocolate, milk chocolate, and even dark chocolate.
- Topping: This is optional, but I do love adding a sprinkle of pearl sugar on top of the dough. You could also add an almond or chocolate glaze or anything traditional that you want!
Tools You’ll Need
- Panettone Mold – For this recipe, I use a P155 panettone mold (6.12″ D x 6.12″ W x 4.25″ H). This size fits one full batch of dough perfectly and allows the loaf to rise up and over the top—exactly the look I was going for.
- Thermometer – Dough temperature is critical for this loaf.
- Sourdough Tools – All the traditional tools I like to use for sourdough bread
- Grater – I like a traditional triangular stand grater for grating frozen and chilled butter
- Rimmed baking sheet
- Mixing Bowl
Sourdough Baker’s Timeline
A sample baking schedule helps me when baking with sourdough. Sourdough takes much longer to rise than commercial yeast bread. This schedule helps me plan my bake.
A few notes: I typically keep my dough in the 78-80ºF temperature range. This does not work well for this dough because you want the butter to stay relatively chilled and not melt. Instead, for this loaf, the dough temperature is 70-72°F throughout the process, which is reflected in the baking timeline.
| Day 1 | Mix Levain |
| 9:00 PM – 9:00 AM | Mix the Levain. Let sit at 78°F for about 10-12 hours until doubled/bubbly and ripe. |
| Day 2 | Mix Dough Bulk Fermentation Shaping |
| 9:00 AM | Mix Dough and Begin Bulk Fermentation |
| 9:30 AM 10:00 AM 10:30 AM 11:00 AM | Stretch and Fold #1 Stretch and Fold #2 Add half butter Stretch and Fold #3 Add half butter Stretch and Fold #4 Add raisins and chocolate chips |
| 11:00 AM – 6:00 PM | Bulk Fermentation Continued (70-72ºF) |
| 6:00 PM | Shape and put in the panettone mold |
| 6:30 PM | Overnight fermentation at about 68-70ºF |
| Day 3 | Score and Bake |
| 8:00 AM | Preheat oven |
| 8:20 AM | Score and Bake |
If you are new to sourdough, learn how to make a sourdough starter from scratch and how a sourdough starter works in my Free Sourdough Beginner Guide. Using naturally fermented sourdough will take much longer, but you will love the fermentation benefits and the flavor!
How to Make Panettone Sourdough Bread
Mix the Levain
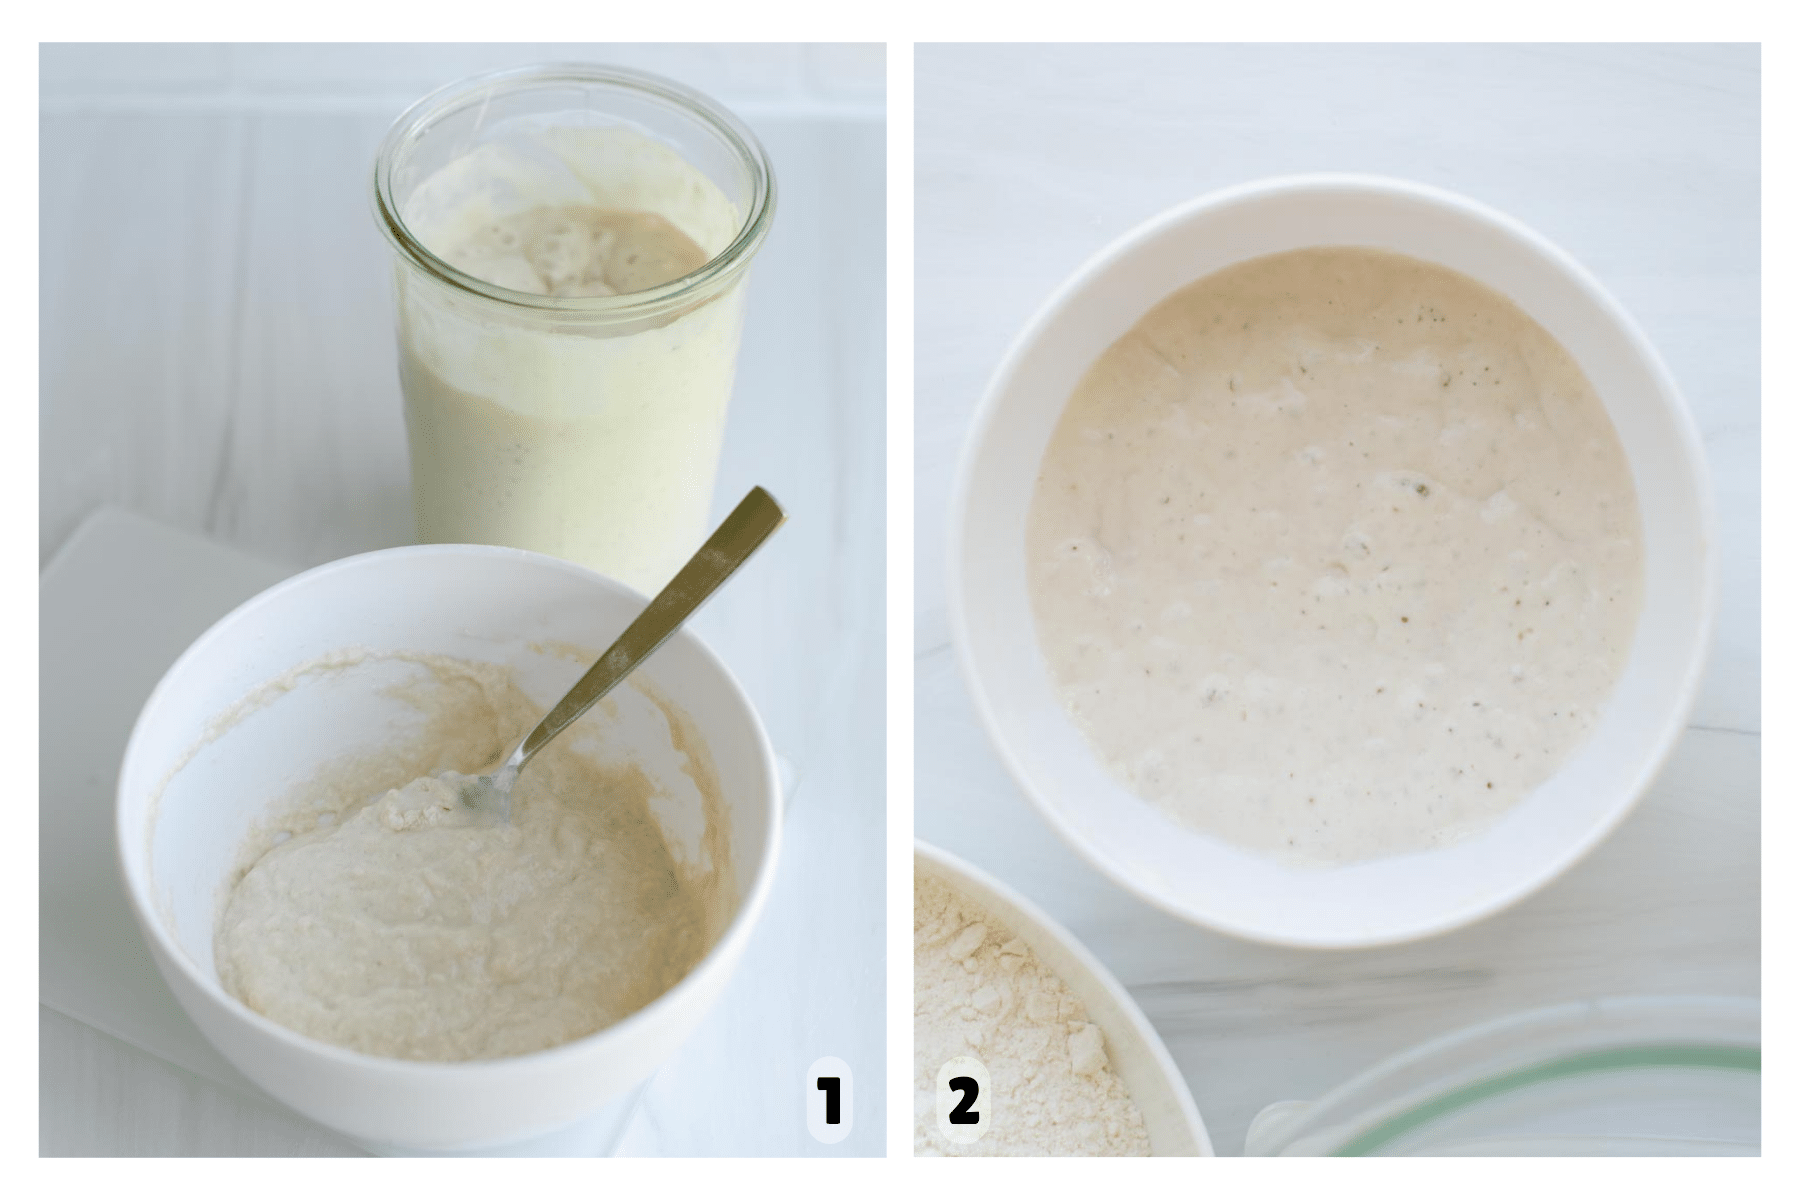
Step 1: Mix Levain. Combine ripe sourdough starter with water and flour to prepare your levain (Image 1). Let rise until bubbly and active (Image 2).
Do you have to use a levain in this recipe? No. I prefer it, but if you have a well-maintained and frequently refreshed sourdough starter, you can substitute it in place of the levain in the recipe
Mix the Dough and Begin Bulk Fermentation
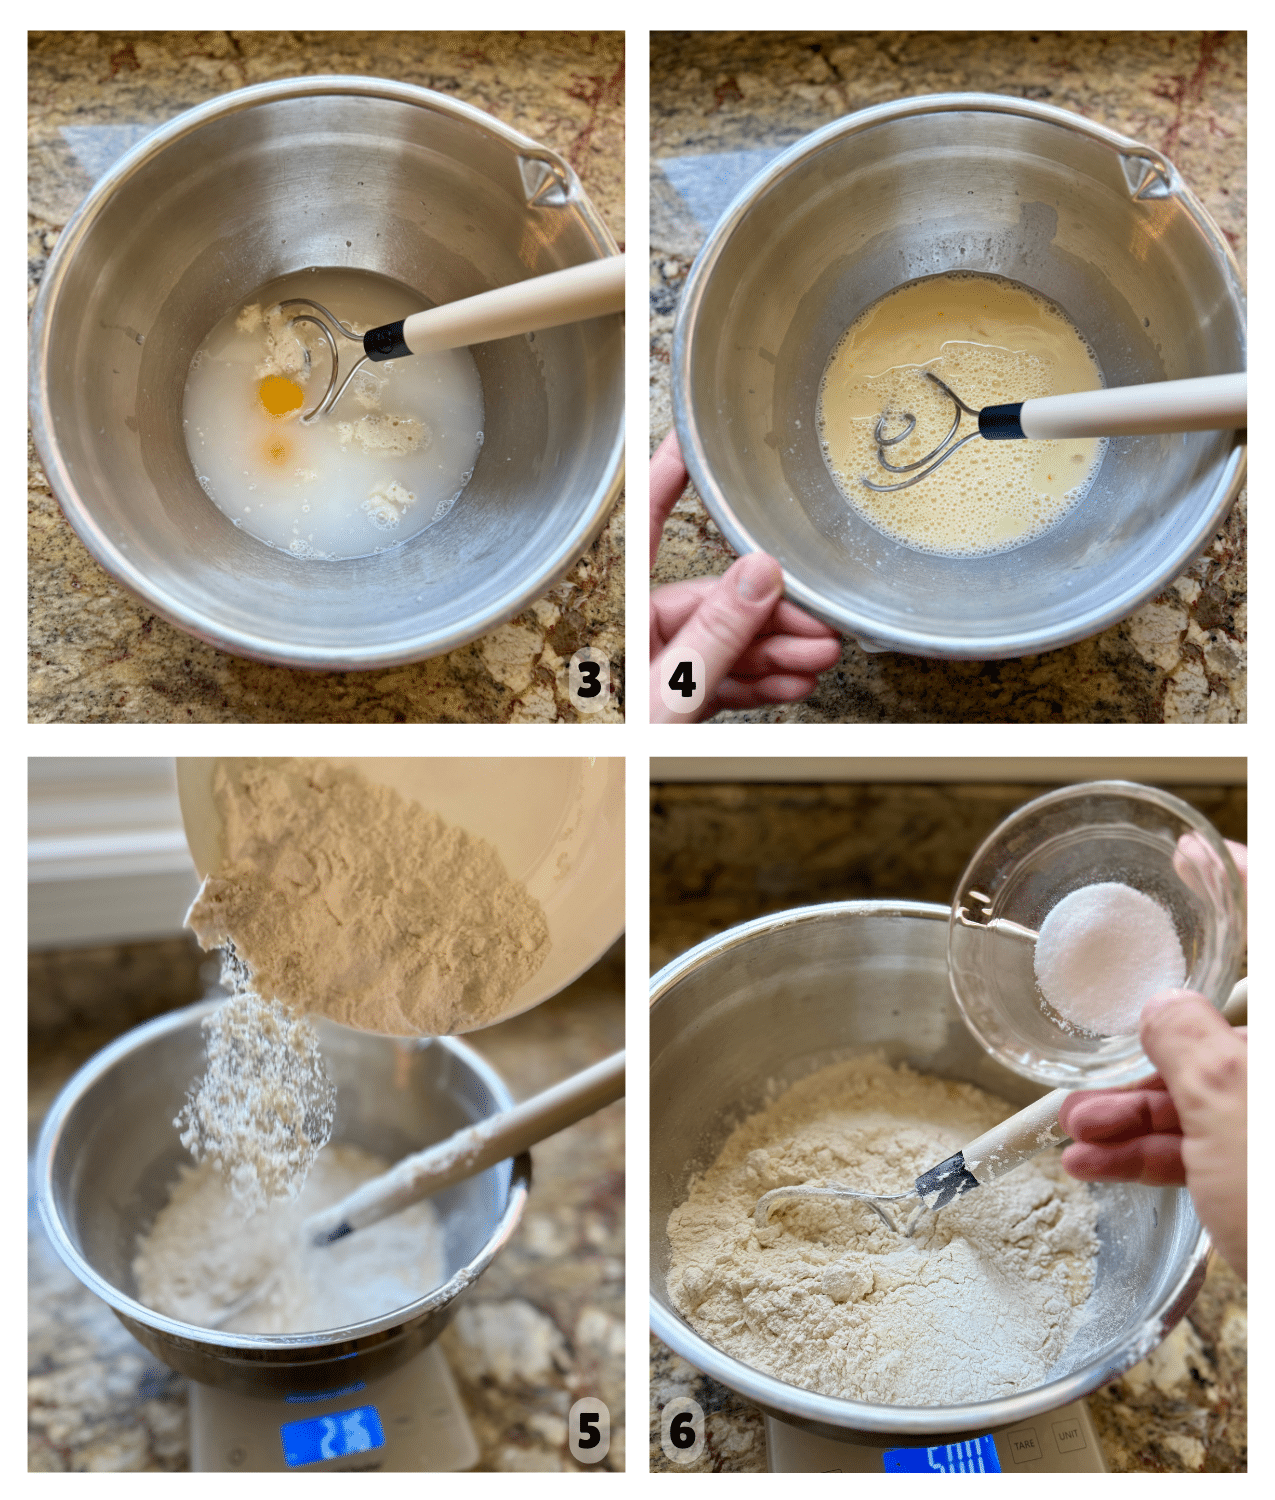
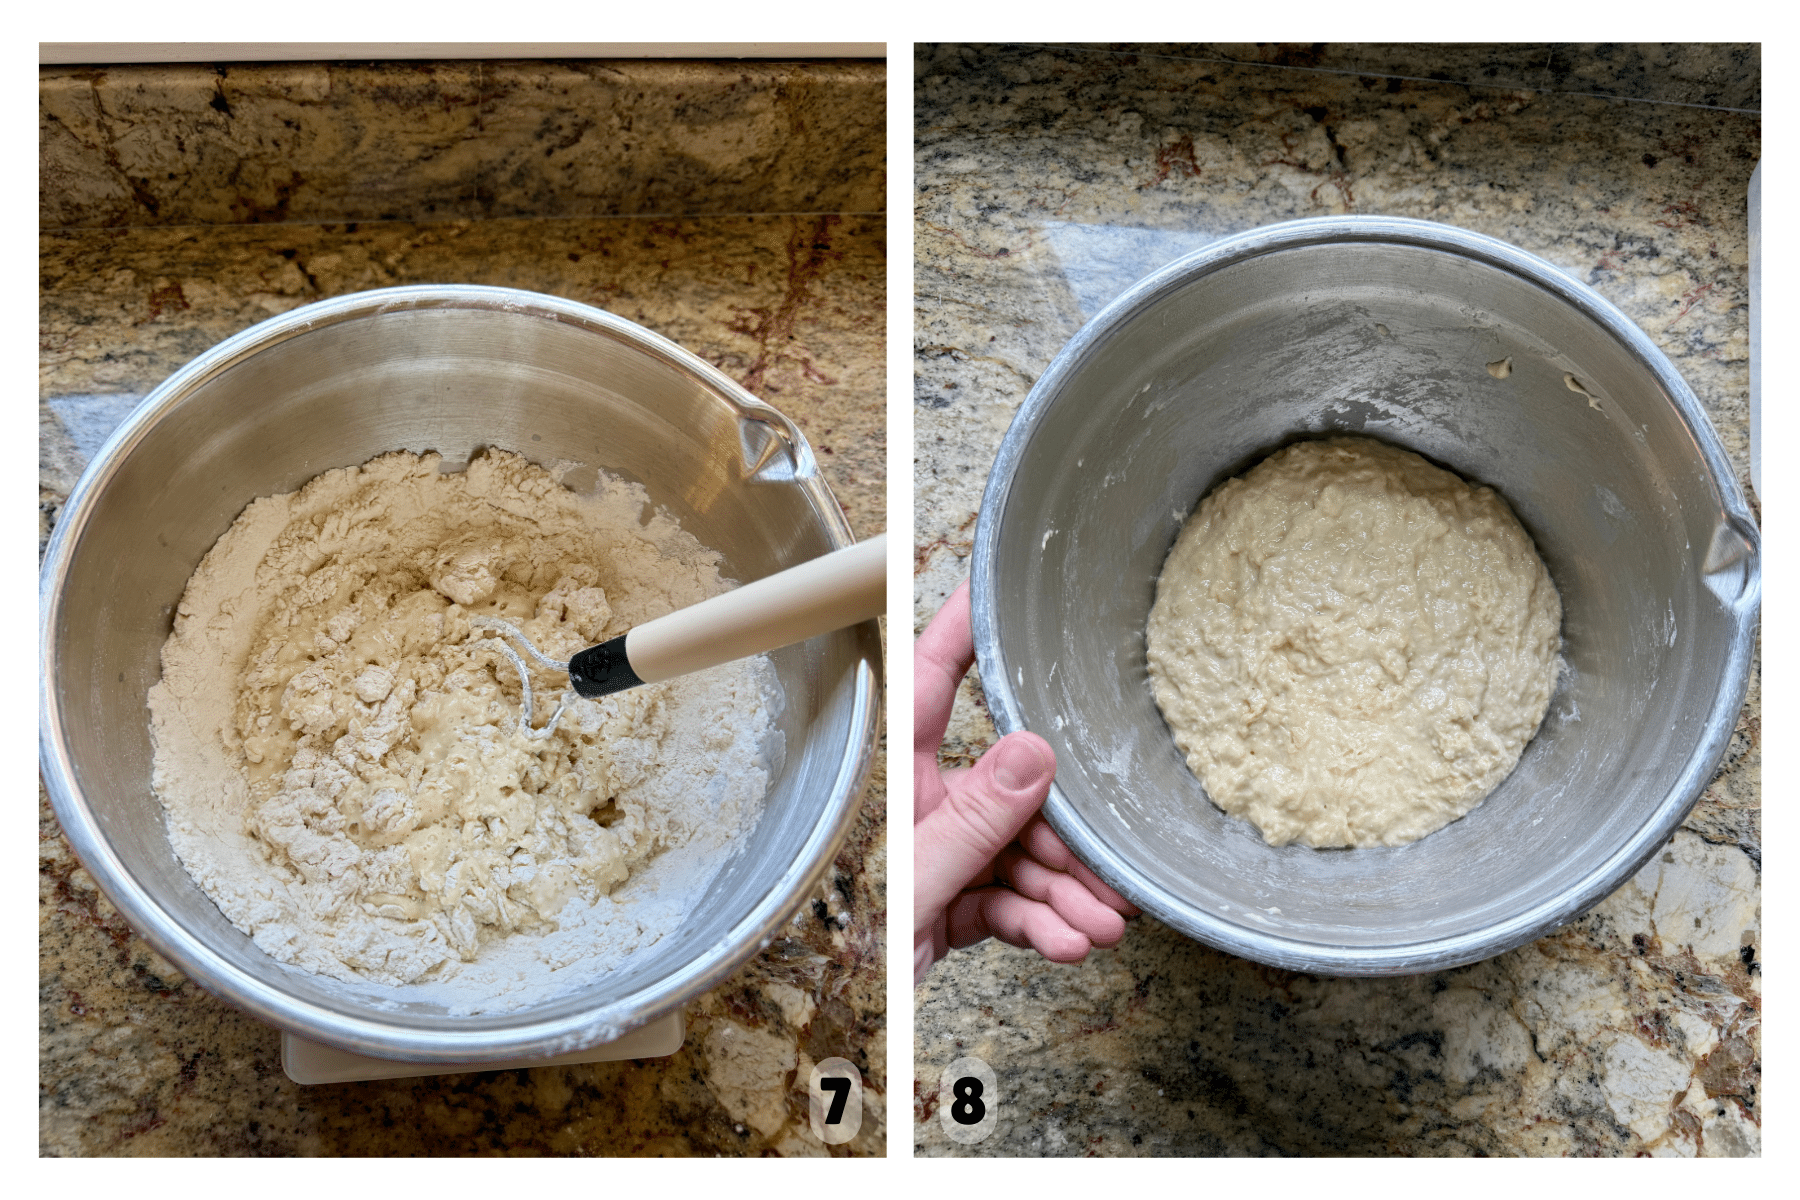
Step 2: Mix the Dough. Combine ripe levain, water, egg yolk, sugar, and Fiori di Sicilia to a large bowl and use a dough whisk to mix together (Images 3 & 4). Add the salt and bread flour (Images 5 & 6) and mix until a shaggy dough forms (Images 7). Cover and let the dough rest for 30 minutes (Image 8).
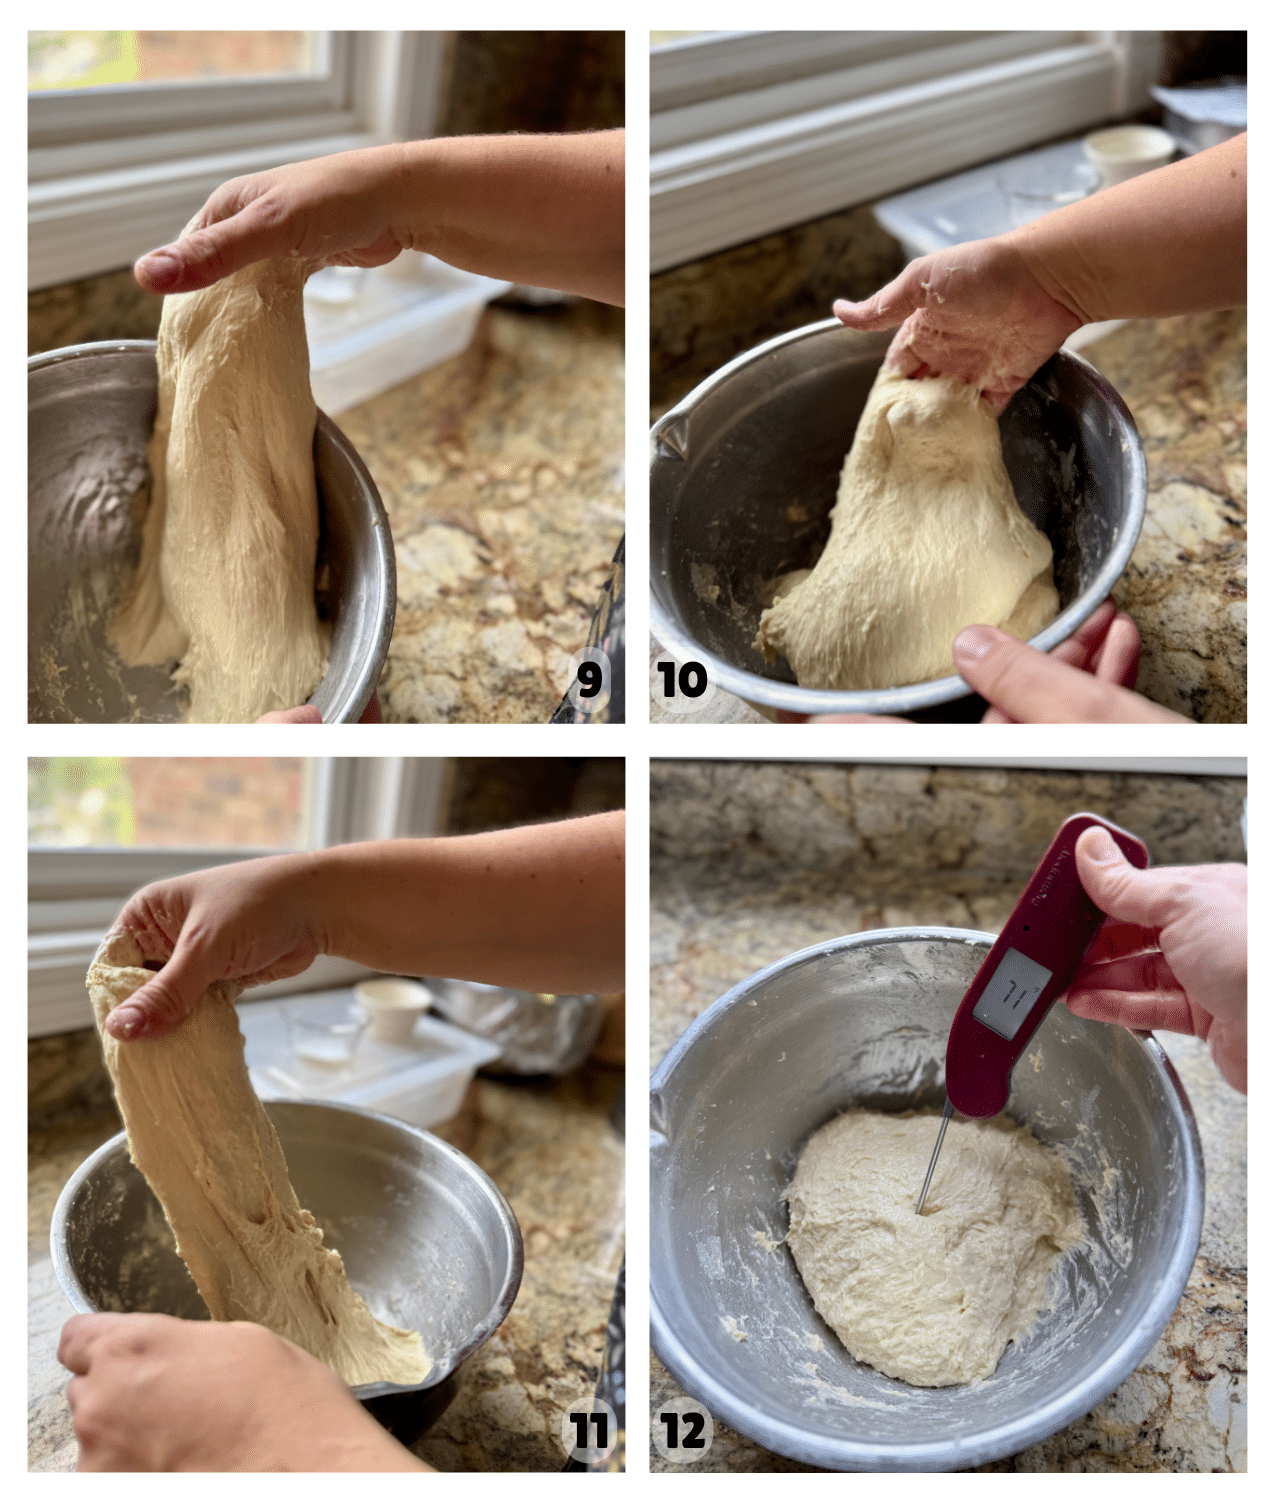
Step 3: Stretch & Folds. Over a period of about 1 ½ hours, perform a series of “stretch and folds” by reaching to the bottom of the bowl and pulling the dough up to fold over on itself (Images 9 & 10). Continue turning the bowl and folding the dough about four times for each round of stretch and folds (Image 11). Cover and wait 30 minutes between each set of stretch and folds, allowing the dough to become more cohesive and elastic over time. Maintain a dough temperature of about 70ºF during this time (Image 12).
Note: If you want to add an autolyse or fermentolyse to this dough and some vigorous mixing – it will only increase the strength and gluten network in the dough. I use these processes in my Classic Sourdough Bread, and they also work well in this loaf. I didn’t include them in the recipe steps because this loaf is already fairly complicated with monitoring temperature and bulk fermentation, and I wanted to keep the recipe approachable for most bakers.
Add in the Butter
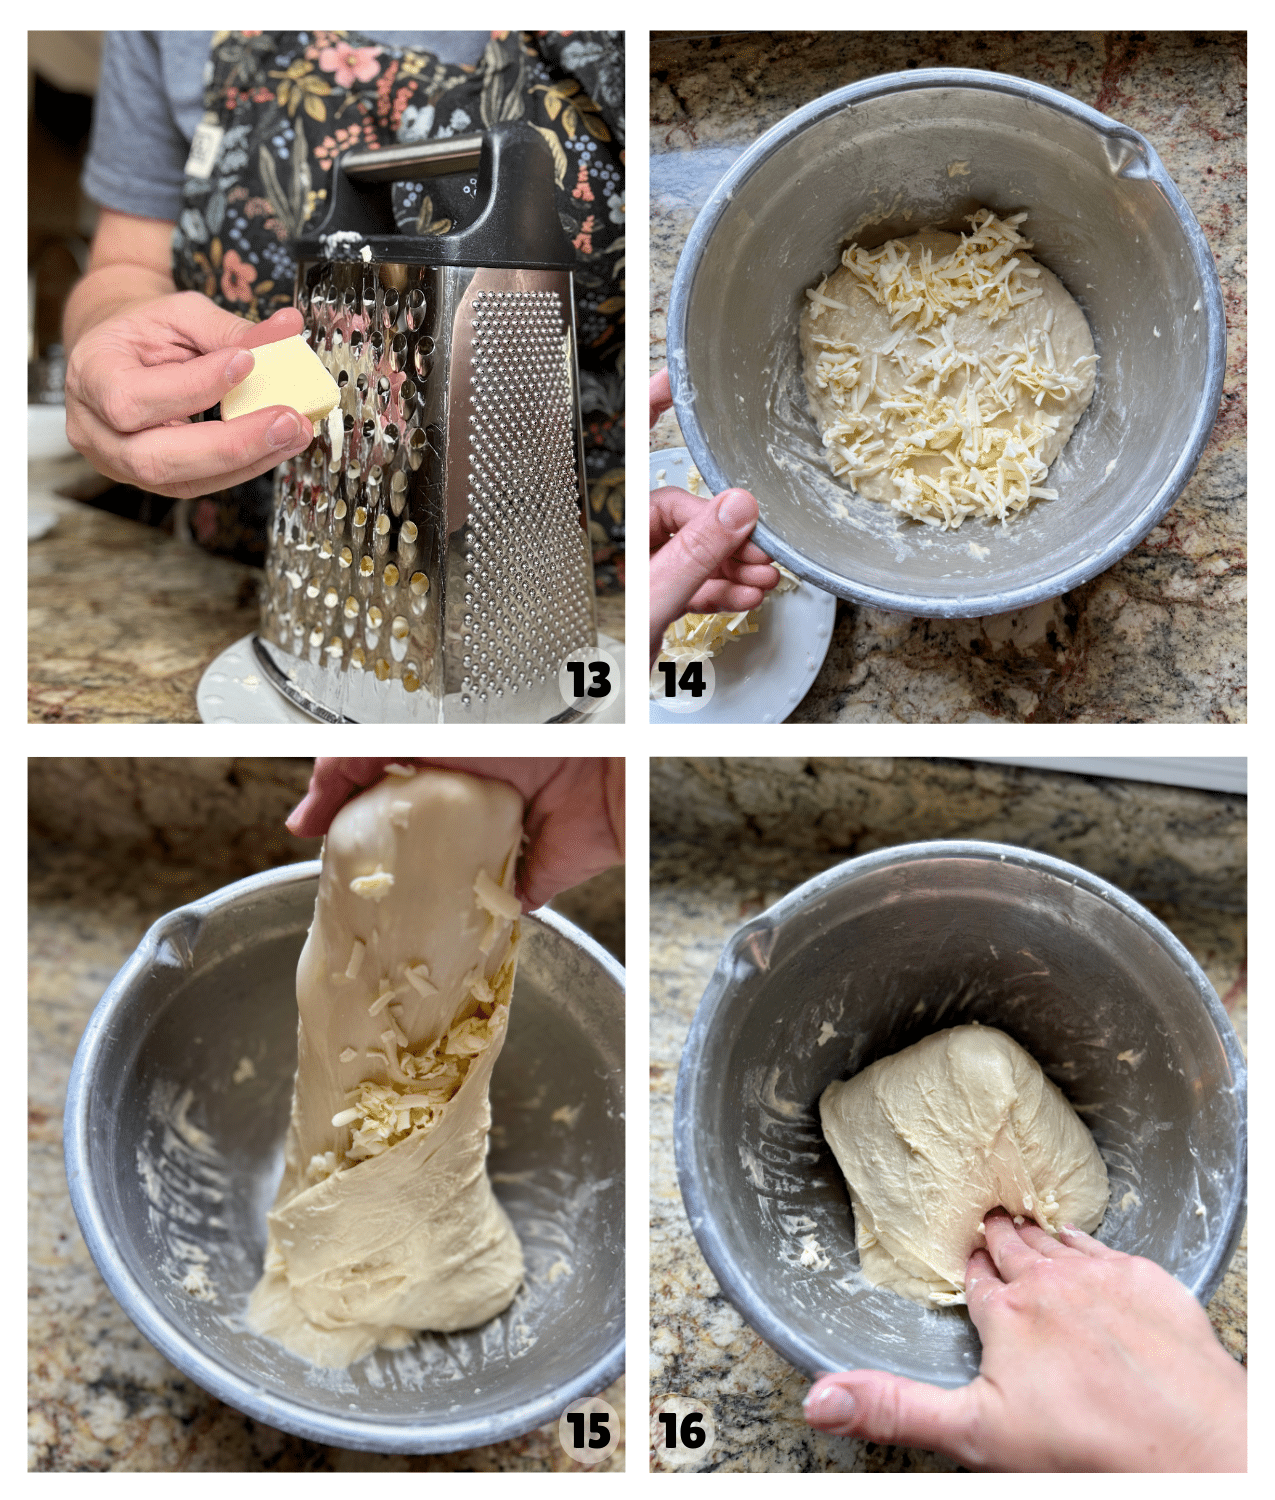
Step 4: Add in the Butter: Before your second set of stretch and folds, grate cold or frozen butter (Image 13) and add half of it to the dough (Image 14). Perform sets of stretch and folds, which will incorporate the butter into your dough (Images 15 & 16). Put the other half of the butter in the refrigerator to chill and after half an hour, add it in during your third round of stretch and folds (Image 17).
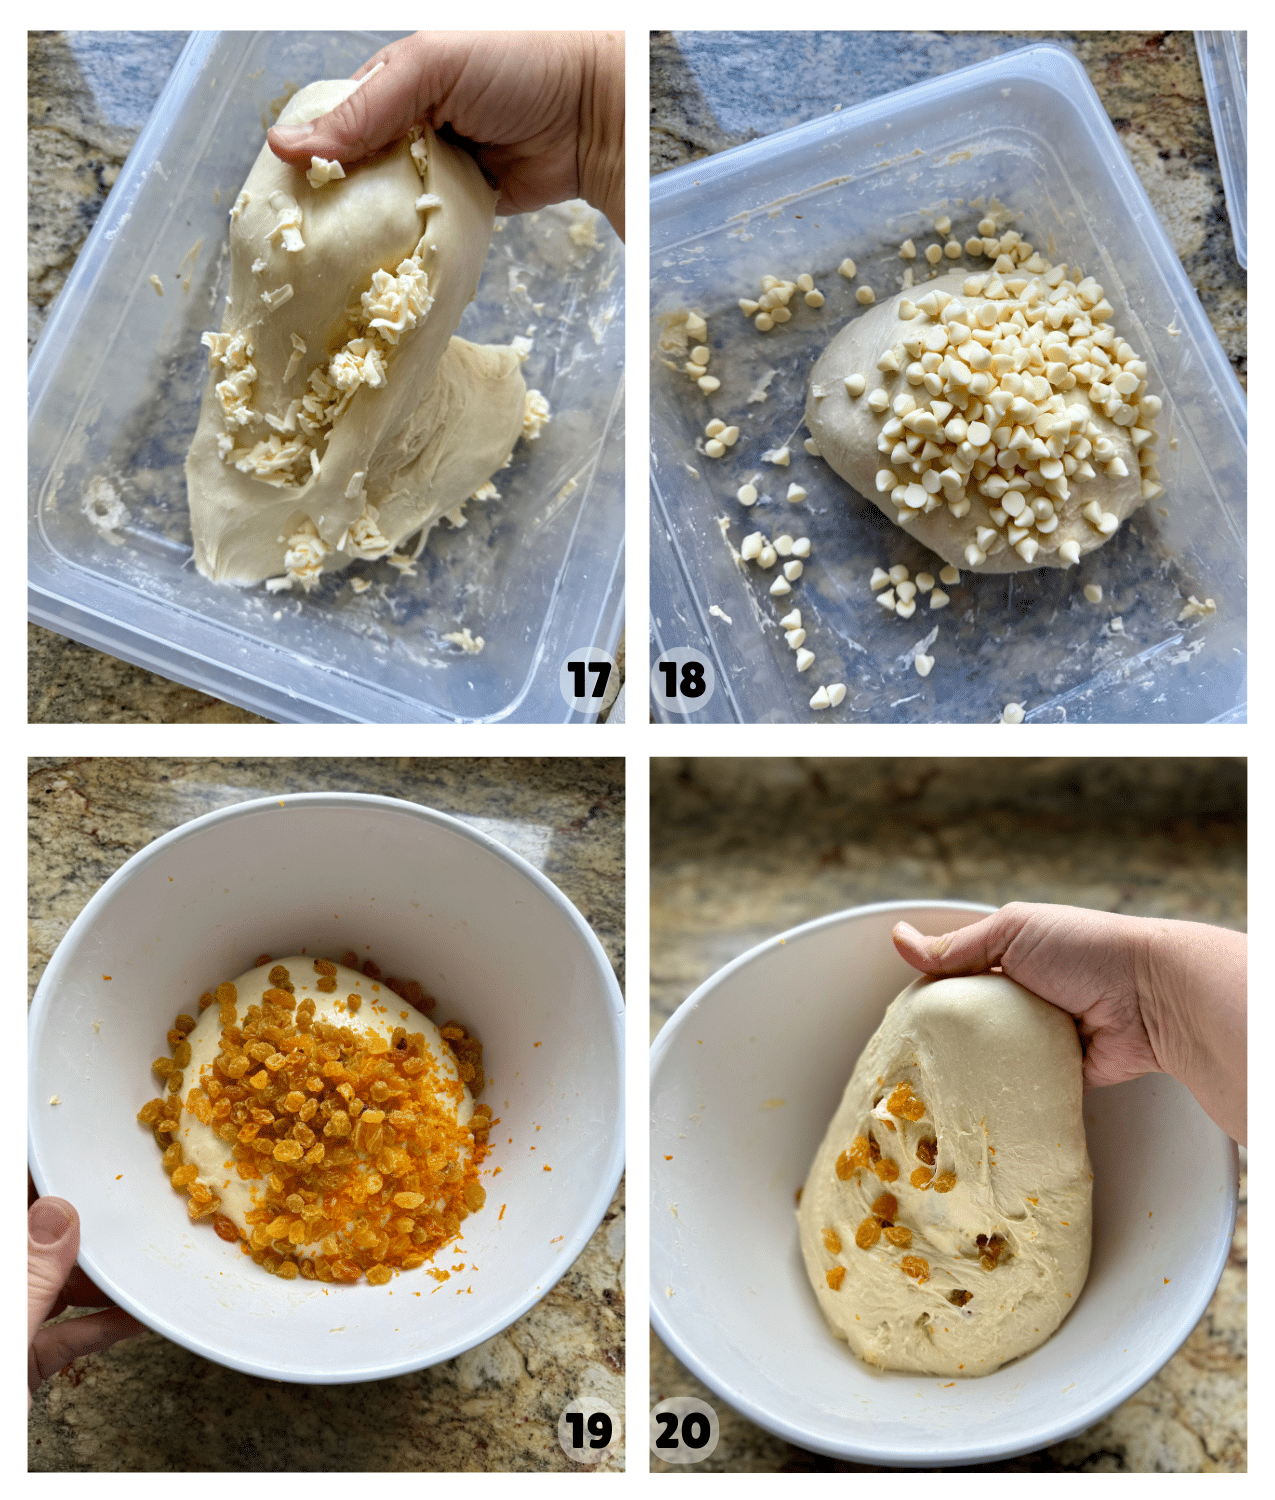
Step 5: Add Inclusions. Before performing your fourth round of stretch and folds, add the white chocolate chips and golden raisins on top of the dough (Images 18 & 19) – I have made this recipe many times, so you are seeing photos that show the different containers I use for my dough – any kitchen bowl will work! Perform stretch and folds, incorporating these inclusions into the dough (Image 20).
This method works well for the chocolate chips and raisins; however, if you are planning to use candied fruit, you should wait to add it until you laminate and shape the dough (see photos below). The sugar in the candied orange peel can pull water from the dough, making it harder to handle, which is why candied fruits shouldn’t be added until the dough is shaped.
Note: Maintaining the right temperature is really important for this loaf! I’ve found a 70-72ºF temperature to work well. I wouldn’t go above 75ºF for this recipe, or the butter will get too soft and the fermentation will speed up. To do this, use cooler water when mixing your dough, keep the dough in a cool place, and take the temperature with a thermometer throughout the process. You may need to use your refrigerator to bring the dough in and out during the stretch and fold process to cool your dough down. During warmer months, I will move the dough in and out of the fridge as needed, checking it with a thermometer during the mixing and rising stage. A 30-minute chill, an hour out, then back in if the dough warms up works well for me.
Rest and Rise

Step 5: Rest. Cover and let the dough rise for 6-7 more hours at about 70º Fahrenheit (Image 21) until it has risen about 50% and has scattered bubbles on top.
Optional Lamination & Shaping The Dough
If you choose to use the more traditional candied orange and candied lemon peel, this is how I add them to the dough (at the END of bulk fermentation).
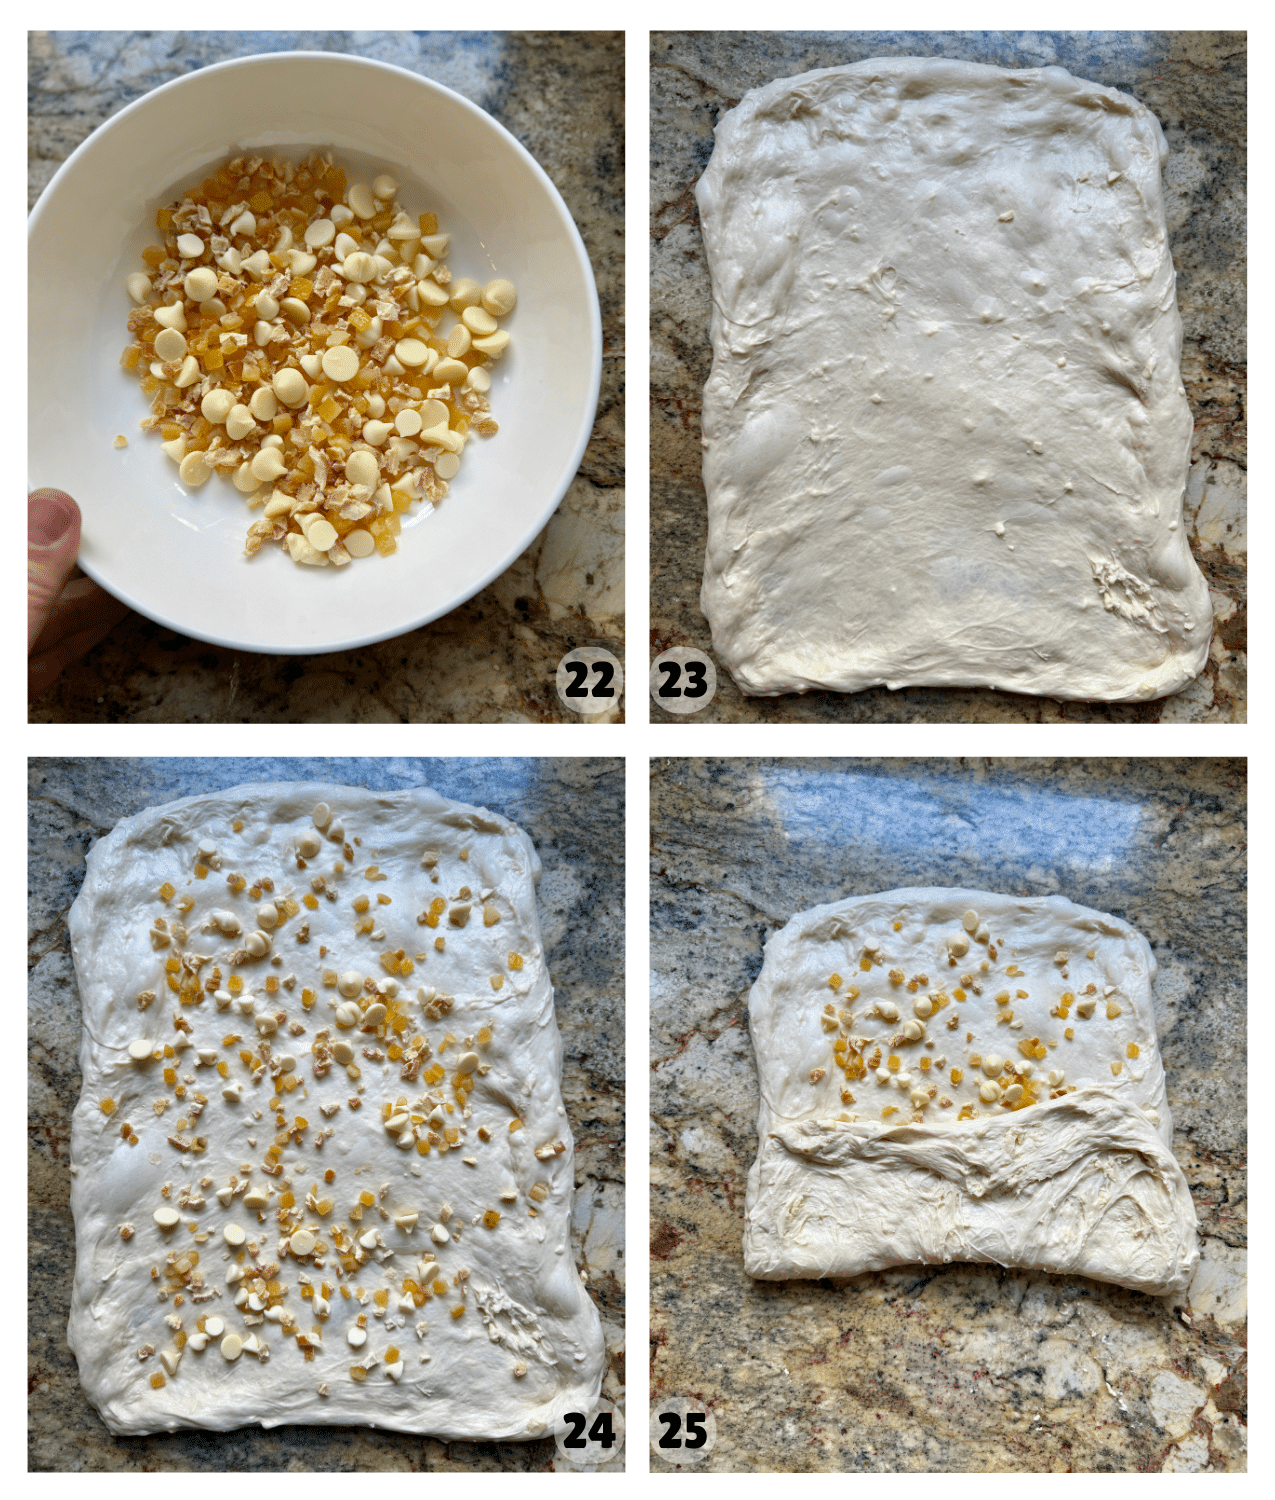
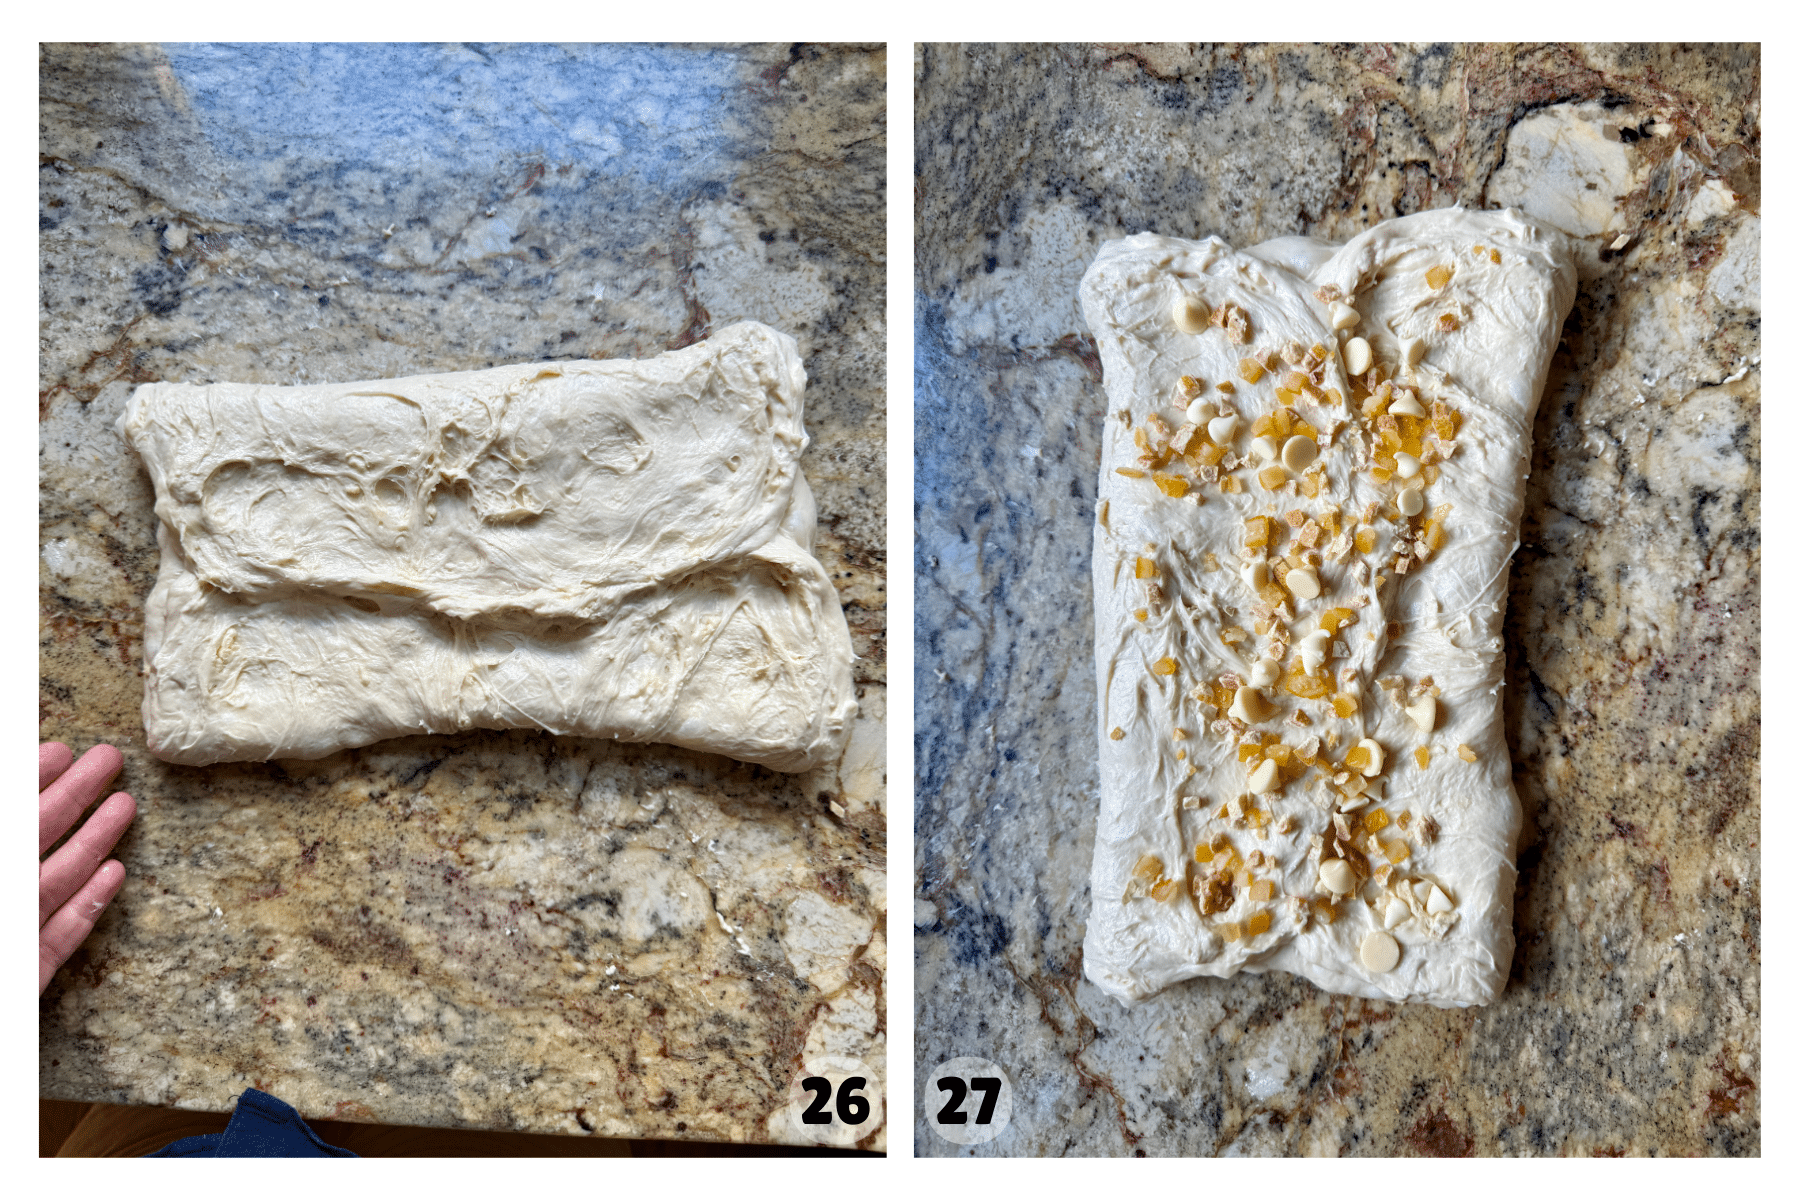
Step 6: Optional Lamination. If you are adding candied fruits (like candied orange peel, Image 22), you will add your inclusions using the lamination method. To laminate the dough, stretch the dough to a thin rectangle without disturbing the air bubbles (Image 23). Sprinkle white chocolate chips and candied fruit evenly on the surface of the dough (Image 24). Fold the dough into thirds, like enclosing a letter (Images 25 & 26). Sprinkle the rest of the inclusions on the dough (Image 27) and continue folding and shaping until you have a round ball of dough that fully encapsulates your inclusions. If you are only using chocolate chips and golden raisins, you can incorporate them during the stretch and folds as described above and skip this step.
Shape the Dough
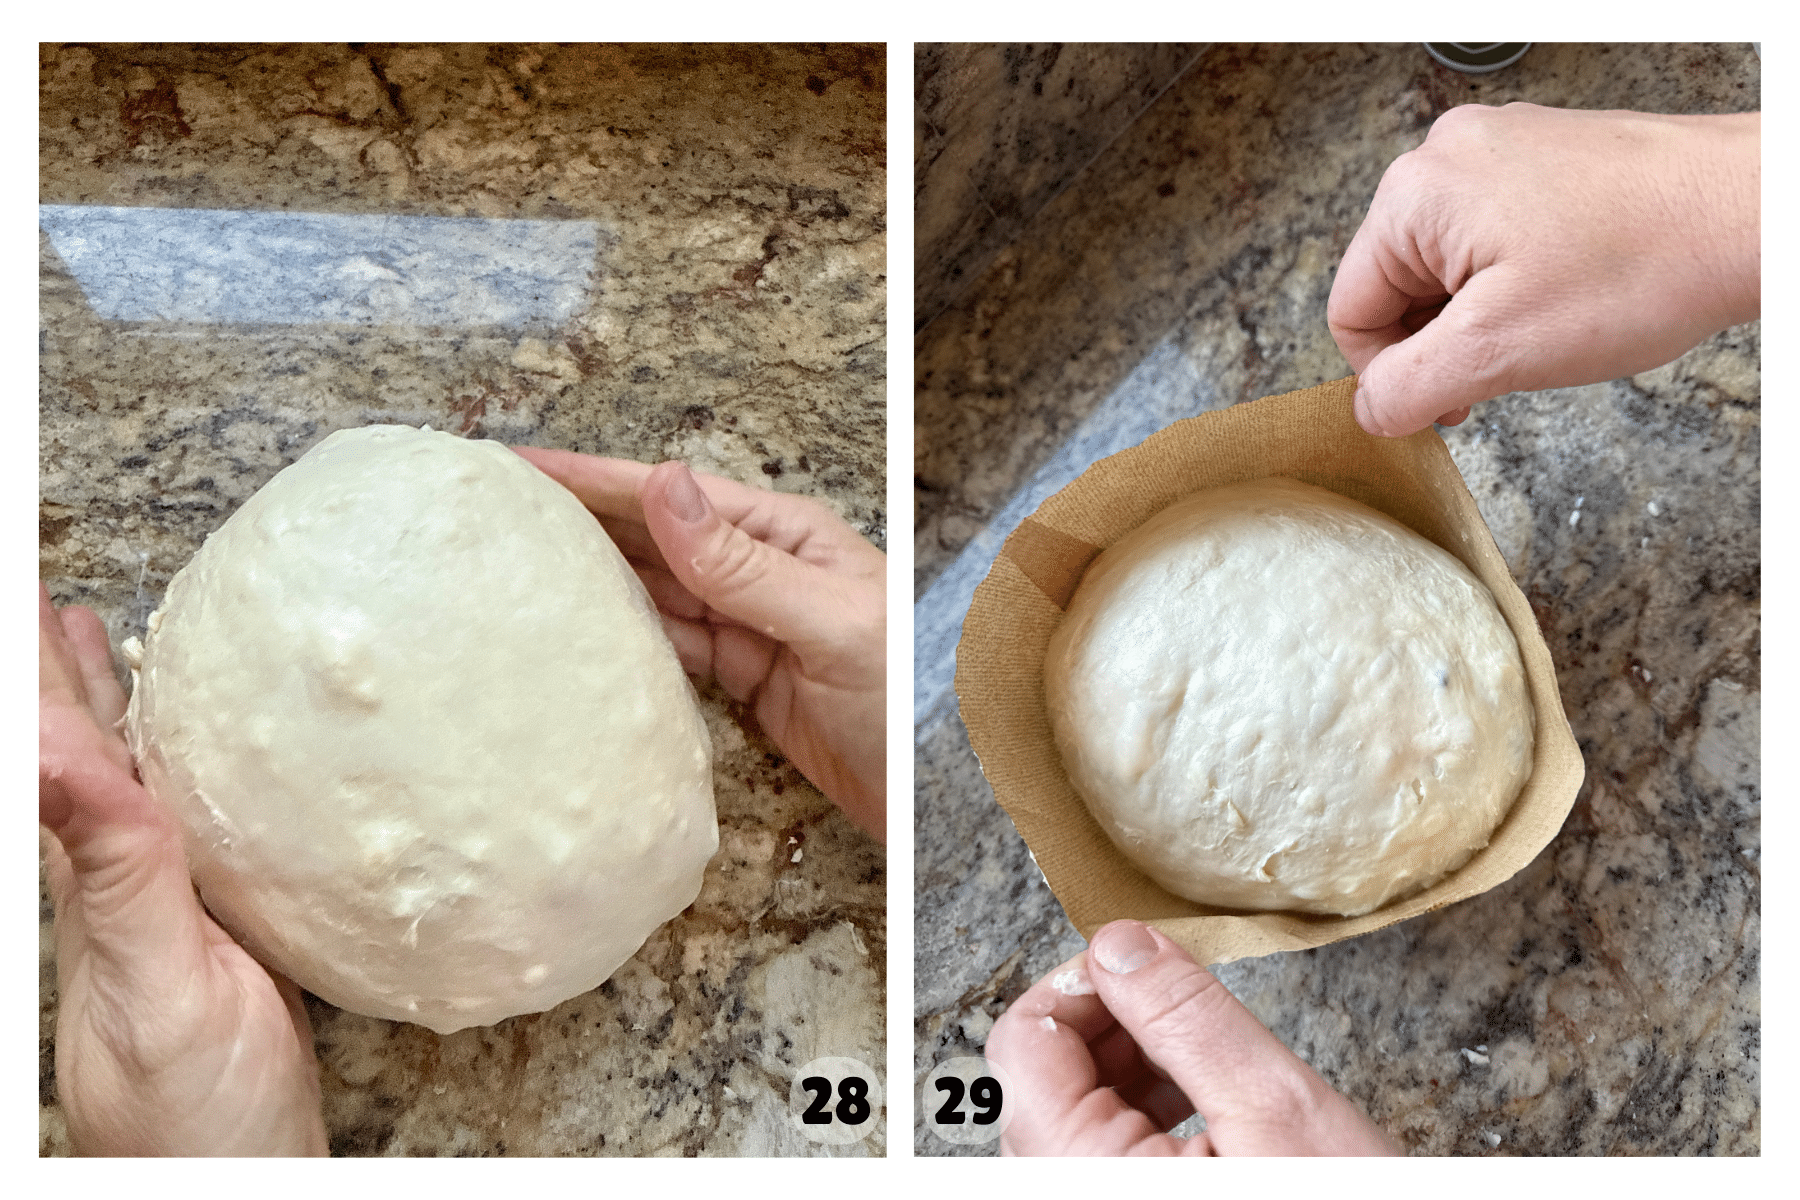
Step 7: Shape Dough. Spray a panettone mold with cooking spray to prepare it. Place the dough gently on the counter and gently pull the dough into a tight circular shape (Image 28). Gather the bread into a circle and place it gently into the prepared panettone mold (Image 29).
Note: If you don’t have a panettone mold, you can still bake this bread! It won’t look like the traditional Italian panettone, but it will still taste delicious. Instead of using the mold, you can place your dough in a banneton basket or small bowl to proof before doing a cold ferment in the fridge and then baking in a Dutch oven, the way you would with a traditional sourdough loaf. You can also stick this bread in a loaf pan
Proofing The Dough
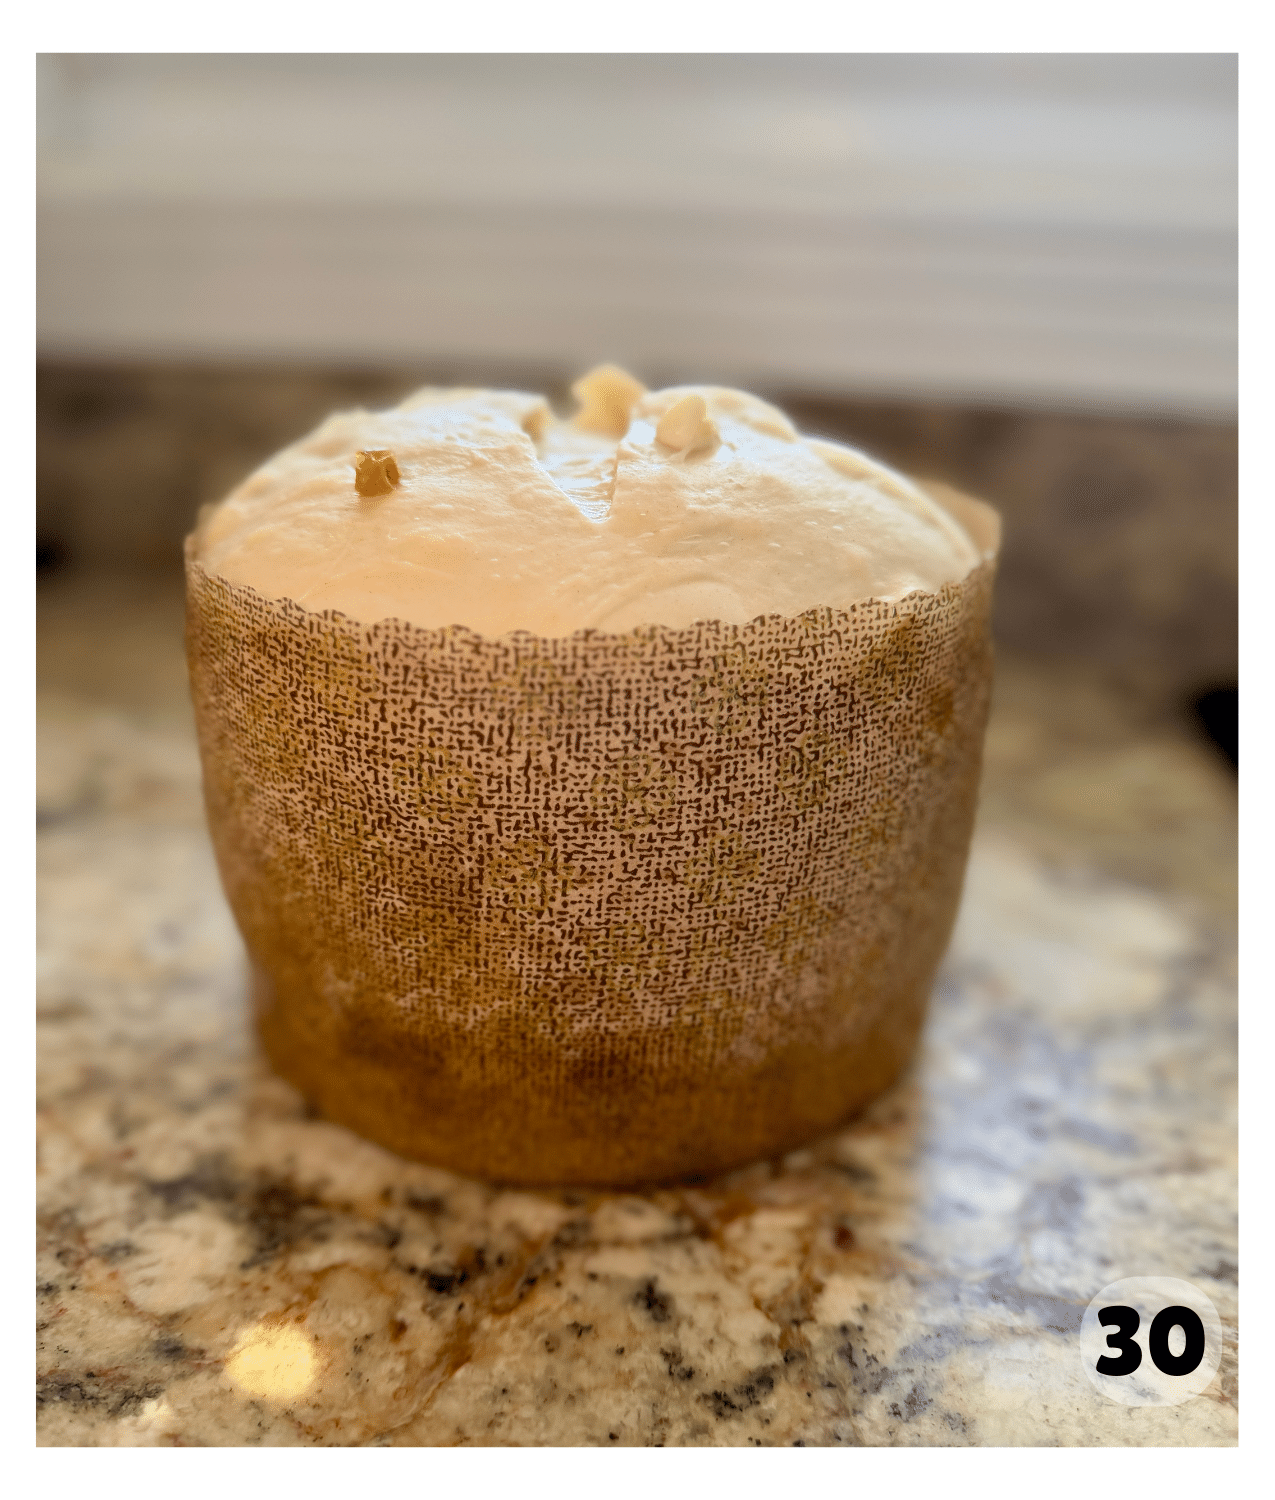
Step 8: Proof. Let the dough proof in the panettone mold for about 12-14 hours overnight at 70º Fahrenheit (Image 30). Your dough should be fully risen, jiggly, and puffed slightly above the panettone mold prior to baking.
How do you keep your dough cold for an overnight rise? It’s definitely easier in the winter/cooler months, but you can make this year-round with a little temperature awareness. Warmer dough ferments faster, so if your kitchen is around 75ºF or higher, skip the overnight room-temperature rise. After shaping, refrigerate the dough and let it finish rising the next day.
Baking the Panettone Sourdough Bread
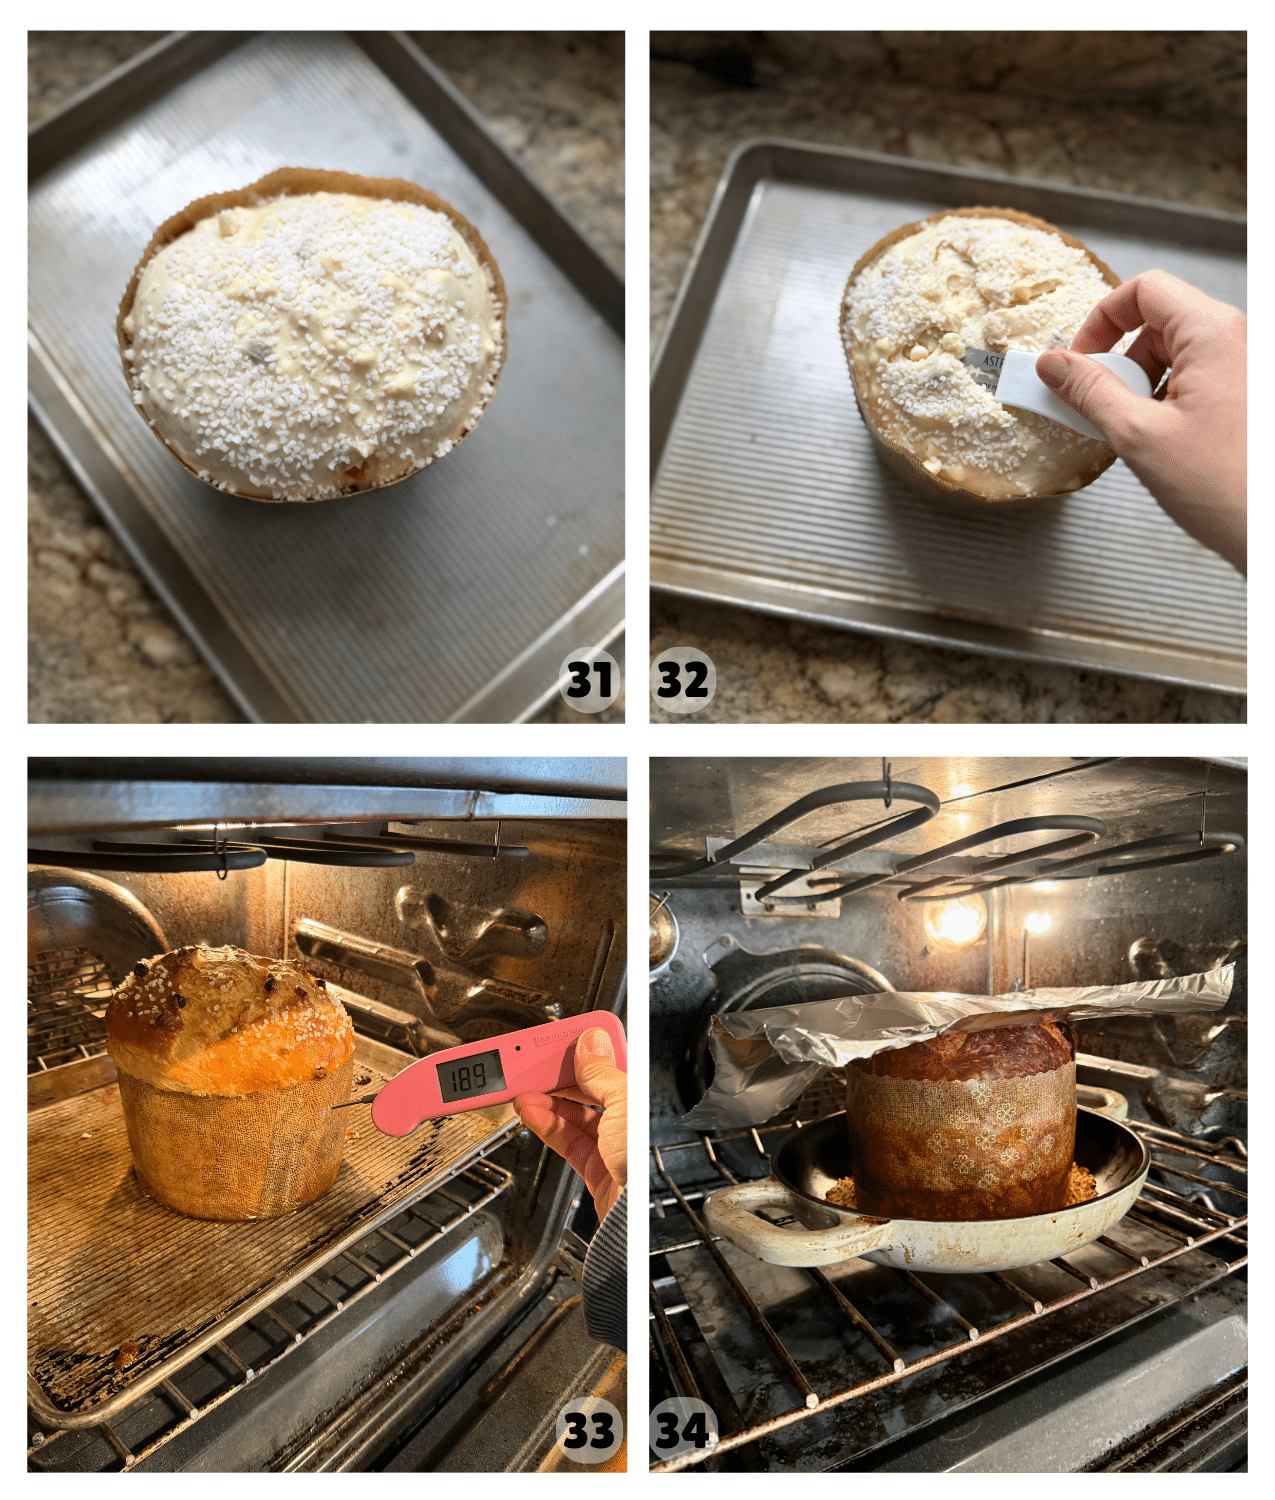
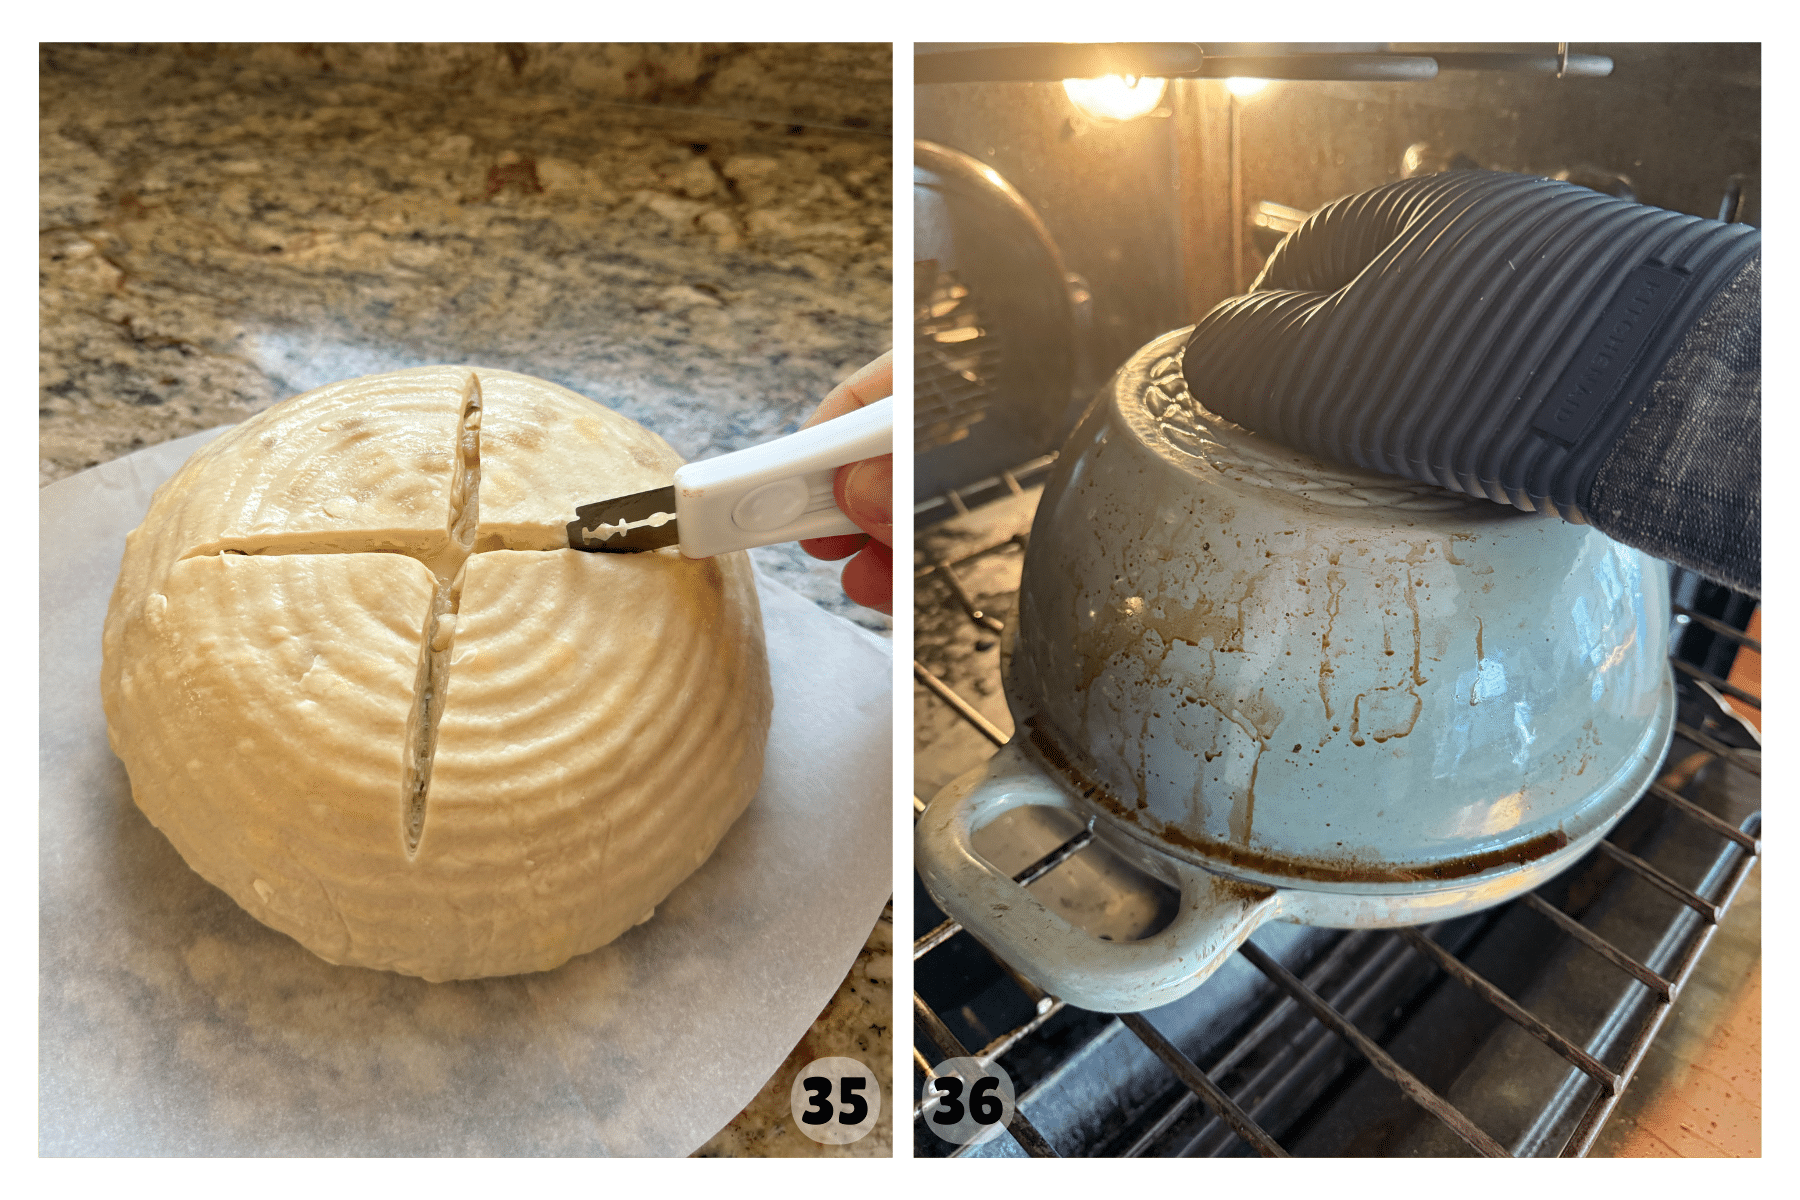
Step 9: Score & Bake. Sprinkle the top of your bread with pearl sugar (if desired) and place your panettone on a baking sheet with rimmed edges (Image 31). Use a bread lame to score your bread, making a cross shape on the top (Image 32). Bake in an oven preheated to 350ºFahrenheit for 50-55 minutes until the internal temperature of your panettone reaches about 190º Fahrenheit (Image 33). If you find that your panettone is browning too quickly, you can add a piece of foil on top to prevent the top from browning too much (Image 34).
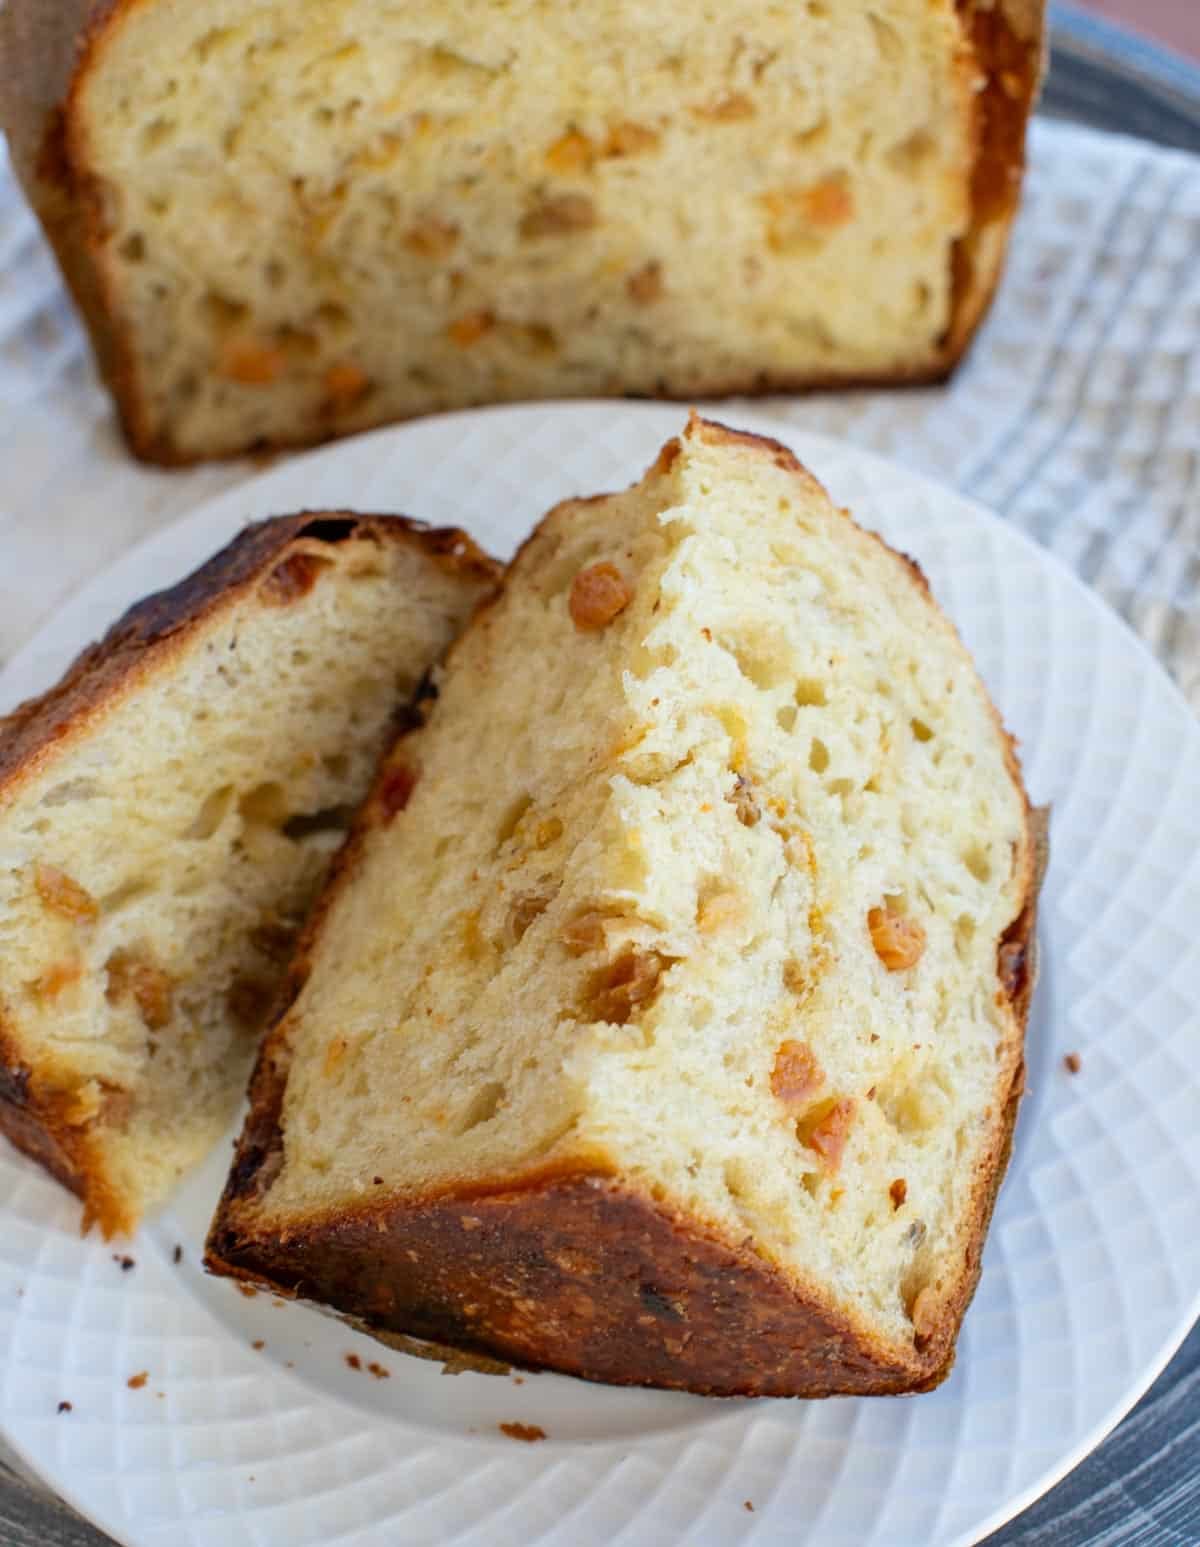
Remove the panettone to a cooling rack (this does not need to be cooled upside down like a traditional panettone) and allow the panettone sourdough to cool completely before slicing.
Serve panettone in slices with more butter, some jam, or even Nutella. I also love using this panettone sourdough as the bread in my sourdough French toast casserole and my sourdough bread pudding.
No panettone mold? If you don’t have a panettone mold, you can bake this as a regular sourdough loaf in a Dutch oven at 400ºF for 30 minutes covered and 15-20 minutes uncovered (Image 35 & 36) or see Amy’s Recipe Tips for more options below!
How to Store Leftovers
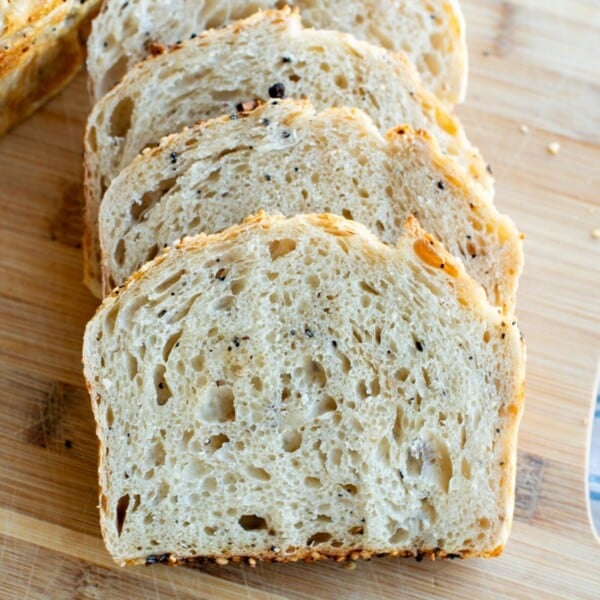
After the panettone bread has cooled completely, slice it up into pieces. Place sliced bread in a bread bag, push air out, and freeze. This bread toasts up well straight from the freezer into the toaster or defrosts well to enjoy a slice later.
Amy’s Recipe Tips
- Temperature is the KEY to this bake. Keeping this loaf at a low temperature so the butter doesn’t melt and then allowing the loaf to rise all night long at a low temperature is what makes this an especially good loaf to make over the winter holidays. If your dough is warmer, it’s going to speed up fermentation, and I wouldn’t recommend proofing overnight.
- A Panettone Mold makes this bake look unique, but you don’t have to bake the dough in one if you don’t have a mold. Use these alternative baking methods:
- Shape the dough and stick it in the fridge. Bake like my traditional sourdough croissant loaf in a preheated Dutch oven
- Stick the dough in a 9 by 5 loaf pan. Let the dough rise and bake according to recipe directions at 350ºF once it has risen.
- Fiori di Sicilia is what really sets apart the panettone flavor. Use the extract instead of the essential oil for the best rise.
- Butter Leakage & Browning – Because this is an enriched loaf, a little butter may leak out during baking. If your oven runs hot, the bottom can brown quickly. Bake on parchment and slide a baking stone or empty sheet pan onto the rack below the loaf to help diffuse the heat.
- Using Candied Fruit: If you’re adding candied orange or lemon peel, laminate them in at the end of bulk fermentation. The sugar in candied fruit pulls moisture from the dough and is much easier to work with during lamination than during stretch and folds.
Frequently Asked Questions
No. Authentic sourdough panettone requires a stiff starter, multiple doughs, and hours of mixing. This recipe is an accessible panettone-style loaf inspired by traditional flavors and my sourdough croissant bread. It’s soft, buttery, lightly sweet, and naturally leavened, without the advanced techniques.
Use any combination of these methods:
– Use cooler water when mixing the dough
– Keep your dough in a cool room
– Chill the dough in the fridge for 20–30 minutes during stretch-and-folds
– Monitor dough temperature with a thermometer
Because this dough includes butter laminated into the dough, some butter may leak out during baking. Proper proofing of your dough will keep this from happening. Reducing the oven temperature can help as well.
No. You don’t have to use a levain. If your starter is active, recently fed, and strong, you can use it directly in place of the levain. I prefer levain because it produces a predictable rise and consistent flavor.
If you prefer mini panettone, you can absolutely divide the dough into smaller molds. I haven’t tested mini sizes yet, so you may need to experiment a bit with the amount of dough and bake time. If you try it, let me know in the comments—I’d love to hear how it turns out! And if you’re looking to make your sourdough loaves into mini sizes, use my technique for mini sourdough loaves as inspiration.
Most Popular Unique Sourdough Bakes


If you tried this Panettone Sourdough Bread or any other recipe on my website leave a 🌟 star rating and let me know how it went in the comments below. Happy Baking!
Panettone Sourdough Bread
Save this for later!
Equipment
- sourdough tools optional
- panettone mold 750 gram panettone mold
Ingredients
Levain (1:10:10 ratio, 10-12 hours peak at 78-80ºF)
- 6 grams sourdough starter ripe, bubbly and active, about 1 teaspoon
- 60 grams all-purpose or bread flour, about 1/2 cup
- 60 grams water, about 1/4 cup
Panettone Sourdough Bread
- 120 grams levain, ripe, bubbly, and active, about ½ cup, see recipe notes
- 325 grams water, about 1 1/3 cup
- 60 grams granulated sugar, scant 1/3 cup
- 1 egg yolk, about 20 grams
- 12 grams Fiori di Sicilia extract, about 1 Tablespoon, see recipe notes
- 10 grams salt, about 1 1/2 teaspoons
- 500 grams bread flour, about 3 1/2 cups
- 113 grams unsalted butter, about 1/2 cup, reserved for stretch and folds
- 100 grams golden raisins , reserved for stretch and folds, about 3/4 cup
- 150 grams white chocolate chips, reserved for stretch and folds, about 1 cup
- swedish pearl sugar, for sprinkling on top, optional
Instructions
Levain (1:10:10 ratio, 10-12 hours peak at 78-80ºF)
- Mix together ripe/active sourdough starter with all-purpose or bread flour and water. Cover loosely and let sit 10-12 hours at 78-80°F until doubled, bubbly & peaked.Note: If you have a ripe, bubbly, active sourdough starter that is fed equal parts flour and water, it can be substituted equally for the levain in this recipe.
Panettone Sourdough Bread (Dough temperature kept at 70-72ºF)
- Mix the Dough: To a large bowl, mix together ripe levain with water, egg yolk, sugar, and Fiori di Sicilia extract (see recipe notes). Add the salt and bread flour. Mix together using a dough whisk or spoon until a wet and sticky dough forms and the ingredients are fully combined. Cover and let rest for 30 minutes.Note: This dough is very sensitive to temperature. It's important to maintain a temperature where the dough will rise AND the butter stays chilled and flaky. I've found a 70-72ºF temperature to work the best. I wouldn't go above 75ºF for this recipe, or the butter will get too soft. To do this, use cooler water when mixing your dough, use the refrigerator as needed and take the temperature with a thermometer throughout the process.
- Stretch and Folds: After the dough has rested for 30 minutes, you will perform a series of “stretch and folds” over the next 1 1/2 to 2 hours. The goal is to strengthen the dough through a gentle kneading process. You will also add cold butter, golden raisins, and white chocolate into the dough during this process, which will disperse evenly throughout the dough.To “stretch and fold,” wet your hand (so it doesn’t stick to the dough). Reach around the dough down to the bottom of the bowl, pull the dough up and over, and place it on top of the dough. Turn the bowl a quarter turn and repeat the stretch and fold. Turn another quarter turn and repeat. Perform one more quarter turn, stretching and folding the dough. Cover and set aside. Take note of how the dough feels through this process. It will go from feeling a little shaggy to smooth and elastic. Cover the bowl and wait about 30 minutes in between stretch and folds. Watch the stretch and fold video here.
- Stretch and fold #1: After 30 minutes, perform your first set of stretch and folds. Cover the dough and let rest for 30 minutes.Stretch and fold #2: 30 minutes later, grate the cold butter. Put half of the grated butter on top of the dough. The other half of the butter should be placed in the refrigerator to chill until the next set of folds. Stretch and fold the dough again, incorporating the flakes of butter into the dough. Cover and let rest for 30 minutes.Stretch and fold #3: 30 minutes later, add the rest of the butter to the top of the dough. Stretch and fold again. The butter will continue dispersing throughout the dough. Cover and let rest for 30 minutes.Stretch and fold #4: After 30 minutes, add the white chocolate chips and golden raisins on top of the dough, stretching and folding them in as you go. You should notice the dough feeling more cohesive and strong. If your dough still feels loose, add in another couple of stretch and folds 30 minutes later to help strengthen and tighten the gluten strands and incorporate the white chocolate and raisins even more.
- Rest: Cover the dough and let rise for 6-7 more hours at 70ºF. You will know the dough is ready to shape when the dough has risen about 50%, jiggles when you shake the bowl, and has scattered bubbles visible on the sides and top.Note: This is different than a traditional sourdough loaf because we are working at lower temperatures to keep the butter cold.
- Shape the Dough: Prepare a 750 gram pannetone mold by spraying it with cooking spray. Tip the bowl upside down, allowing the dough to fall onto a clean counter surface. Going around in a circle, pull the dough sideways towards you and then fold up to the top of the round. Move 90 degrees and repeat the same process, pulling the dough sideways and then folding up to the top.Flip the dough over so the seam side is down and drag the dough on the countertop with your hands, sealing the seam and encouraging a circular round. Gather the dough into a circle and place it seam-side down into the mold.Note: You can bake this as a traditional boule and shape it into a circle or oval, placing it in a lined banneton, if you prefer. The dough won't rise quite as much because it doesn't have the mold for structure, but it will still taste delicious. See recipe notes for more details.
- Rise: Cover the dough with plastic wrap or a plastic shower cap. Let the dough rise overnight at 70ºF until risen even or just a little above the pannetone mold. When the dough is at 70ºF, this usually takes about 12-16 hours.
- Score and Bake: Preheat the oven to 350ºF. Place the panettone dough on a baking sheet. Sprinkle pearl sugar on top of the dough if desired. Gently score the top of the dough with a razor blade, making a cross in the top. Bake at 350ºF for 50-55 minutes. The loaf should register 190ºF when it has finished baking.
- Remove to a cooling rack. Let cool completely and then slice into it and enjoy!
Notes
Nutrition
Nutrition information is automatically calculated, so should only be used as an approximation.


I just made this for the third time. First time, I used oil not extract. Disaster. Second time, went with fresh orange and vanilla. Over proofed it. We had company and I didn’t get back to the house in time. This time……magic! Until I removed it from the loaf pan. It’s easier to cut for the toaster is the reason I used a loaf pan. The bread kind of collapses on the outside after removing from the pan. Should I leave it in the pan for a short time to cool? Maybe that will help the structure?
It sounds like you’ve learned a lot with each attempt! I would leave it in the pan to cool for a few minutes before removing. I hope your next attempt turns out even better!
Thank you so much for responding so quickly. I will definitely give it another try & let you know how it works.
Great!
Hi Amy, Can you describe how your levain should look. I’ve made it twice, & it seemed kind of thin (more like pancake batter), & it didn’t have a lot of bubbles, so I was afraid to proceed with the recipe. I’ve never used a 1:6:6 levain & I expected it to be much stiffer than my usual mature & ripe 1:1:1 starter. I kept it in my oven with the light on, & thermometer said the oven temp ranged between 75-80 degrees. I left it in for about 15 hours, since it barely doubled & just didn’t seem to make much progress.
It’s completely normal for it to look more like thick pancake batter rather than a stiff dough. If it hasn’t collapsed and still smells pleasant, it’s safe—and encouraged—to proceed with the recipe next time. Trust the process here; this levain behaves differently than a traditional ripe starter, but it absolutely does its job in the dough.
I love panettone & am going to try your wonderful recipe. I just got the Fiori di Sicilia extract & will start tomorrow. I’m wondering if I can use bread flour instead of all purpose. I’m also used to doing an autolyse before adding the levain. Do you think those changes would make any difference to final result?
Bread flour is just fine. I don’t think those changes will make a big difference. Happy baking!
I’m am sad. The dough is in bulk fermentation. It’s been 7 hours and it’s not jiggly nor does it have bubbles on the surface. The temp is 72. Should I just let it sit longer before shaping? I’ve made the croissant loaf and it came out great. Not sure what’s happening here.
I hate when that happens! Was your levain active when mixing the dough? Is the dough temp 72 or the air temp 72? I would probably give it another hour or two. Let me know how it turned out!
OH MY GOSH—-this is soooo good! I had so much fun making this! Even better than those really expensive ones I have bought in the stores for years! Thanks Amy!!
I’m so glad you loved this! Thank you for sharing your review.
Need to hang panettone after baking?
My bread is in its final rise. I’ve made panettone before and most recipes say to hang the bread upside down after it’s baked. Why don’t we do that with this recipe?
Thank you!
Hi Mary,
This is my take on an easier version of a panettone, so it’s not as enriched with egg, butter and sugar as a traditional panettone. You don’t need to turn this one upside down.
Hope that helps!
That makes sense.
Thank you very much for the quick reply!
This recipe was so stinking good! I made it as written the first time and next time I will be adding candied orange. Made minis and they were perfectly giftable. Thank you!!
Yum! This is a great recipe to gift. Thanks for the review!
OK first, this recipe is amazing. I have made it five times – the first for my family, the rest for gifting, but the kids begged to keep the fifth one too. Sure, I said! I’ll make more! Well, I had run out of the extract after the fifth loaf, and soon discovered that Amazon couldn’t get me more before Christmas, and it was nowhere to be found, locally.
So I rush ordered it from King Arthur, in order to make loaf number 6. It is not labeled as an extract or essential oil, and the ingredients do not list essential oils, so I thought I was safe. But here I am, 24 hours after starting loaf number 6, which is totally unrisen and looks just like it did when when I started, having learned the hard way that the King Arthur brand is in fact an essential oil. So, learn from my mistake! Don’t use the King Arthur brand of fiori di scilia!
This panettone has been instantly beloved by all who have received it, and I know it will be a holiday staple in our house for years to come. But next year I will stock up on the extract well in advance!
Thank you, Amy, for another amazing recipe.
Thanks for your warning and feedback! And thank you for the glowing review – I’m glad it has become a new family staple for you!
@amybakesbread – do you think that Orange extract and vanilla extract together will work in this recipee? I do t have the other one available
I would use 10 grams of vanilla extract plus the zest of one orange. It won’t be quite the same, but it will still give your loaf a bright, citrusy flavor.